Image docker dispo ici !
Je ne suis pas d’accord ![]() Beaucoup d’utilisateurs de la v3 on utilisé des arduino pour des raisons de coûts principalement, avaient suivi mes tutos à la lettre sans tout comprendre, et était bien content de n’avoir qu’un bout de code à téléverser sur l’Arduino !
Beaucoup d’utilisateurs de la v3 on utilisé des arduino pour des raisons de coûts principalement, avaient suivi mes tutos à la lettre sans tout comprendre, et était bien content de n’avoir qu’un bout de code à téléverser sur l’Arduino !
Nice!
@billona Du coup pour l’instant le service Arduino gère quoi ? ![]() L’émission/réception en 433Mhz est fonctionnelle?
L’émission/réception en 433Mhz est fonctionnelle?
Actuellement rien du tout ![]() Pour l’instant je suis en train de construire le front.
Pour l’instant je suis en train de construire le front.
Je suis en train de mettre en forme les devices, mais j’ai encore quelques soucis. Je n’arrive pas à faire ma requête POST API pour sauvegarder le device dans la DB.
Je sais que mon code contient des erreurs. Même si je m’améliore de plus en plus, je suis encore en phase d’apprentissage de Preact. Une fois que le front fonctionnera correctement, je m’occuperais du back. Dans un premier temps :
- Un js pour envoyer des données à l’Arduino
- L’API Arduino à améliorer.
De plus, je me suis permis d’effectuer quelques petites modifications :
- J’ai rajouté le paramètre manufacturer dans l’API USB, afin d’automatiser la connexion de l’Arduino à l’avenir
- J’ai fait un petit ajout dans le modèle des devices, pour y rajouter les sous-services Arduino (Emmision 433, Emission 433 Chacon, Emission IR, …), ainsi qu’un champ data pin pour définir où envoyer l’information
- J’ai fait la traduction FR du service Arduino.
Si tu as des retours à faire concernant mon code n’hésite pas ![]()
On pourrait discuter de ça? je pense qu’elle est là la vrai question ! ![]()
Edit: En remontant j’ai trouvé ton post, désolé j’avais pas vu le message auparavant vu la vague de message ici, je le remets:
L’histoire du sous service je suis pas convaincu. Tu pourrais expliquer ici quelle est ton fonctionnement? Comment ça fonctionne pour l’utilisateur?
Et quelle est cette histoire de code?
La définition de l’API, c’est le plus important. Car une fois que l’API est définie, on ne pourra plus la modifier jusqu’à la prochaine version majeure de Gladys, car des utilisateurs dépendront de cette API. On veut être 100% sûr que cette API fait le boulot pour le long terme.
Mmm pourquoi tu ne peux pas stocker l’arduino sous la forme d’un device? un arduino = un device. Tu peux te servir du comPath comme identifier, et au démarrage aller chercher le/les arduino.
Pour l’instant, tu peux coder l’UI pour ne prendre en charge qu’un arduino pour l’instant si tu ne veux pas trop t’embêter et sortir une v0.1 assez vite, mais au niveau du stockage je verrais plus ça dans les device que dans les variables ![]()
Pour avoir trifouillé beaucoup les modules 433, j’utilisais ceux-là
salut. BOn en attendant que ça fonctionne…
Mon retour d’expérience:
Pour la partie SEND:
Il faut, en variable, le nombre de fois que le code doit être envoyé: parfois c’est trop prafois c’est pas assez. Exemple si j’envoi 4 fois le code 433, le code n’est pas reçu par mon device dans 100% des cas (cause brouillage momentané ou bruit de fond), si je mets 15 fois, mon alarme sonne 2 fois elle a le temps de lire 2 fois le code, c’est trop. Ca pourrait allumer et éteindre un device en un envoi.
RECIEVER:
Autre chose pour le reciever: parfois le code RF433 est mal récupéré. gladys inerprète le code envoyé par l’arduino et créé un device avec un code tout pourri. (genre “E53F”)
On peut limiter ça en coupant les suites trop courtes, ca évite le nombre de faux devices mais, pareil il faut garder la possibilité de prévoir un dialogue avec un code court. donc éventuellement à paramétrer dans le setup.
Autre proposition: tu peux passer l’arduino en mode apprentissage (un code = un device créé) puis tu le coupe (un code inconnu reçu ben ça fait rien).
Plus généralement, toutes les variables utilisées dans le code arduino pourraient être reportées dans le SETUP du module pour pouvoir tout customiser. Comme je te disais par téléphone, pour le gros newb comme moi qui veut pas passer 1000 ans à définir toutes les variables, une variable “pas conne” doit être mise par défaut. Voire même tu peux mettre un bouton “advanced” qui révèles les valeurs que d’habitude on ne trifouille pas pour l’utilisateur expérimenté.
Côté utilisateur je voyais quelque chose comme ça :
L’utilisateur choisit comment il veut que ce device fonctionne, lui fournit le data pin et le message. Ensuite, niveau code, on aurait ça :
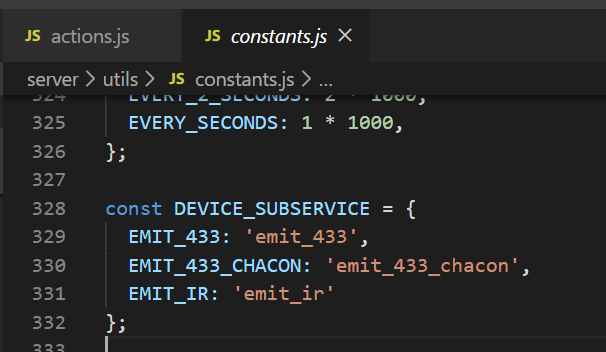
Ca permet de stocker un paramètre dans la DB, qui correspondra en quelque sorte à la fonction qui sera appelée dans l’Arduino.
Exemple :
- Sous-service : emit_ir
- Data pin : 3
- Code : 0xF7C03F
Pour moi je voyais quelques complications vis-à-vis de ça. Mais je crois qu’on s’embrouille légèrement sur nos définitions des devices alors voilà ce que j’avais en tête :
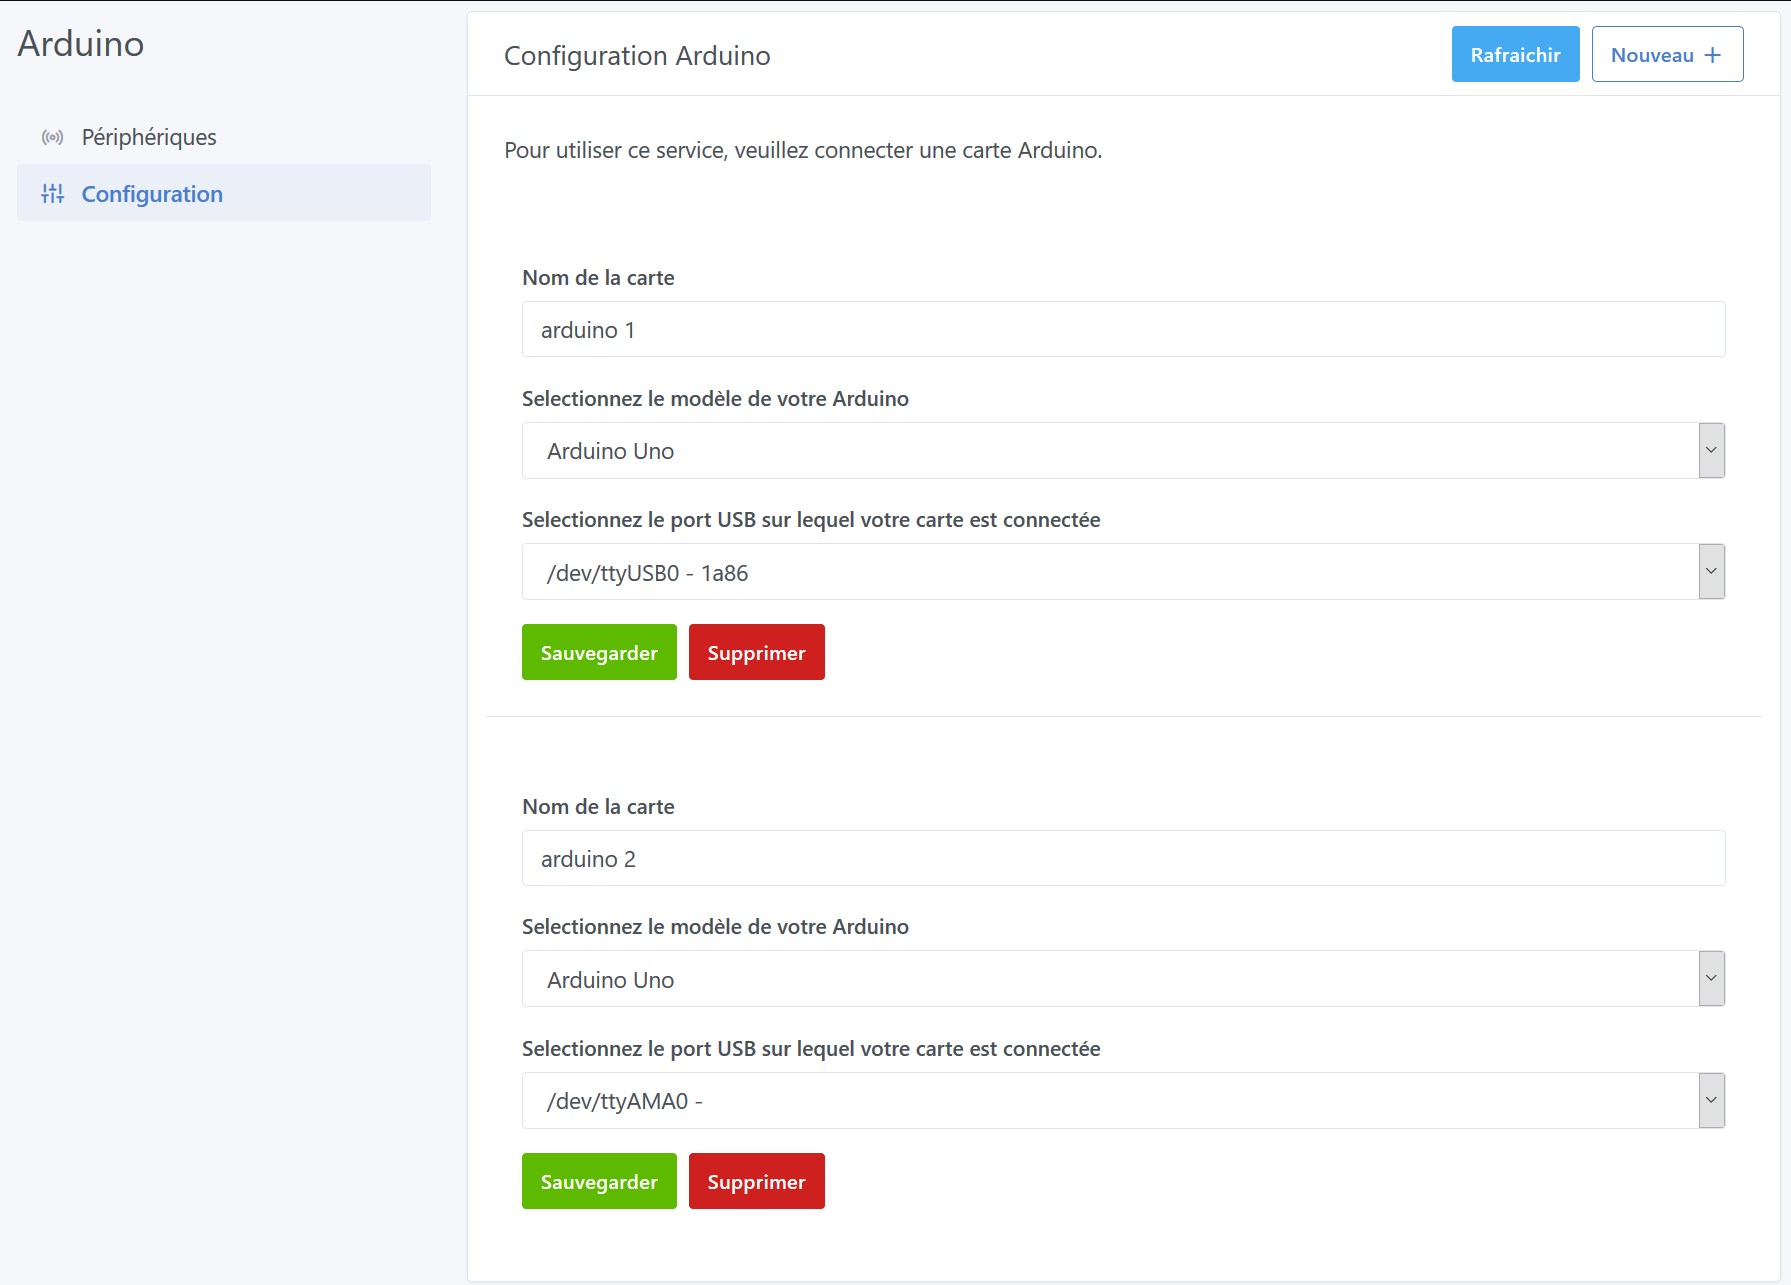
Un seul arduino relié en USB, son path et son modèle dans les variables. Ensuite, chaque device permettra d’effectuer une action sur cette carte.
Dans un premier temps je ne trouvais pas de manière simple de pouvoir gérer 2 arduinos dans la DB, mais au final si on fait un peu comme le module Serial de Gladys 3 alors ça peut marcher ![]()
Je regarde pour modifier ça alors. ![]()
Pour moi le data pin ne se change pas à chaque fois. Dans le setup au branchement ça suffirait, comme le nombre de répétitions. Par contre, protocol, pulselength change selon le device.
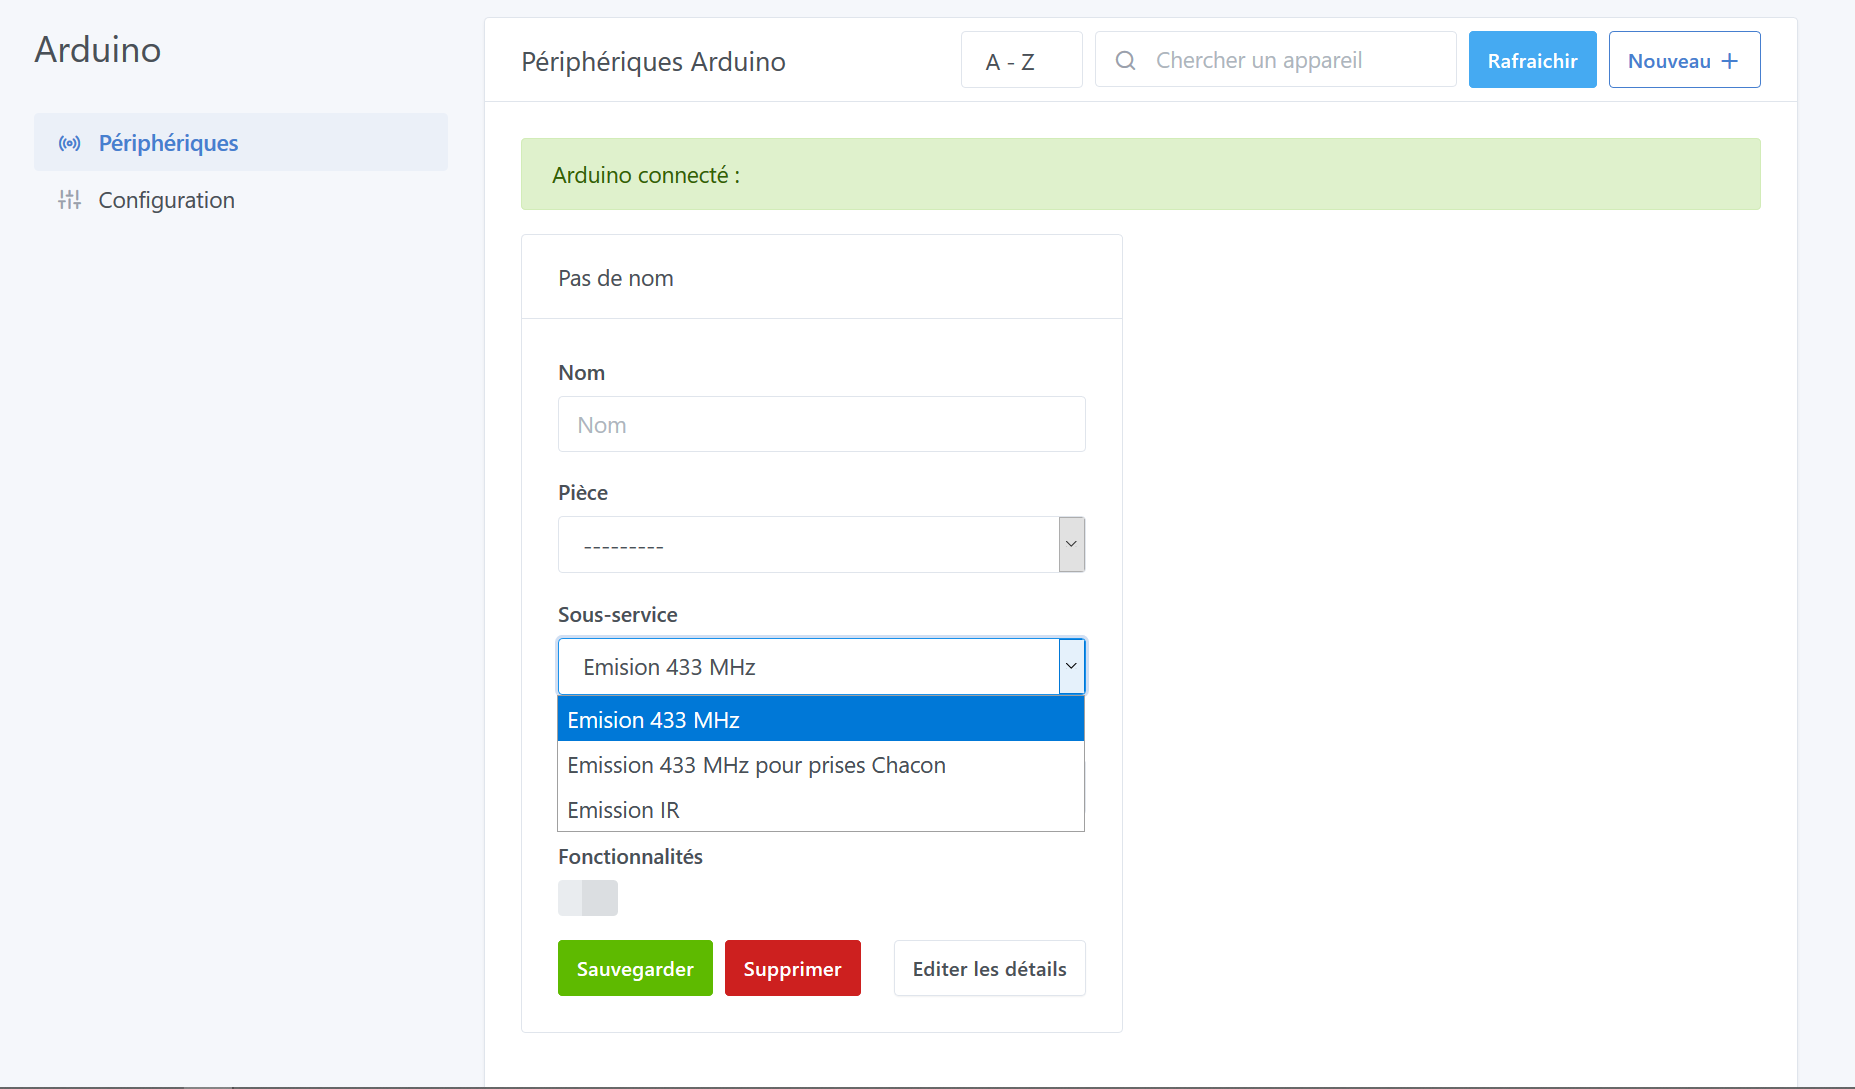
Bon et bien après un peu de travail… Les Arduinos sont maintenant implémentés comme des devices ![]()
Voilà comment ça rend pour l’instant :
Bon pour l’instant l’UI est assez basique je l’admets ![]() Mais elle est fonctionnelle. J’ai l’intention d’améliorer le rendu une fois que tout fonctionnera comme je le souhaite.
Mais elle est fonctionnelle. J’ai l’intention d’améliorer le rendu une fois que tout fonctionnera comme je le souhaite.
Au niveau de la DB, ça donne ça :

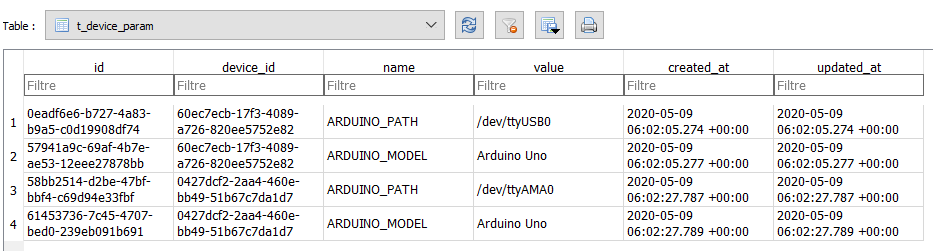
@pierre-gilles pour m’expliquer un peu sur mon idée de départ, je me suis basé dans un premier temps sur le modèle de DB qui est disponible dans la documentation API. Or, ce modèle ne fait pas mention de la table t_device _param, cette même table dont se servent les caméras RTSP pour stocker les URL. J’ai donc modifié le tout pour que chaque propriété de l’Arduino (comPath, modèle), soit stockée à cette endroit.
Maintenant que les arduinos sont stockés sans difficultés (et surtout maintenant que j’ai réussi à me familiariser avec la création de devices par le front ![]() ), je vais regarder pour créer des d’autres « types » de devices. Pour moi, ces derniers seraient rattachés à un arduino, et contiendraient les fameuses propriétés évoquées plus tôt :
), je vais regarder pour créer des d’autres « types » de devices. Pour moi, ces derniers seraient rattachés à un arduino, et contiendraient les fameuses propriétés évoquées plus tôt :
- Un sous-service pour préciser le rôle (émission 433, réception 433, émission IR, …)
- Un data pin pour savoir par où transitent les données sur l’arduino,
- des codes éventuels concernant l’émission.
Je réfléchis donc à tout ça dans la journée, je mets ça au clair sur papier, et dès que tout ambiguïté est levé je m’attarde sur le dev ![]()
D’ailleurs @pierre-gilles je souhaitais te faire part d’une remarque que j’ai pu me faire : j’ai eu énormément de soucis lorsque j’ai créé l’action de suppression des devices. Or je me suis inspiré de l’action.js du service RTSP Caméra.
Le problème vient de la condition :
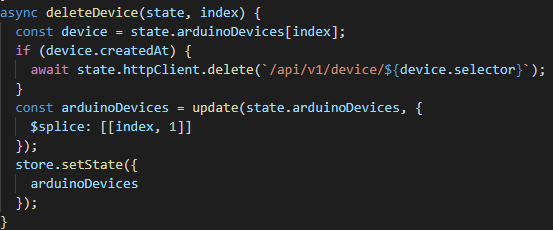
Dans RTSP Caméra, la condition est écrit comme ça :
if(device.created_at)
Or, en faisant des console.log, j’observe que la variable est
device.createdAt
Et juste à cause de ça, mes caméras ne disparaissent pas de ma DB lorsque je clique sur supprimer ![]()
Une orientation pour la structure de l’API: Ouvert ou fermé:
API fermée:
Le module Arduino n’exécute qu’un code .ino fait pour le module Gladys. Il est parfaitement abouti et n’a aucun bug.
Le problème si j’ai récupéré un code arduino sur une autre source, il ne peut pas être intégré.
API ouverte: un sous-service est une fonction, un copier coller de n’importe quel code arduino qui fonctionne. Il faut juste en argument récupérer ceux nécessaires au sous services.
{
“service”: “MyFunctionTrouveeSurInternet”,
“message”: {
“ARG1”: PinDeDonnee ,
“ARG2”: Le_code_à_envoyer
“ARG3”: “Je ne sais quel paramètre utile à la fonction”
… 5 Arguments seraient suffisants?
}
}
Dans le code .ino:
Void loop()
On serial event : Si “Service” = “MyFunctionTrouveeSurInternet” alors execute MyFunctionTrouveeSurInternet (ARG1, ARG2, ARG3…);
Copier/coller depuis internet
MyFunctionTrouveeSurInternet (int PinDeDonnee , Le_code_à_envoyer, etc…)
{ bla, bla, bla }
Mes autres sous services
SendRadioCode(PinDeDonnee, Le_code_à_envoyer, protocole, etc) {}
SendIRcode (){}
Fait comme ça, si le mec se plante et met “A” dans l’argument Pin, ça plante.
Enfin dans un tuto chacun peut faire “son” code arduino en remplaçant les arguments dans gladys.
@benPi à vrai dire tes 2 propositions ne sont pas incompatibles… D’une certaine manière.
Ce que j’avais en tête : un .ino fait pour le module Gladys, abouti et sans bug. Seulement, ce code serait composé justement de certaines fonctions, qui font elles-mêmes office de sous-service comme tu l’as décrit.
Par exemple dans un premier temps, le premier sous-service sera l’émission 433 MHz. Ensuite j’ajouterai le 433 MHz pour Chacon. Ensuite l’émission IR. Chacune de ses fonctionnalité aura sa fonction propre dans l’arduino, qui sera appelée dès lors d’une interaction avec le device.
Il faut y aller pas à pas tant qu’on est sur les bases.
D’autant plus que rien n’empêche ce fichier ino d’être évolutif. Une première version pourra sortir, puis, lorsque le besoin se fera sortir, on mettra à jour le service avec les nouvelles fonctionnalités, et on proposera une nouvelle version du code arduino.
Tiens un exemple (c’est pas propre désolé), de plusieurs sous services dans l’arduino
On envoi les arguments en JSON nécessaires à la fonction en question. J’ai commenté au max pour que tu voies le raisonnement.
/*
 * Receiver is not mandatory !!
 * You can just have a emitter.
 *
 * Configuration
 * Pin D2 => interruption 0 => radio receiver
 * Pin D10 => 433Mhz emitter
 *
 * Wait for a JSON on serial port. When a JSON is received, it calls the right function
 * Code example : (the % is for the end of the command). Put thats code into the serial to test
 *
 * {"function_name":"SendRadioCode","ARG1":"5502227","ARG2":1,"ARG3":218}%
 * => call the SendRadioCode function with code "5502227" CANAL 1 PULSELENGTH 218
 */
 /*
 * IRrecord: record and play back IR signals as a minimal
 * An IR detector/demodulator must be connected to the input RECV_PIN.
 * An IR LED must be connected to the output PWM pin 3.
 * A button must be connected to the input BUTTON_PIN; this is the
 * send button.
 * A visible LED can be connected to STATUS_PIN to provide status.
 *
 * The logic is:
 * If the button is pressed, send the IR code.
 * If an IR code is received, record it.
 *
 * Version 0.11 September, 2009
 * Copyright 2009 Ken Shirriff
 * http://arcfn.com
 */
 /*PHOTOCELL simple testing sketch.
Connect one end of the photocell to 5V, the other end to Analog 0.
 Then connect one end of a 10K resistor from Analog 0 to ground
For more information see http://learn.adafruit.com/photocells */
// SERVICES: RF_433_COM, SERVO_MVT, IR_COM, PHOTOCELL,PIR MVT detector
#include <ArduinoJson.h> // SERIAL_COM
#include <RCSwitch.h> // RF_433_COM
#include <Servo.h> // SERVO_MVT
#include <IRremote.h> // IR_COM


//DEFINITION PINS

//PHOTOCELL
int pinPhotoCell = 0; // A0 the cell and 10K pulldown are connected to A0
//PIR
int pinPIR = A1; //PIN 15 = A1
//SERVO
int pinServo = 9;//PWM PIN ONLY check TODO: http://....
//RF_433_COM
int pinRF_433_COMrcv = 0;
int pinRF_433_COMsend = 10;
// IR_COM
int RECV_PIN = 11; // CONNECT TO DATA IR RCVR
int BUTTON_PIN = 12; // BUTTON TO PRESS TO SEND IR CODE: just for tests
int STATUS_PIN = 13; // UNIVERSAL LED RETURN STATUS = ARDUINO WORKING

// OBJECTS AND VARIABLES

//PHOTOCELL
int photocellReading; // the analog reading from the analog resistor divider A0
int luminosite; // PHOTOCELL INTENSITY FROM 0 TO 1024
//SERVO
int angle;   // variable to hold the angle for the servo motor 0-180°
int i; // incréments servomoteur
Servo myServo;  // SERVO
//RF_433_COM
RCSwitch mySwitch = RCSwitch(); //RF_433_COM
//IR_COM
IRrecv irrecv(RECV_PIN);//IR_COM
IRsend irsend;          //IR_COM
decode_results results; //IR_COM

//                         SERVICES
//                  SERVICE SEND RF_433_COM:
void SendRadioCode(long code, int canal, int pulseLength) {
      // PulseLength and Canal are sets in Gladys module.
      // Default to 1 & 100. Will work on most devices. Check deviceType conf to adjust to your needs.

    mySwitch.setProtocol(canal, pulseLength);
    mySwitch.send(code, 24);
}

//                  SERVICE SEND IR_COM:
void sendIRCode(int repeat,unsigned long codeValue,int codeType,int codeLen,unsigned int rawCodes[RAWBUF],int toggle ) {

  /* FOR INFO
   *  The type of code codeType default is -1
    unsigned long codeValue; // The code value if not raw
    unsigned int rawCodes[RAWBUF]; // The durations if raw
    int codeLen; // The length of the code
    int toggle = 0; // The RC5/6 toggle state
   **/

  if (codeType == NEC) {
    if (repeat) {
      irsend.sendNEC(REPEAT, codeLen);
      Serial.println("Sent NEC repeat");
    }
    else {
      irsend.sendNEC(codeValue, codeLen);
      Serial.print("Sent NEC ");
      Serial.println(codeValue, HEX);
    }
  }
  else if (codeType == SONY) {
    irsend.sendSony(codeValue, codeLen);
    Serial.print("Sent Sony ");
    Serial.println(codeValue, HEX);
  }
  else if (codeType == PANASONIC) {
    irsend.sendPanasonic(codeValue, codeLen);
    Serial.print("Sent Panasonic");
    Serial.println(codeValue, HEX);
  }
  else if (codeType == JVC) {
    irsend.sendJVC(codeValue, codeLen, false);
    Serial.print("Sent JVC");
    Serial.println(codeValue, HEX);
  }
  else if (codeType == RC5 || codeType == RC6) {
    if (!repeat) {
      // Flip the toggle bit for a new button press
      toggle = 1 - toggle;
    }
    // Put the toggle bit into the code to send
    codeValue = codeValue & ~(1 << (codeLen - 1));
    codeValue = codeValue | (toggle << (codeLen - 1));
    if (codeType == RC5) {
      Serial.print("Sent RC5 ");
      Serial.println(codeValue, HEX);
      irsend.sendRC5(codeValue, codeLen);
    }
    else {
      irsend.sendRC6(codeValue, codeLen);
      Serial.print("Sent RC6 ");
      Serial.println(codeValue, HEX);
    }
  }
  else if (codeType == UNKNOWN /* i.e. raw */) {
    // Assume 38 KHz
    irsend.sendRaw(rawCodes, codeLen, 38);
    Serial.println("Sent raw");
  }
}
 //                  SERVICE SERVO:

void setServo(int angle,int pin) {
  // set the servo position
  myServo.attach(pin); // attaches the servo on pin 9 to the servo object
  myServo.write(angle);
}

//                  SERVICE PIR MVT:
void pirMvt(){
    if (analogRead (A1)>200){
      Serial.println(analogRead (A1));

    angle = map(i, 0, 1023, 0, 179);
    Serial.print("angle: ");
    Serial.println(angle);
    // set the servo position
    myServo.write(angle);

    }
    else
    {
        digitalWrite(7,HIGH);
    }
}


//                  SERVICE PHOTOCELL:
void photocell (){
      // CODE PHOTOCELL
      photocellReading = analogRead(pinPhotoCell);

      // We'll have a few threshholds, qualitatively determined
      if (photocellReading < 10 ) {
          Serial.println(" - Noir");
        } else if (photocellReading < 200) {
          Serial.println(" - Sombre");
        } else if (photocellReading < 500) {
          Serial.println(" - Lumiere");
        } else if (photocellReading < 800) {
          Serial.println(" - Lumineux");
        } else {
          Serial.println(" - Tres lumineux");
      }
  }

// READ serial: MAIN XXXXXXXXXXXXXXXXXXXXXXXXXXXXXXXXXXXXXXXXXXXXXXXXXXXXXXXXXXXXXXXXXXXXXXXXXXXX
// Serial buffer
String command = "";

// End of command marker
char endMarker = '%';

/**SEND SERIAL TO ARDUINO
 * This function is automatically called when data is received on serial port /CHOOSE THE GOOD SERVICE
 */
void serialEvent() {
    //lit toutes les données (vide le buffer de réception)
    char last_readed_char = Serial.read();
    if ( last_readed_char == endMarker ) { // Si dernier caractère est % alors c'est une commande => executeFunction
      executeFunction(command);
      command = "";
    } else {
      command += last_readed_char;
    }
}
/*
 * Execute the right function = Command recieved via serial {"function_name":"SendRadioCode","ARG1":"5502227","ARG2":1,"ARG3":218}%
 *                                                  THAT IS {"function_name":"SendRadioCode","ARG1":ARG[1],"ARG2":ARG[2],"ARG3":ARG[3],"ARG4":ARG[4]}%
 */
void executeFunction(String json_data) {
  StaticJsonBuffer<200> jsonBuffer;
  JsonObject& v = jsonBuffer.parseObject(json_data);//on décompose la chaine de cartère

  // TODO: int ARG[]=[v["ARG1"],v["ARG2"],v["ARG3"],v["ARG4"]]; // ARRAY WITH ALL GLADYS ARGUMENTS COMMING WITH THE COMMAND

  long ARG1=v["ARG1"]; //USUALLY THE CODE?
  int ARG2=v["ARG2"]; //USUALLY CANAL?
  int ARG3=v["ARG3"]; //USUALLY PULSELENTH? TODO: define as unsigned to work with IR_COM
  unsigned int ARG4=v["ARG4"]; //USUALLY PIN NUMBER?

  // COMMAND "SENDRADIOCODE"=> RF_433_COM
  if ( v["function_name"] == String("SendRadioCode") )
  {
    SendRadioCode( ARG1,  ARG2,  ARG3);
    // Serial.println("ARG1: " & canal, "ARG2: " & pulselength, "ARG3: " & code);
  }
  //COMMAND "sendIRCode" => IR_COM
  if ( v["function_name"] == String("sendIRCode") )
  {
    sendIRCode(1,ARG1,ARG3, ARG2,ARG4,0);
  }
  //COMMAND "setServo" => SERVO
  if ( v["function_name"] == String("setServo") )
  {
    setServo(ARG1,ARG2);
  }
}
//XXXXXXXXXXXXXXXXXXXXXXXXXXXXXXXXXXXXXXXXXXXXXXXXXXXXXXXXXXXXXXXXXXXXXXXXXXXXXXXXX
void setup() {

  // Open serial communications and wait for port to open:
  Serial.begin(9600);

  // Receiver RF_433_COM is connected on Arduino Pin #2 by default
  mySwitch.enableReceive(pinRF_433_COMrcv);
  // Transmitter RF_433_COM is connected to Arduino Pin #10  by default
  mySwitch.enableTransmit(pinRF_433_COMsend);
  // Optional set pulse length.
  mySwitch.setPulseLength(385);
  // Optional set protocol (default is 1, will work for most outlets)
  mySwitch.setProtocol(1);
  // Optional set number of transmission repetitions.
  mySwitch.setRepeatTransmit(15);


  //PIRPIN A1 = 15
  pinMode (A1, INPUT); // Sortie PIR sur A1
  pinMode (7,OUTPUT); // SORTIE D7 = LED TEST
  digitalWrite(7,HIGH);
  delay(1000);

  // SERVICE IR_COM/
  irrecv.enableIRIn(); // Start the receiver
  pinMode(BUTTON_PIN, INPUT);
  pinMode(STATUS_PIN, OUTPUT); // TEMOIN LUMINEUX DE FONCTIONNEMENT?

}

/*
 * <IR_COM> SERVICE
 */
// Storage for the recorded code
//int codeType = -1; // The type of code
//unsigned long codeValue; // The code value if not raw
//unsigned int rawCodes[RAWBUF]; // The durations if raw
//int codeLen; // The length of the code
//int toggle = 0; // The RC5/6 toggle state

// Stores the code for later playback
// Most of this code is just logging
/*
void storeCode(decode_results *results) {

  int codeType = results->decode_type;
  int count = results->rawlen;
  if (codeType == UNKNOWN) {
    Serial.println("Received unknown code, saving as raw");
    codeLen = results->rawlen - 1;
    // To store raw codes:
    // Drop first value (gap)
    // Convert from ticks to microseconds
    // Tweak marks shorter, and spaces longer to cancel out IR receiver distortion
    for (int i = 1; i <= codeLen; i++) {
      if (i % 2) {
        // Mark
        rawCodes[i - 1] = results->rawbuf[i]*USECPERTICK - MARK_EXCESS;
        Serial.print(" m");
      }
      else {
        // Space
        rawCodes[i - 1] = results->rawbuf[i]*USECPERTICK + MARK_EXCESS;
        Serial.print(" s");
      }
      Serial.print(rawCodes[i - 1], DEC);
    }
    Serial.println("");
  }
  else {
    if (codeType == NEC) {
      Serial.print("Received NEC: ");
      if (results->value == REPEAT) {
        // Don't record a NEC repeat value as that's useless.
        Serial.println("repeat; ignoring.");
        return;
      }
    }
    else if (codeType == SONY) {
      Serial.print("Received SONY: ");
    }
    else if (codeType == PANASONIC) {
      Serial.print("Received PANASONIC: ");
    }
    else if (codeType == JVC) {
      Serial.print("Received JVC: ");
    }
    else if (codeType == RC5) {
      Serial.print("Received RC5: ");
    }
    else if (codeType == RC6) {
      Serial.print("Received RC6: ");
    }
    else {
      Serial.print("Unexpected codeType ");
      Serial.print(codeType, DEC);
      Serial.println("");
    }
    Serial.println(results->value, HEX);
    codeValue = results->value;
    codeLen = results->bits;
  }

}
**/
int lastButtonState;

// </IR_COM>

void loop() {

// Capteur PIR
pirMvt();

// PHOTOCELL
photocell ();


// <RF_433_COM_RCV>

  if (mySwitch.available()) {
    int value = mySwitch.getReceivedValue();

    // ACTIVE THIS TO KNOW bitlength, delay and protocol to set at the learning phase
    /*int lenght = mySwitch.getReceivedBitlength();
    int delais = mySwitch.getReceivedDelay();
    int protocol= mySwitch.getReceivedProtocol();*/

    if (value == 0) {
      Serial.print("Unknown encoding");
    } else {
      Serial.print("{\"action\":\"received\",\"value\":");
      Serial.print( mySwitch.getReceivedValue() );
      Serial.println("}");

      // ACTIVE THIS TO KNOW bitlength, delay and protocol to set at the learning phase
     /* Serial.print(mySwitch.getReceivedBitlength());
      Serial.print(mySwitch.getReceivedDelay());
      Serial.print (mySwitch.getReceivedProtocol());*/
    }
    delay(200);
    mySwitch.resetAvailable();
    }
// </RF_433_COM_RCV>

// <IR_COM SERVCE>

     // If button pressed, send the code.
  int buttonState = digitalRead(BUTTON_PIN);

  if (lastButtonState == HIGH && buttonState == LOW) {
    Serial.println("Released");
    irrecv.enableIRIn(); // Re-enable receiver
  }

  if (buttonState) { // IF YOU PRESS BUTTON
    Serial.println("Pressed, sending");
    digitalWrite(STATUS_PIN, HIGH);
    //sendIRCode(lastButtonState == buttonState, ,,,); put an example IR code to try
    digitalWrite(STATUS_PIN, LOW);
    delay(100); // Wait a bit between retransmissions
  }
  /*
  else if (irrecv.decode(&results)) { // IF A DATA IS RECIEVED
    digitalWrite(STATUS_PIN, HIGH);
    storeCode(&results);
    irrecv.resume(); // resume receiver
    digitalWrite(STATUS_PIN, LOW);
  }
  */
  lastButtonState = buttonState;
  // </IR_COM SERVCE>

}J’ai un petit souci que je n’arrive pas à régler concernant la page des devices.
J’ai dupliqué le fonctionnement de la page setup pour l’adapter à la page device. L’ajout de device est basé sur le même code. J’arrive donc à ajouter autant d’arduino que je veux dans la DB, mais lorsque je veux ajouter des devices via la page device, j’ai une erreur 422.
![]()
Le JSON passé en paramètre de la requête POST API est correcte, car s’affiche dans un console.log de la même manière que les arduino. Mais je n’arrive pas à voir où est mon erreur. Pourriez-vous m’aider ?
Merci beaucoup 
faut que tu rajoutes la détection des arduino chinois clones. dans setup.js
Damn, je commence à comprendre comment ça fonctionne le bazard
// foreach port we test if it is an arduino
  ports.forEach(function(port) {
    if (port.manufacturer && port.manufacturer.toLowerCase().search("arduino") != -1) {
      arduinos.push(port);
    } **else if (port.manufacturer && port.manufacturer.toLowerCase().search("qinheng") != -1){**
           arduinos.push(port);
C’est déjà prévu, j’ai noté ça sur ma feuille de route. Si tu regardes mon code tu remarqueras une première liste de manufacturer comprenant des clones chinois. De plus, dans la page de configuration, tu peux voir le manufacturer de l’appareil relié au comPath dans la liste (exemple : /dev/TTYUSB0 - 1a86)
Mais pour l’instant, ma priorité reste la résolution du problème que j’ai évoqué plus tôt, l’erreur 422 POST API alors que la syntaxe est correcte.
Une fois que ça sera réglé, j’améliorerai ces devices de manière à fournir les services arduino.
Yes! j’ai toujours pas accès à ton code, je fais simplement remonter les problèmes de la version 3. Au cas où. Si tu as pris en compte c’est top, pour ton autre problème je peux pas t’aider.
Top merci beaucoup 
Tu peux voir mon code ici :
La liste des manufacturers est définie dans l’action.js de la page :
Actuellement c’est ce que j’ai fais dans mon arduino avec Gladys, V3, ca n’est pas compliqué à faire, j’ai un bouton dans gladys pour l’activer/désactiver. Si tu as besoin fais signe.
Comment tu gères les sous-services ? est-ce dans le service Arduino ou dépenant du code arduino ?
Si c’est directement dans le service pourquoi mettre le chacon spécifiquement ? Quid des autres ?
En fait, un service, c’est une fonction arduino qui contient le code. si gladys envoie a l’arduino « service »: « RF433_CHACON » ca appelle cette fonction.
Ton code arduino perso, tu l’appelles « perso » est dans ta fonction perso tu mets ton code arduino.
donc toute fonction arduino peut être appelée.
Ha donc en fait, tout dépend du code arduino.
Enfin tout sauf ce qui concerne la manière de récupérer et d’afficher les services ainsi que les intéractions possibles avec Gladys c’est ca ?
Dans ce cas Yeah c’est top ! 