@GBoulvin has given you the solution; you need to be in the dialout group to access the serial port.
Hello @VonOx
Do I need to type this command? Even if Node-RED is installed and running, it won’t cause any problems?
Sorry for my ignorance, but I’ve been trying to find solutions to no avail. ![]()
Thanks for your help
I have to adapt it to my case of course, the line that interests us is this one:
-u node-red:dialout
But I don’t know how to send it to the Raspberry Pi, I typed this:
docker run -d \
--log-opt max-size=10m \
--restart=always \
--privileged \
-u root \
--network=host \
--name node_red \
-v /var/lib/node-red:/data \
-u node-red:dialout \
nodered/node-red
but apparently that’s wrong
I ran this command
ls -l /dev/ttyUSB1
and in response I get this message :
crw-rw---- 1 root dialout 188, 1 Jul 17 21:08 /dev/ttyUSB1
Does this mean that we are indeed in the dialout group?
@Psoy
hello,
I don’t have all the details, but in your docker run command you have at least one problem: you apply the -u (user) option twice, once as root and once as node-red:dialout, so there must be a conflict
And you need to delete your existing container before recreating it.
[quote=« Einstein8854, post:24, topic:7430 »]
you apply the
docker run -d \
--log-opt max-size=10m \
--restart=always \
--privileged \
--network=host \
--name node_red \
-v /dev:/dev \
-v /var/lib/node-red:/data \
nodered/node-red
That should be sufficient; you run it in privileged mode so normally there’s no need for user or groupadd
You just need to map /dev otherwise your container won’t see it
[quote=« Psoy, post:26, topic:7430 »]
you were talking about Dialout, I ran this command
ls -l /dev/ttyUSB1
and in return I get this message:
``
thanks again @VonOx for your answers.
but I’m still getting the same error
"[serialconfig:5fefad5a76dd3e43] serial port /dev/ttyUSB0 error: Error: Error: Permission denied, cannot open /dev/ttyUSB0"
I uninstalled the Node-RED container, then I deleted the node-red folders in \var\lib.
I reran your command but it kept rebooting like at the start, so I ran the command
docker run -d \
--log-opt max-size=10m \
--restart=always \
--network=host \
--name node_red \
-u node-red:dialout \
--device=/dev/ttyUSB0 \
--device=/dev/ttyUSB1 \
-v /var/lib/node-red:/data \
nodered/node-red
Try this
So after double-checking, it seems that it has changed. It looks like we’re in the config for the version change of the Serial Port palette 1.01 versus 0.15 :
![]() .
.
je changerai la version toute à l’heure je vous tiens au courant
Thanks again, Vonox
Tutorial to reinstall NODE-RED in V3
A big thank you to @VonOx, for patiently guiding me.
The installation command in that video no longer works following the move to Node-RED V3. It must be replaced by the following commands:
: Intégrer Node-RED avec Gladys Assistant en MQTT | Gladys Assistant
Uninstall the old node red
1 - stop the docker container
docker stop node_red
2 - remove the node red container
docker rm node_red
3 - delete the node-red folder in \var\lib
cd /var/lib
4 - we entered the lib folder, list the folder contents
ls
5 - look for the node-red folder (note: hyphen from the 6 key) and delete it:
sudo rm -r node-red
6 - let’s verify that the node-red folder is gone
ls
7 - back to the prompt pi@gladys:~ $
cd /
8 - I reboot the rpi (I don’t know if it’s necessary but it reassures me)
sudo reboot
9 - Verify that the node red container is gone
docker ps
installation of node red
1 - type @VonOx’s command
"you will need a system connected to the USB0 and USB1 ports; for my part I have an RFlink on port ttyUSB0 and the Sonoff Zigbee key on port ttyUSB1. So you may need to adapt in the lines " --device=/dev/ttyUSB0 \ " the name of the port used, for example “–device=/dev/ttyACM0.”
docker run -d \

--log-opt max-size=10m \

--restart=always \

--network=host \

--name node_red \

-u node-red:dialout \

--device=/dev/ttyUSB0 \

--device=/dev/ttyUSB1 \

-v /var/lib/node-red:/data \

nodered/node-red
2 - then this one
sudo chown -R 1000:1000 /var/lib/node-red
3 - Generate a hash: For more details watch Pierre-Gilles’ video: Intégrer Node-RED avec Gladys Assistant en MQTT | Gladys Assistant
Generate a hash
docker exec -it node_red node-red admin hash-pw
example of a hash : $2b$08$tfrMEc4pnblhhSDFFBUjeOtGU.Ixh5d19P31NWCf2JZKmwZF888mK
4 - Edit the file with nano: Don’t forget Sudo (for me it is required)
sudo nano /var/lib/node-red/settings.js
Remove the double // between “adminAuth:” and the corresponding closing brace } for adminAuth: {
5 - Paste the generated hash
6 - Then restart node red
docker restart node_red
Downgrading the Serialport version
we will use version 0.15.0 instead of version 1.0.1
thanks to @Bjm
So you must keep the node-red-node-serialport version 0.15.0. To get this version, follow @Bjm’s tutorial, which I paste below
I installed node-red-node-serialport version 0.15.0 which worked on my 32 bits
https://www.npmjs.com/package/node-red-node-serialport/v/0.15.0
1 - In the terminal open a Shell in docker
docker exec -it node_red /bin/bash
this returns to me
bash-5.0#
2 - I append the following command
npm i node-red-node-serialport@0.15.0
It churns and at the end returns this to me
 notice created a lockfile as package-lock.json. You should commit this file.
+ node-red-node-serialport@0.15.0
added 48 packages from 37 contributors and audited 338 packages in 60.866s
45 packages are looking for funding
  run `npm fund` for details

found 4 critical severity vulnerabilities
  run `npm audit fix` to fix them, or `npm audit` for details
3 - As there are 4 critical vulnerabilities I run
npm audit fix
As suggested
4 - Then
exit
5 – restart node red
docker restart node_red
Installation of the « palette : node-red-node-serialport »
Open Node-RED to install the « node-red-node-serialport » palette
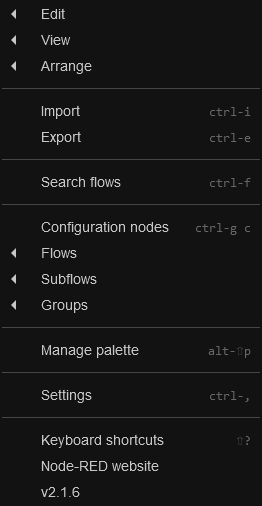
Click at the top right on the 3 horizontal bars to open the above menu.
image262×506 4.11 KB
I don’t know why the images are not displayed, but clicking on them opens them; these images are taken from the RFlink, NodeRed and Gladys tutorial
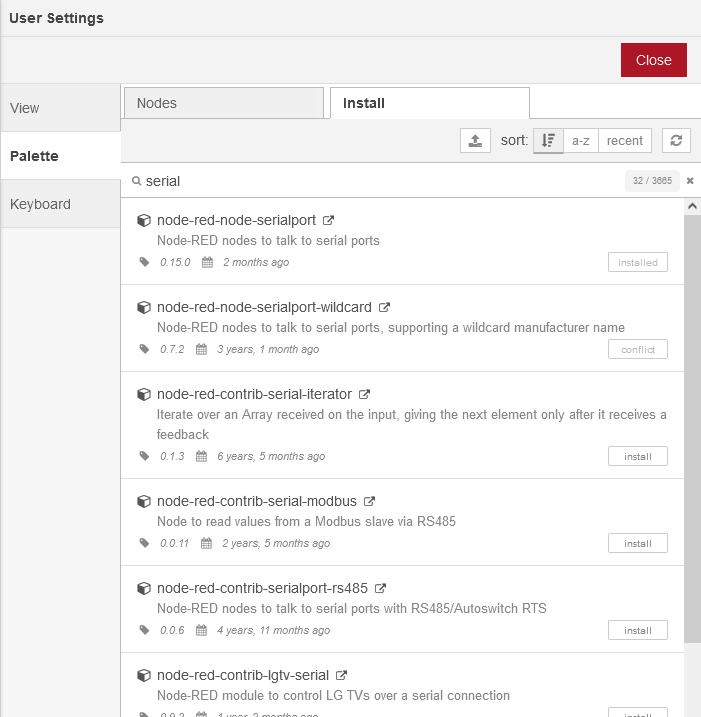
Click on « manage palette » 11th line. The window below opens, click on the “install” tab, then type “serial” in “search modules” to search for palettes (libraries). Libraries appear. Choose the library (or palette) “node-red-node-serialport”, click the small “install” on the right.
Once done, click on the Nodes tab.
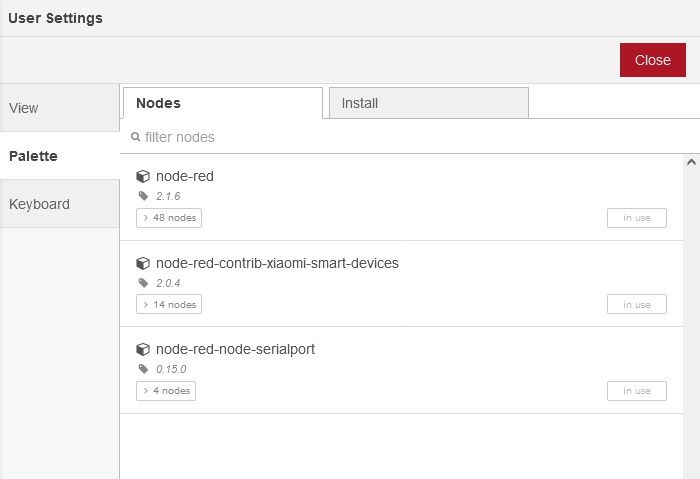
Verify that the palette is present. Then check in the “filter nodes” column on the left of the screen that you have the following nodes:
That should get you back to low-code development.
@Psoy, be careful — you’re saying to delete the persistence folder, but I think that’s only valid in your case. I encountered the permission issue too and I didn’t have to do all that.
@VonOx do I need to update the command on the blog or not?
As for me on the Docker side, I did absolutely nothing ![]()
Good evening @VonOx
Is the persistence folder node-red, in /var/lib?
You shouldn’t do that, I thought wiping everything would be better!
Should I remove that passage?
I’ve had the pleasure of using this tutorial several times unfortunately, but it has always worked ![]()
Good evening Pierre-Gilles
I mention it at the beginning of the tutorial, saying that the command in your video no longer works with Node-RED v3. Maybe specify that there is this problem because the first thing people will do to install
Yes, it needs to be adapted according to the device, that’s also why we generally create a udev rule, it allows having a permanent « path »
I forgot that, I’ll specify it.
I’ll add this before :
" you will need to have a system connected to the USB0 and USB1 ports, for my part I have an RFlink on port ttyUSB0 and the Sonoff Zigbee key on port ttyUSB1. So you may need to adapt in the lines " --device=/dev/ttyUSB0 \ " the name of the port used, for example "–device=/dev/ttyACM0."
Is that ok? (I’m asking you first! ![]()