Here we go!! After Pierre-Gilles’ live coding, re-motivated, here we go again:


Thanks @pierre-gilles ^^
Looks like an all-nighter😅
Here we go!! After Pierre-Gilles’ live coding, re-motivated, here we go again:
Thanks @pierre-gilles ^^
Looks like an all-nighter😅
Cool! Think about what I said in the stream: start with a small MVP, even if you need to iterate afterwards.
If you handle only one type of device in the first release, that’s already very good.
Start by doing the whole end
Thanks for your message!!
Yes, I’m doing that alongside rewatching the session and I still have our previous exchanges in mind.
I went with the jokes as planned. I did my Whimsical in 1h30 and now I’ve almost finished the first front-end.
It’s clearly more pleasant, no doubt!!
Really, that’s what I was missing (even if I think I’m going to struggle with the test, with your video next to it
Hello !!
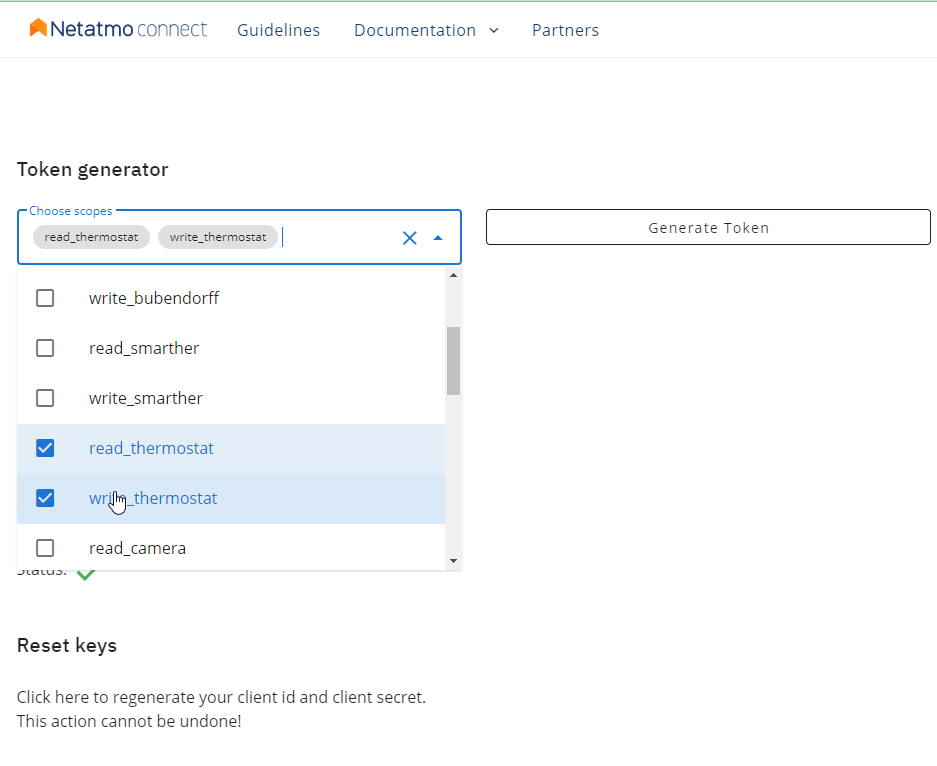
Well… I’ve « really » made progress… despite running into Netatmo’s new authentication method!!
I finally managed to get the OAuth2 connection working… but by cheating. I need advice to avoid overengineering…
@pierre-gilles, @AlexTrovato? Do you have a simple method to configure the redirect_uri in
I have the same issue on ewelink, as soon as I get home I’ll show you my technique ![]()
Thank you very much for your reply @AlexTrovato
Great — I’ll wait for your feedback. Even though I’ve made progress ^^
I’m leaving here what I’d started writing before your response ^^ we’ll talk about it again!! :
I found window.location.origin which returns the current href for me. Does that work? Or do we already have an object that returns that in Gladys and is accessible
In my frontend, to access the login page I do ‹ window.location.href = authUrl; › with 'authUrl = ‹ https://api.netatmo.net/oauth2/authorize?client_id=xxxxxxxxxxxxxxxxxxxxxx\u0026scope=read_thermostat\u0026state=c041b83e32dd3c20f1dae2c97b8384bb\u0026redirect_uri=http%3A%2F%2F172.26.50.62%3A1444%2Fdashboard%2Fintegration%2Fdevice%2Fnetatmo%2Fsetup ›
It works well, but am I allowed to do that? Or do we have a tool to do it on the frontend?
Then it correctly redirects to ‹ http://172.26.50.62:1444/dashboard/integration/device/netatmo/setup?state=9e60560558955bfb320655f145dde6d5\u0026code=xxxxxxxxxxxxxxxxxxxxxxxxxxxxxxx › with a code that we retrieve fine. I then compare the returned state with the initial state to validate the ‹ transaction ›.
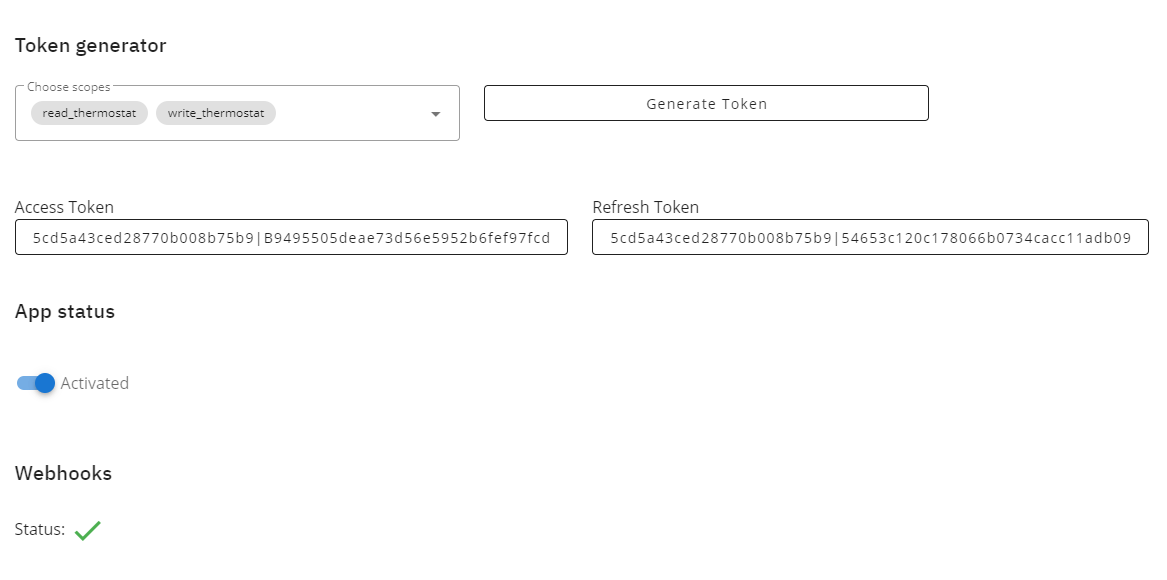
Then I have to make a new request from the server to obtain the ‹ access_token › and the ‹ refresh_token ›.
To keep the token valid, we agree that I poll every 10000s for example for { "access_token":"2YotnFZFEjr1zCsicMWpAA", "expires_in":10800, "refresh_token":"tGzv3JOkF0XG5Qx2TlKWIA", }
Edit:
For info I pushed the frontend and opened a new PR. I’ll tidy up the server side to push tomorrow.
Wow, what a message ![]()
I use the same trick. But you must correctly declare this URL on the Netatmo/eWeLink OAuth side.
I even added the check that we’re not using Gladys Plus (and that we’re on a local instance) with this trick this.props.session.gatewayClient !== undefined; I was inspired by the enedis service:
So, still based on enedis, I chose the option to open a new tab that redirects to the eWeLink login page:
The target="_blank" allows opening a new tab to the link from the href.
That’s right, so for my current eWeLink development, I created a new page that corresponds to my redirectUrl after OAuth login.
It retrieves the code and state, and sends them to the Gladys server to generate the token.
To retrieve the query parameters received during the redirect, I do this:
    const { search: queryString, origin, pathname } = window.location;
    const queryParams = new URLSearchParams(queryString);

    // Map query params to JSON Object
    const params = {};
    for (const [key, value] of queryParams.entries()) {
      params[key] = value;
    }
And params['code'] gives me the OAuth authorization code.
We’d say, rather than every 10000s, use the expires_in duration.
And you also need to handle the 401 error when calling the Netatmo APIs. If you receive 401, you attempt an OAuth refresh_token once. If you get another 401, then you’ll need to ask the Gladys user to reconnect.
Many thanks for taking the time to give your multiple answers to my questions!!
Glad we’re heading in the right direction — I’ll look/test all that tomorrow and keep you posted.
Indeed… opening in a new tab!! That completely slipped my mind ^^
Have a good evening
Good evening @AlexTrovato,
Well, I’ve looked everything over and I had also gone with the new tab… but… for now I’ve reverted.
I wanted to handle all the connection states but it’s impossible to get the correct states with a new tab… even with WebSockets (I wondered if it was affected by not being on the tab anymore… I couldn’t get anything to work)
For now I’ve gone back to the same tab.
I’ve pushed the server and the front-end changes.
Here’s what it looks like:
You can see in it that on registration the messages should have turned blue with a connection message… but that’s not the case. On return it works because of a page refresh ![]() I’m despairing about the propagation of events ^^
I’m despairing about the propagation of events ^^
At first I thought of displaying the access_token on return to « be sure » of the connection, but I think sending it to the front-end isn’t great.
Also, I plan to add a second login method later with the option to create the tokens in dev.netatmo and copy/paste them.
Ah ok!! I thought it had to be before the end ^^ Thanks for the info!!
Indeed!! Thank you very much!
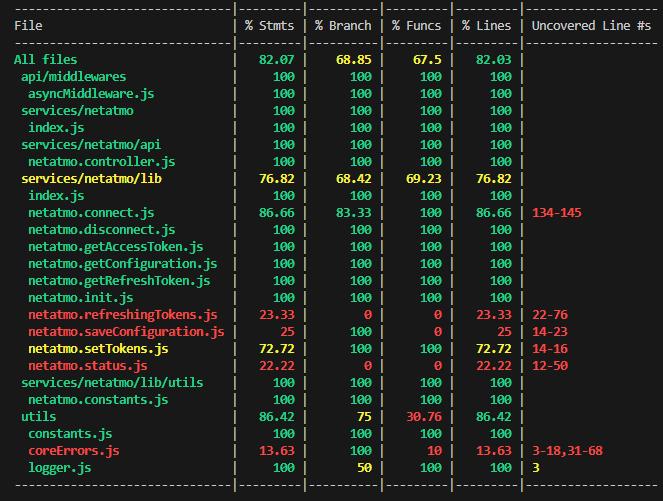
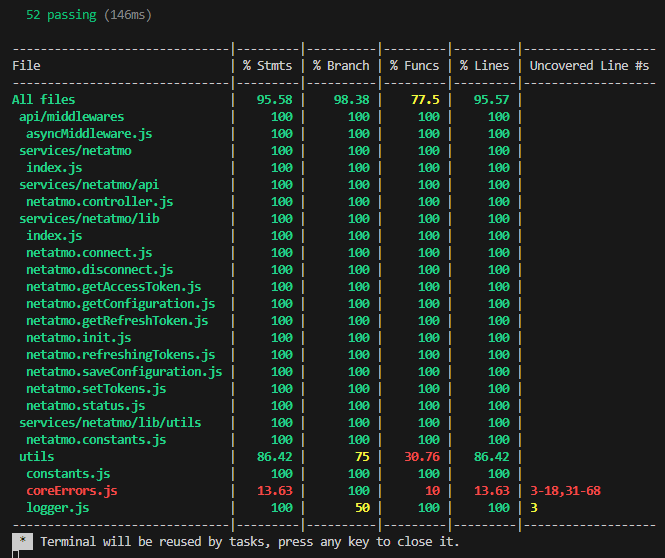
Connection working!! Advanced related tests (the first ones are pushed)
@pierre-gilles, I really didn’t understand anything before, your live coding is a real revelation (even if there are still things that will probably not work ^^). Thanks!!
I’ll finish the tests for this part as advised and move on to exploring the devices.
Edit: It’s moving forward!!
But I’m really struggling with axios ![]()
![]()
Edit 2: Doneee!! ![]()
Hi @pierre-gilles,
Wouldn’t it be beneficial to do an initial review for this part that is new (I’m specifically referring to the OAuth2 connection). Knowing that all the tests are written for this part and that apparently, if I don’t get too far ahead, everything passes (the front-end tests are finishing up).
This would also avoid making the review too long.
And it would also prevent me from working on something else if this start isn’t valid.
Thanks in advance.
Edit: Note that I can also create an image and share API access to my account for those who would like to help by testing the connection for the functional part (or test with their account if they have one).
I quickly went through the PR, and honestly it’s night and day compared to the PRs you used to make — this is clearly in the spirit of the project ![]()
Could you:
And then, if we have at least one real user who says it works well for them, we’ll do an initial review + a merge into master.
The idea is to validate your work little by little while it’s still « hot » and then make small PRs to add other compatibilities.
What do you think about that?
So great if the live stream gave you wings — it’s a pleasure to read! ![]()
I have a NetAtMo thermostat. Ready to test if needed.
I have Netatmo cameras.
It’s really nice to read!! ^^
And yes I really feel the difference!! ^^
As I told you, it’s really the thing that was « missing » for me, especially for coding enthusiasts who are not professional developers. As you advised me I watched a lot of videos / followed tutorials. But I couldn’t find anything comparable to Gladys and it’s hard to get an overall understanding in that case (speaking for myself at least)
As I said, your live stream is a revelation and I sincerely think it can inspire a lot of people.
Ok I’ll do that. That’s what I had in mind, I’ve only focused on the thermostat for the moment.
I launched an image this morning, but I’ll wait until I’ve set that up.
That suits me perfectly ^^
Perfect, it’s the 1st step ^^
Yes, I know ^^
The cameras will be the 3rd step. The 2nd being the valves.
Then the 4th step: the weather stations - main module
Etc.
However, could I at least ask
No problem, my Pi is available for your image now that I’ve finished with Sonos.
Hello,
Ready and waiting to help with testing.
I have a complete weather station (including a rain gauge and an anemometer).
Thanks for taking on the development of this feature ![]()