Hello,
I propose a tutorial on sending data from a Roborock S51 robot vacuum with Valetudo to Gladys via MQTT.
If your robot is not compatible with Valetudo, the code can be adapted to your needs; it will serve as a basis.
TUTORIAL #4: Managing your robot vacuum with Valetudo in Gladys.
EDIT 28/06/2023: Complete overhaul of the RobotAspiToGladys.sh file code, simplifying its use
EDIT 25/06/2023: Code modification (JsonArrayToString, etc.), information on Valetudo RE, and the card
Robot Vacuum Side:
You need to install Valetudo RE on it.
Valetudo (for the installation part): https://valetudo.cloud/pages/general/getting-started.html
Valetudo RE: GitHub - rand256/valetudo: Valetudo RE - experimental vacuum software, cloud free · GitHub
Valetudo RE MQTT Commands: MQTT API · rand256/valetudo Wiki · GitHub
I had to configure the MQTT connection in Valetudo RE.
URL: mqtt://gladys:XYZ@192.168.XXX.XXX:1883
I didn’t change the default configuration:
Username: rockrobo
Topic Prefix: valetudo
Autoconfiguration Prefix: homeassistant
BASH Side:
- Shared file: /opt/mosquitto/MQTTConfig.sh
I will use the shared file proposed with my other tutorials: [TUTO] Partage d'informations entre BASH et Gladys
It allows testing the presence of commands, sharing Gladys connection variables, and adding color to messages.
You need to add the following code in the « Customizable Variables » block:
# Gladys topic shortcuts
GladysSet="gladys/master/device"
GladysGet="gladys/device"

# Shortcuts to MQTT devices
AspiRobot="mqtt:salle:aspirobot/feature/mqtt:aspirobot"
Adapting AspiRobot with your topic.
It also seems necessary to modify the ORANGE variable to:
ORANGE="\e[1m\e[38;5;202m"
- BASH Script: /opt/mosquitto/RobotAspiToGladys.sh
The idea is to create a loop that monitors the arrival of information to display it in Gladys.
The script will send all the information it finds to Gladys, which will only update the displayed ones.
jq will fill an associative array with all the keys and values it finds for each topic.
This notion of topic is important as it will be used in Gladys.
It is possible to customize the values (date format, for example) and the types (text or state).
You need to look a bit at the code which is normally quite detailed.
You will need to automate its launch at the startup of the pc/raspberry.
Requires the commands mosquitto_pub and mosquitto_sub (debian package mosquitto-clients) as well as jq (debian package jq).
#!/bin/bash

#########################################################
## Sending robot vacuum information to Gladys ##
#########################################################
# Requires packages: mosquitto-clients jq
# To be executed at startup, its infinite loop will continuously monitor what is happening

# Loading the common file
source /opt/mosquitto/MQTTConfig.sh

# Checking for the presence of dependencies
! CommandCheck "mosquitto_pub:mosquitto-clients" "mosquitto_sub:mosquitto-clients" "jq:jq" && exit 1

### Variables to customize

# Shortcut variable defined in Valétudo
ValeRock="valetudo/rockrobo"

# Variables for concatenation into text when retrieving values in json array format
ValueSeparator=", "
LineSeparator="@"

### Variables to customize

# Calculations for creating the table
TerminalWidth=$(($(tput cols) - 2 - 54))
printf -v ColumnValueDash '─%.0s' $(seq 1 ${TerminalWidth})
printf -v ColumnValueSpace ' %.0s' $(seq 1 $(( ${TerminalWidth} - 8 )))

# Displaying the table headers
echo "Base topic: ${GladysSet}/${AspiRobot}:"
echo "┌─────────────────────────────────────────────┬───────┬${ColumnValueDash}┐"
echo -e "│ ${ORANGE}Topic                                      ${RAZ} │ ${FUCHSIA}Type${RAZ}  │ ${BLEUFONCE}Value${RAZ} ${ColumnValueSpace}│"
echo "├─────────────────────────────────────────────┼───────┼${ColumnValueDash}┤"


# Descending function in objects {} and adds keys and sub-keys in an array with its value
function AutoJsonReader()
{
    # $1: Topic / Mother object
    # $2: JSON code
    # AllValues: Name of the global variable that will be filled

    # Defining local variables
    local Key Value Line

    # Using NULL as separators, the -j allows not to have a line break between entries
    mapfile -td '' Lines < <(jq -rj 'to_entries[] | "\(.key)@@@\(.value)\u0000"' <<< "${2}")

    # Looping through the JSON code and returning key@@@value
    for Line in "${Lines[@]}"
    do
        # Key value with addition of the mother key if present
        Key="${1}${Line%%@@@*}"

        # Key value
        Value="${Line##*@@@}"

        # If the value is an object {}
        if [[ "${Value:0:1}${Value: -1:1}" == '{}' ]]
        then
            # Restart the function with this code to fill the sub-keys
            AutoJsonReader "${Key}." "${Value}"

        else
            # Adding the (sub-)key and its value to the array
            AllValues["${Key}"]="${Value}"
        fi
    done
}


# Function converting a json array to text
# The array can contain others but no {}
function JsonArrayToString()
{
    # Local variables
    local NewString Line

    # If the array contains a sub-array
    if [[ "${1:0:2}" == '[[' ]]
    then
        # Loop processing arrays one by one
        while read Line
        do
            # Calling the function with a sub-array and retrieving its text value
            NewString+="$(JsonArrayToString "${Line}")${LineSeparator:-@}"
        done < <(jq -c '.[]' <<< "${1}")

        # Returning the final text with removal of the last LineSeparator
        echo "${NewString/%${LineSeparator:-@}}"

    elif [[ "${1:0:1}" == "[" ]]
    then
        # Converting the array to text
        NewString=$(jq -r --arg Separator "${ValueSeparator:-:}" 'join($Separator)' <<< "${1}")

        # Returning the text either final or of a sub-array
        echo "${NewString}"
    fi
}


# Looping through the information sent by the robot vacuum
# ${ValeRock}/map_data not used, replaced by the "camera"
while read Topic JSONCode
do
    # Only keeping the last level of the topic for the case
    # ex: valetudo/rockrobo/state => state
    Topic="${Topic##*/}"

    # Cleaning the array
    unset AllValues
    declare -A AllValues

    # Filling the array
    AutoJsonReader "${Topic}:" "${JSONCode}"

    # In the case of the error field, it is only returned if it is the case, so I give it a default value
    if [[ ${Topic} == "state" ]]
    then
        [[ -z ${AllValues["state:error"]} ]] && AllValues["state:error"]="No error"
    fi

    # Looping through the field names by retrieving.
    for Field in "${!AllValues[@]}"
    do
        # Retrieving the corresponding value.
        Value="${AllValues[${Field}]}"

        # Reprocessing the value of some information, just use their Topic as a key
        case "${Field}" in
            # Date type format
            "attributes:last_bin_out"|"attributes:last_bin_full"|"command_status:updated"|"attributes:last_run_stats.endTime"|"attributes:last_run_stats.startTime")
                Value=$((Value / 1000 ))
                Value=$(date +'%d/%m/%Y' -d "@$Value") ;;

            "attributes:last_run_stats.duration") Value=$((Value / 60 )) ;;
        esac

        # Text type by default
        ValueType="text"
        TypeSpace=" "

        # If you want to force a text type, just add keys separated by | in the @()
        if [[ "${Field}" != @() ]]
        then
            # If the type is numeric, it is passed to state
            [[ "${Value}" == ?(+|-)+([0-9])?(.|,)*([0-9]) ]] && { ValueType="state"; unset TypeSpace; }
        fi

        # Does not process null values (not found)
        if [[ ${Value} != "null" ]]
        then
            # Converting json arrays to text if the value starts with a [ and ends with a ]
            [[ "${Value:0:1}${Value: -1:1}" == '[]' ]] && Value="$(JsonArrayToString "${Value}")"

            # Calculations for the table
            printf -v FieldSpace ' %.0s' $(seq 1 $(( 43 - ${#Field} )))
            printf -v ValueSpace ' %.0s' $(seq 1 $(( ${#ColumnValueSpace} - ${#Value} + 7)))

            # Displaying information in the terminal in a table
            echo -e "│ ${ORANGE}${Field}${RAZ}${FieldSpace} │ ${FUCHSIA}${ValueType}${RAZ}${TypeSpace} │ ${BLEUFONCE}${Value}${RAZ}${ValueSpace}│"

            # Sending the value of the correct topic to Gladys
            # Using shortcuts to define the entire topic
            # It is important to properly configure the MQTT devices in Gladys to have the correct Topic format
            mosquitto_pub -u "${User}" -P "${Pass}" -t "${GladysSet}/${AspiRobot}:${Field}/${ValueType}" -m "${Value}"

            # Retrieving the return value of the mosquitto_pub command
            MosquittoReturns=${?}

            # Displaying a message in case of mosquitto error
            (( ${MosquittoReturns} )) && echo -e "[${ROUGE}Error${RAZ}] The mosquitto_sub command returned code ${MosquittoReturns}." 1>2
        fi
    done

    # Separator between topics
    echo "├─────────────────────────────────────────────┼───────┼${ColumnValueDash}┤"
done < <(mosquitto_sub -v -u "${User}" -P "${Pass}" -t ${ValeRock}/state \
                                                    -t ${ValeRock}/attributes \
                                                    -t ${ValeRock}/command_status \
                                                    -t homeassistant/vacuum/valetudo_rockrobo/config)
If you run it, it will display for example:
bash RobotAspiToGladys.sh
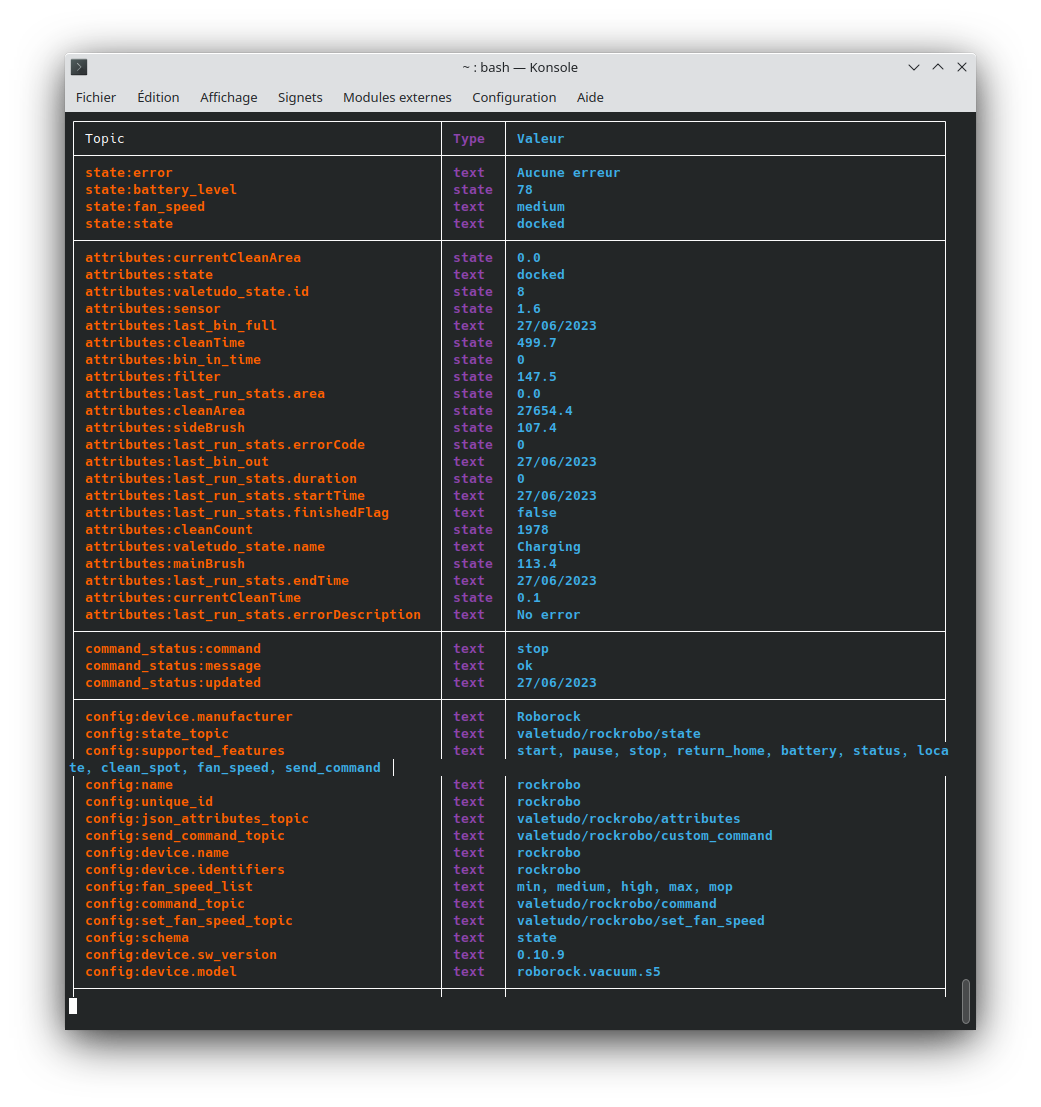
The topics are important, you will need to indicate them to Gladys in the following steps.
- BASH Script: /opt/mosquitto/GladysToRobotAspi.sh
It is possible to send MQTT commands to Valetudo.
In the following code, I propose 3 actions that will be launched when I press a Xiaomi button.
1 click (code 1): start
2 clicks (code 2): stop
long click (code 5): return to base
To change the actions, simply modify the Actions variable.
You will need to automate its launch at PC/Raspberry startup.
Requires the mosquitto_pub and mosquitto_sub commands (Debian package mosquitto-clients).
#!/bin/bash

#####################################################################################################
## Monitoring of the special vacuum cleaner button and triggering of the appropriate actions of the vacuum cleaner ##
#####################################################################################################
# Requires the package: mosquitto-clients

# Loading the common file
source /opt/mosquitto/MQTTConfig.sh

# Checking the presence of commands
! CommandCheck "mosquitto_pub:mosquitto-clients" "mosquitto_sub:mosquitto-clients" && exit 1

### Variables to customize

# List of actions, correspondence of MQTT codes and commands
Actions=(null start stop pause locate return_to_base clean_spot)

### Variables to customize

# Infinite loop to retrieve the value of the MQTT button
while read Value
do
    # Blocking if the sent code is unknown
    if [[ ${Value} != @([1-6]) ]]
    then
        echo -e "[${ORANGE}Warning${RAZ}] Value ${Value} unknown..." 1>&2
        continue
    fi

    # Retrieving the command associated with the button code
    Action="${Actions[${Value}]}"

    # Sending the command to the vacuum cleaner via the broker
    echo -e "Executing the action '${BLEUFONCE}${Action}${RAZ}'."
    mosquitto_pub -u "${User}" -P "${Pass}" -t valetudo/rockrobo/command -m ${Action}

    # Retrieving the return value of the mosquitto_pub command
    MosquittoReturns=${?}

    # Display a message in case of mosquitto error
    (( ${MosquittoReturns} )) && echo -e "[${ROUGE}Error${RAZ}] The mosquitto_sub command returned the code ${MosquittoReturns}." 1>&2
done < <(mosquitto_sub -u "${User}" -P "${Pass}" -t "${GladysGet}/${AspiRobot}:action/state")
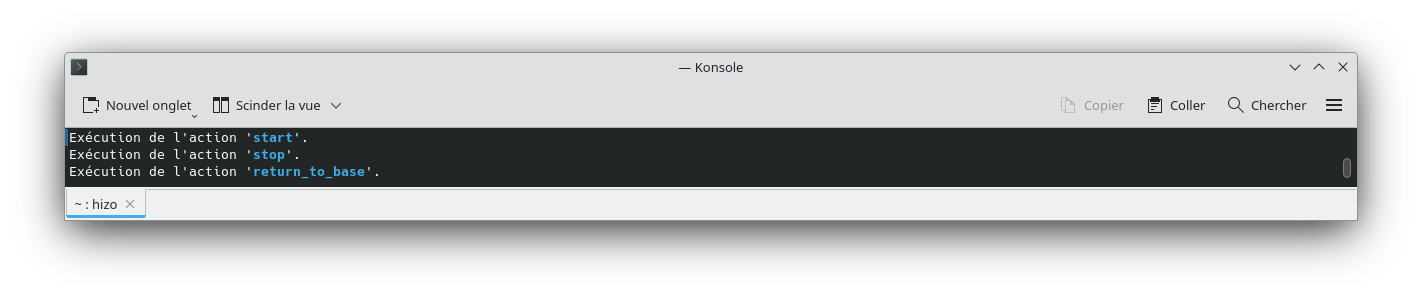
If you run it, it gives for example:
bash GladysToRobotAspi.sh
Gladys side:
- Creating the vacuum cleaner at the MQTT level:
Name: Vacuum Cleaner
External ID: mqtt:room:vacuumrobot (mqtt:Room:Element)
Room: Room
In my case it looks like this:
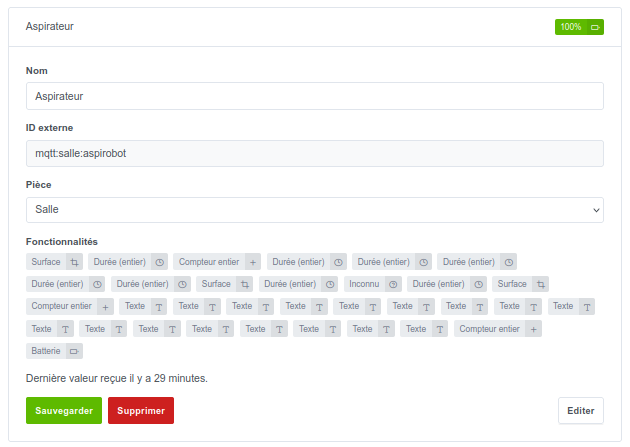
You need to adapt it to what you put in the AspiRobot variable of the bash file MQTTConfig.sh
- Creating the desired features with the correct type:
This step will be long since you need to create all the features to manage with Gladys…
I created blocks to gather the information.
You need to be careful to use the correct feature types so that the received data is compatible.
Battery, text, area or duration…
Examples of external ID formatting for features:
The important thing is to use the topics indicated by the bash script RobotAspiToGladys.sh and give them to Gladys.
In my case it looks like this:

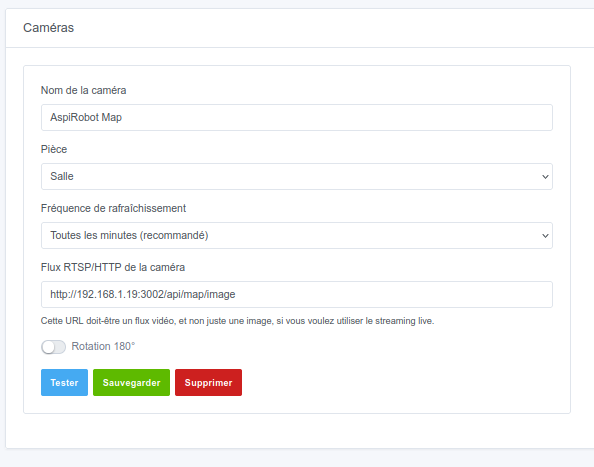
- Creating the camera displaying the map:
It is possible to use http://VacuumIP/api/simple_map to retrieve the map, for example:
wget http://VacuumRobotIP/api/simple_map -O "/tmp/VacuumRobotMap.png"
But this one requests an image every minute, which seems heavy for the vacuum cleaner.
It is possible to install GitHub - rand256/valetudo-mapper: Valetudo companion service · GitHub which will generate a map from the MQTT data.
You can then give the address http://serverIP:3000/api/map/image (or port 3002?) to the camera type device.
In my case it looks like this:
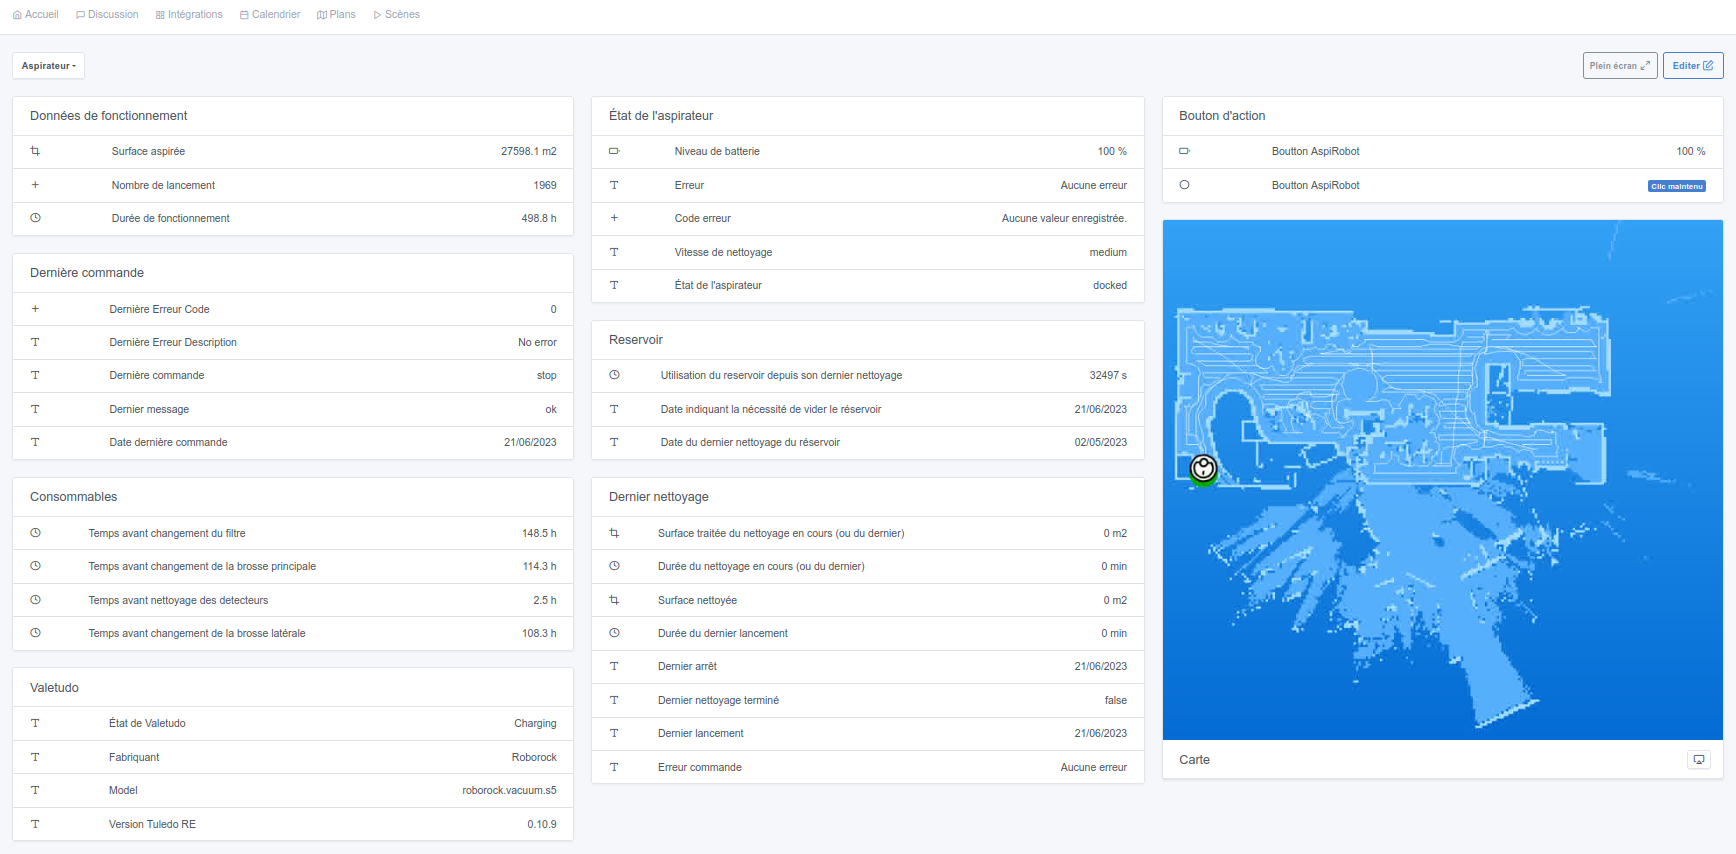
- Adding the different features to the dashboard:
Nothing specific here, you need to proceed as usual.
Personally, here’s what I did:
- Managing the action button:
You just need to have a specific feature in the MQTT device (visible in my screenshot)
- Type: Unknown
- Name: Action
- ID: mqtt:vacuumrobot:action
- Values: from 1 to 10
- Is it a sensor? No
To have a trigger like a button (VacuumRobot button in my case, with a nice typo  )
)
To create a scene at the button that will send the action code to the feature above:
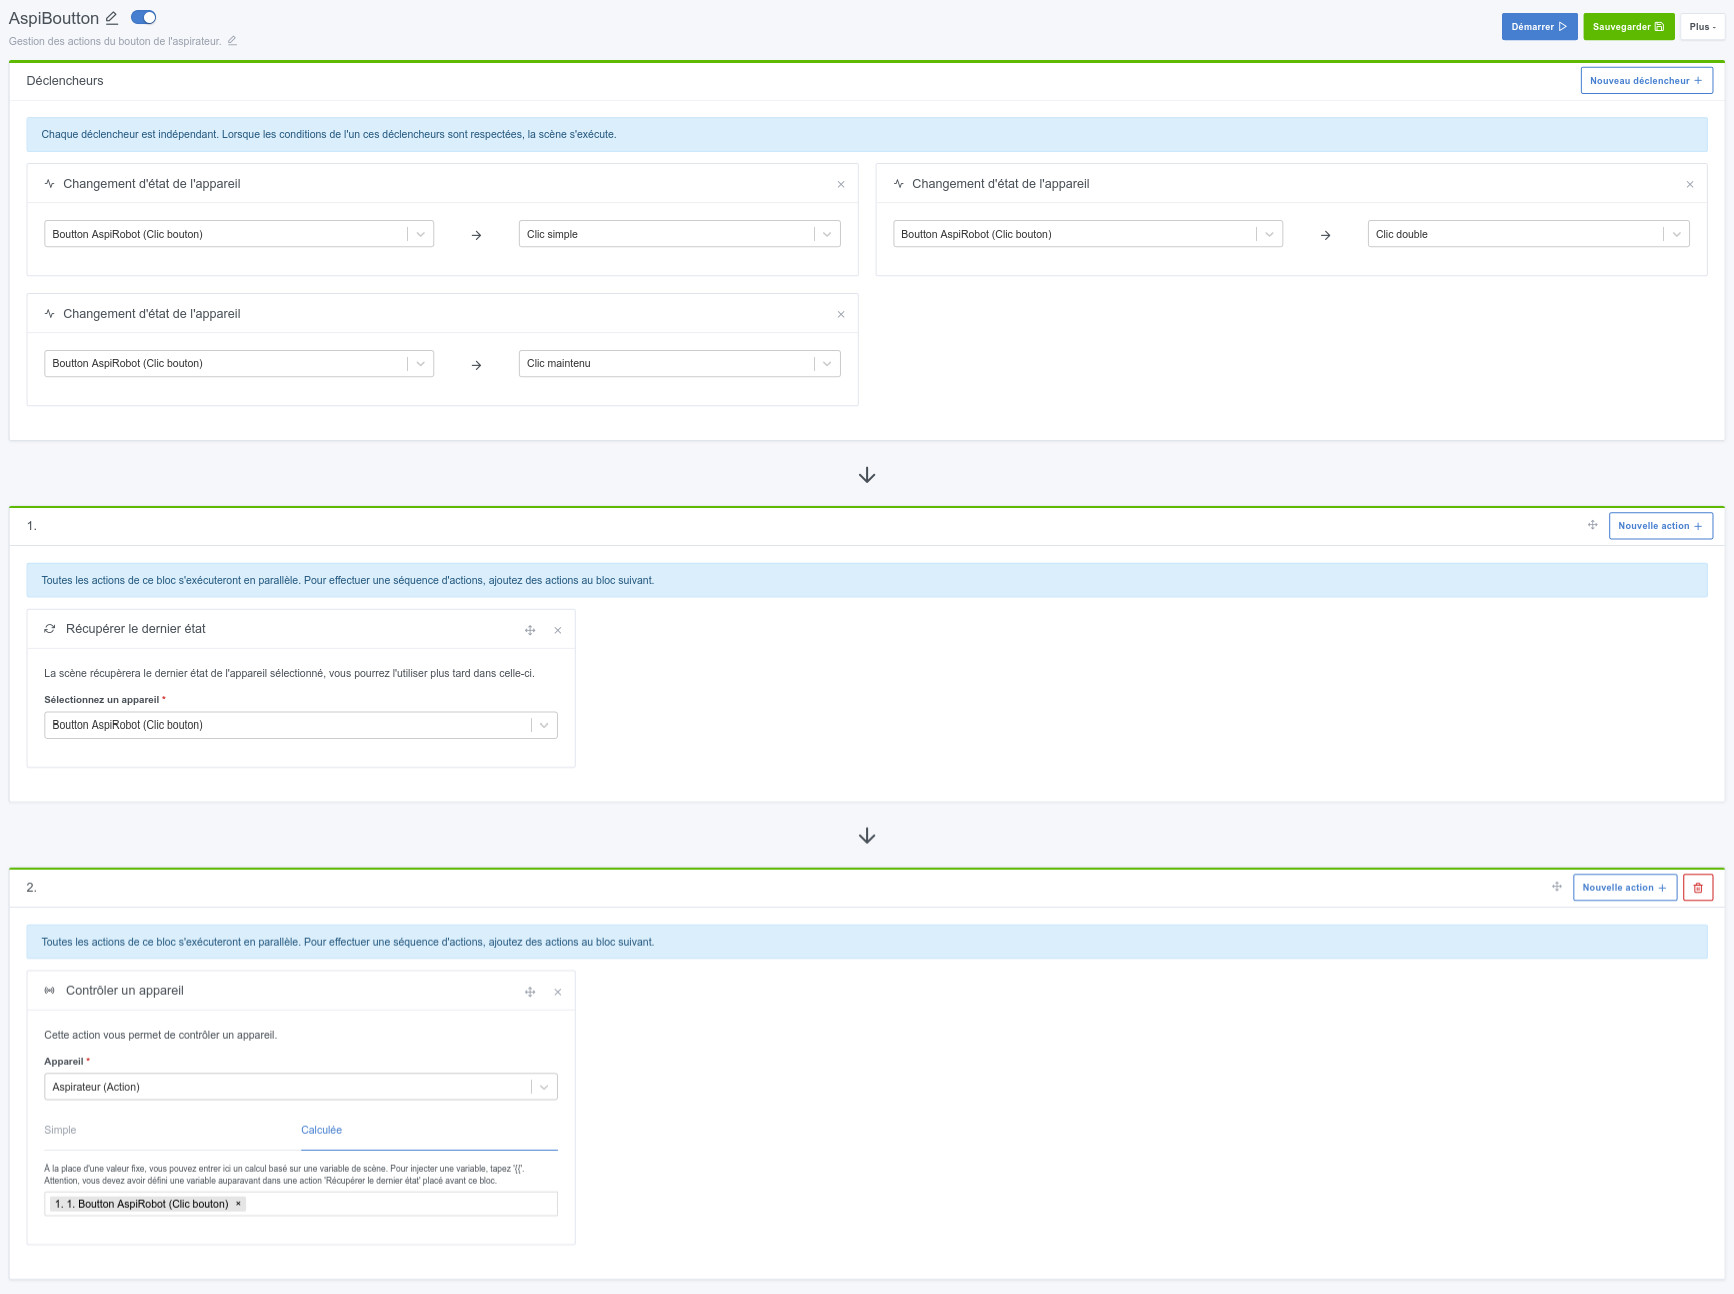
The code will be received by the file /opt/mosquitto/GladysToRobotAspi.sh.
Hopefully this can be useful, at least as a base or starting idea for other vacuum cleaners.
Valetudo:
If you use this version, there seem to be a lot of information: https://valetudo.cloud/pages/integrations/mqtt.html#capabilities
Thanks to: Faire communiquer votre aspirateur robot Xiaomi Roborock en MQTT
Other tutorials:
TUTORIAL n°1: Display the Raspberry temperature in Gladys.
TUTORIAL n°2: Launch a BASH command via a Gladys action.
TUTORIAL n°3: Indicate the presence of a user via the WI-FI of their phone.

 I’ll share it on Gladys’ social media.