Hello! ![]()
I’m making this little tutorial to show you one of the possibilities for sending SMS from Gladys.
Why send SMS from Gladys?
Gladys is great and when you’re not in front of the screen, you like to have notifications to monitor certain things, but there’s a catch!
Gladys depends on the internet for remote notifications!
A small problem that we can solve thanks to SMS ![]()
========
Prerequisites
- PC / VM with a Linux distribution (Debian buster (10) will be the easiest for installation)
- Raspisms: A free and free software once created for Raspberry but now compatible with most Linux distributions.
- A USB GSM key compatible with Gammu (List of compatibilities Base de connaissances Gammu)
I personally use the « Huawei E8372 » - An SIM card obviously: The one you want as long as it can send SMS and fit into the chosen GSM key.
Raspisms has a paid version hosted in the cloud that dispenses you from a GSM key and local installation, but makes you dependent on an internet connection.
PC / VM
You can have either a PC / Mini PC dedicated to your SMS server, or use what you use to run Gladys.
/!\ For VMs, you will need to be able to connect a USB device to the VM (I do not show this part in the tutorial)
Raspisms
This is the software that will serve as a web interface to use our virtual phone, manage contacts, create scheduled SMS, etc..
We will mainly use the built-in API to allow Gladys to give instructions to the GSM key.
Gammu
This is the software that allows you to configure the GSM key and use it in Raspisms.
The configuration may vary from one GSM key to another, in the tutorial the « Huawei E8372 » will be used.
========
Installation
Now we are going to proceed with the installation of everything necessary!
We start with Raspisms, you will find all the installation information on the official website RaspiSMS | Téléchargement
The documentation also includes the installation of Gammu
/!\ By default Raspisms is configured on port 80, if it is already in use on your machine you will have an error at the end of the installation but don’t panic!
You will need to change the listening port of Apache:
nano /etc/apache2/ports.conf
You replace port 80 with an available one, I put 8080 for example and you save.
You can restart Apache and we will be good.
systemctl start apache2.service
========
GSM Key Configuration
The installation being finished, we are going to configure our GSM key to communicate with it.
First we plug the GSM key into one of our USB ports ![]()
In your terminal you type the command: lsusb
You will see your USB devices:
root@Gladys:~# lsusb
Bus 002 Device 001: ID 1d6b:0003 Linux Foundation 3.0 root hub
Bus 001 Device 005: ID 31b2:0010
Bus 001 Device 004: ID 8087:0a2a Intel Corp.
Bus 001 Device 003: ID 12d1:155e Huawei Technologies Co., Ltd.
Bus 001 Device 002: ID 0658:0200 Sigma Designs, Inc. Aeotec Z-Stick Gen5 (ZW090) - UZB
Bus 001 Device 001: ID 1d6b:0002 Linux Foundation 2.0 root hub
My key is there
Bus 001 Device 003: ID 12d1:155e Huawei Technologies Co., Ltd.
If you have the same as me you won’t have the same name at the beginning because by default the key is in « Web Use » mode (Way of saying that it must be activated via a web interface to use it) which is a problem without a graphical interface.
We must therefore switch this key to « Switch » mode with the command:
usb_modeswitch -v 12d1 -p 155e --huawei-alt-mode
« -v » corresponds to the first part of your key’s ID and « -p » to the second part (the ID appears in the result of the lsusb command)
Once this is done you should see that the name of the key that appears in the « lsusb » command is slightly different, for those who have the same as me: « Huawei Technologies Co., Ltd. »
If you type the command:
ls /dev/ttyUSB*
You should have a list of USB ports, the problem is that we don’t know which one to use and they are likely to change when restarting the PC or changing the port of the key.
We are now going to fix the name of our GSM key port!
We go to the folder: /etc/udev/rules.d/
cd /etc/udev/rules.d/
Then we create a file that will execute the command to fix the name we want:
nano 70-huawei_e8372.rules
You put the name you want ending with .rules
In this file we put:
SUBSYSTEM==« tty », ATTRS{idVendor}==« 12d1 », ATTRS{idProduct}==« 155e », ENV{ID_USB_INTERFACE_NUM}==« 00 », SYMLINK+=« sms », RUN+=« /usr/bin/killall -SIGHUP gammu-smsd »
- ATTRS{idVendor}== (First part of your key’s ID)
- ATTRS{idProduct}== (Second part of your key’s ID)
- SYMLINK+= (Name of the port you want to have, « sms » in my case)
Once this is done, you need to restart your PC
Now that the PC has rebooted you should have your GSM key appear under the name « sms » in the list of your devices via the command:
ls /dev/
We have finished the configuration of the GSM key, yes it was a bit long ^^’
========
Gammu Configuration
We are now going to configure Gammu to communicate with our GSM key
You can either create the conf file by hand, or use the command:
gammu-config
You choose the location where the file will be saved and then you arrive at this interface
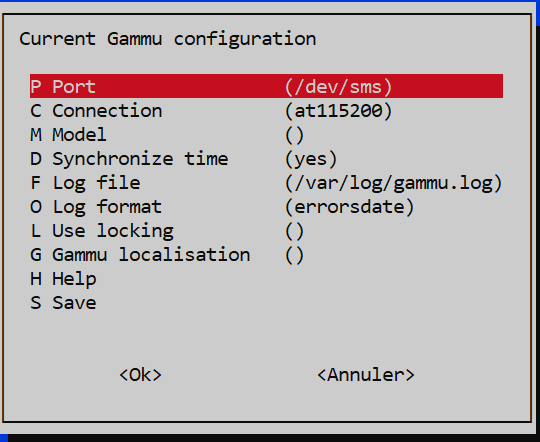
Port: The port we created for our GSM key
Connection: You can find the information in the Gammu doc Base de connaissances Gammu or go by trial and error ^^
Log file: If you want to save the logs somewhere
Log format: The types of logs you want to save in the log file
Once finished you click « Ok » to validate!
Test the GSM key
To test if our configuration file is good we will type the command:
gammu --identify
If you have the information of your key that comes back correctly it’s perfect:
root@Gladys:~# gammu --identify
Device       : /dev/sms
Manufacturer : Huawei
Model        : unknown (E8372h-320)
Firmware     : 11.0.2.1(H697SP2C983)
IMEI         : 8621470XXXXXXXX
SIM IMSI     : 2081501XXXXXXXX
On the other hand, if the information does not come back it is that the type of connection in the conf file is not the right one for your key.
Re-run the « gammu-config » command and try another type of « Connection ».
Now that our key is recognized we are going to try to send our first SMS!
echo "Test Message" | gammu --sendsms TEXT +33770XXXXXX
(Make sure to put your number after TEXT)
If you receive the SMS after executing the command we have finished the configuration of Gammu.
If it doesn’t work, you will need to check the logs in the file indicated in the config created previously.
========
Raspisms Configuration
It’s time to connect Raspisms and our GSM key ![]()
We meet on the Raspisms web page via the URL
You replace of course the IP with yours.
To log in you will need the logins ![]()
You type the command:
cat /usr/share/raspisms/.credentials
And you will have your logins ![]()
Once connected, you go to « Phones »

Click on « Add a phone »

Phone name: What you want
Phone type: Gammu
Configuration file: The gammu file created in the « Gammu Configuration » step
PIN code: The PIN code of your SIM card if it has one. If SMS sending does not work afterwards, try the configuration without a PIN code
Then "Save the phone"Now that the phone is declared in Raspisms, we are going to try to send an SMS from Raspisms
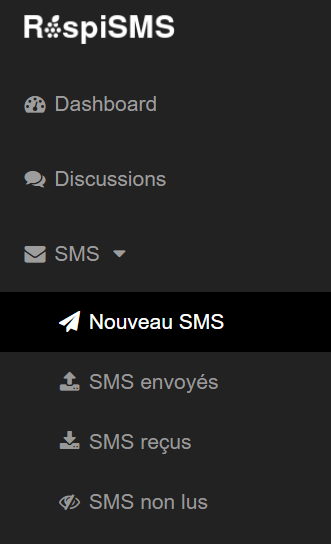
Then « Create a new SMS »
You just need to put your text in « SMS Text » and indicate your phone number in « Target Numbers ».
Finally → Save the SMS
If you receive it, that’s perfect ![]()
========
Gladys Configuration
We are coming to the final step and the one we are most interested in!
We are going to send SMS through a Gladys scene
You need to create an action « HTTP Request »
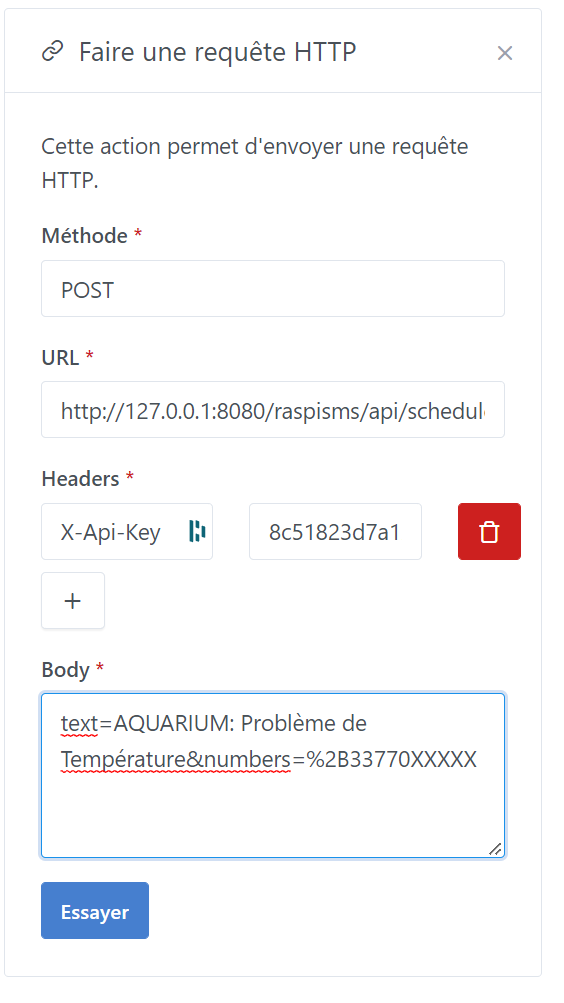
Method: POST
URL: http://127.0.0.1:8080/raspisms/api/scheduled/ (Replace the IP and port with your information)
Headers: NAME: X-Api-Key and VALUE: Your API key
Retrieve the API key: On Raspisms, top right, click on your account then « Profile ».
In « My Data » click on « Click to view the API key »
Body: It consists of 2 variables (text and numbers which are separated by an &)
text=This is a test message
numbers=+330770XXXXXX
Which gives us:
text=This is a test message&numbers=%2B33770058702
You will notice that the « + » of the number has become a « %2B », it is recommended to encode special characters in URL format.
You can use this site for that: https://www.urlencoder.org/
There we go, we have finally finished the tutorial!!! ![]()
Congratulations to you ![]()
Bonus: Raspisms API documentation for more features Utiliser l’API HTTP