Very happy that there’s so much interest in this work!
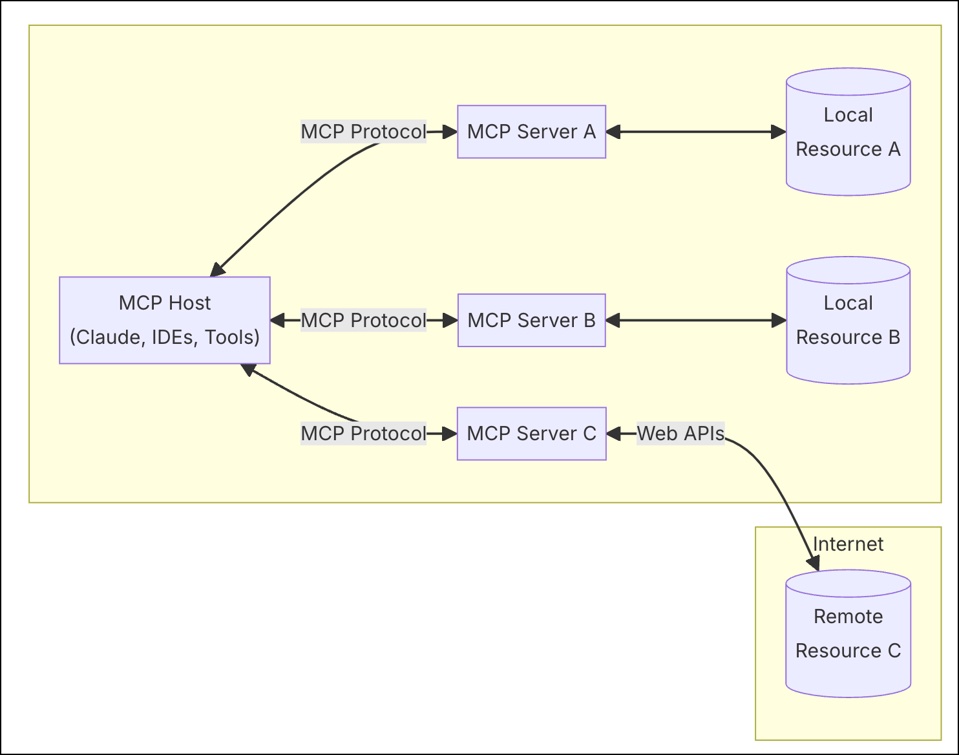
To explain a bit more, here is a diagram of a setup operating with the MCP protocol
So there’s the host which contains the MCP client; today these are often well-known agents such as Claude Desktop, ChatGPT… that integrate this client. As I was saying, in the demo video above, it’s the agent present in VSCode with GitHub Copilot.
Its work will be, on one hand, to converse with the LLM (often Claude Sonnet or GPT-4) which will handle understanding requests and analyzing data, and on the other hand to interact with the MCP server.
The MCP server takes care of declaring functions that the MCP client can call to interact with the resource (in our case the resource is Gladys, but it can be a database, Google Drive, Slack… any local or remote tool). In our case, for now, 4 functions:
device.get-state to obtain sensor datacamera.get-image to retrieve camera imageslight.turn-(on|off) to turn a room’s lights on/offscene.start to start a scene
Now if we look more closely while keeping it simple at how the host part works, when we use for example Claude Desktop, here’s what will be done:
- At startup, Claude Desktop will ask all MCP servers to which it is connected for the available functions that each offers (in our case
device.get-state, camera.get-image…)
- When the user asks Claude Desktop something (say « Give me the living room temperature ») it will send the question to the LLM specifying in the request context that it has access to several functions and that if the user’s request requires it, one of those functions can be called
- The LLM replies to Claude Desktop, « I need you to use
device.get-state with the parameter the room salon »
- Claude Desktop calls the function of Gladys’ MCP server
device.get-state(salon) and returns the requested data to the LLM
- The LLM builds the response with this new data and returns it to Claude Desktop which displays it to you
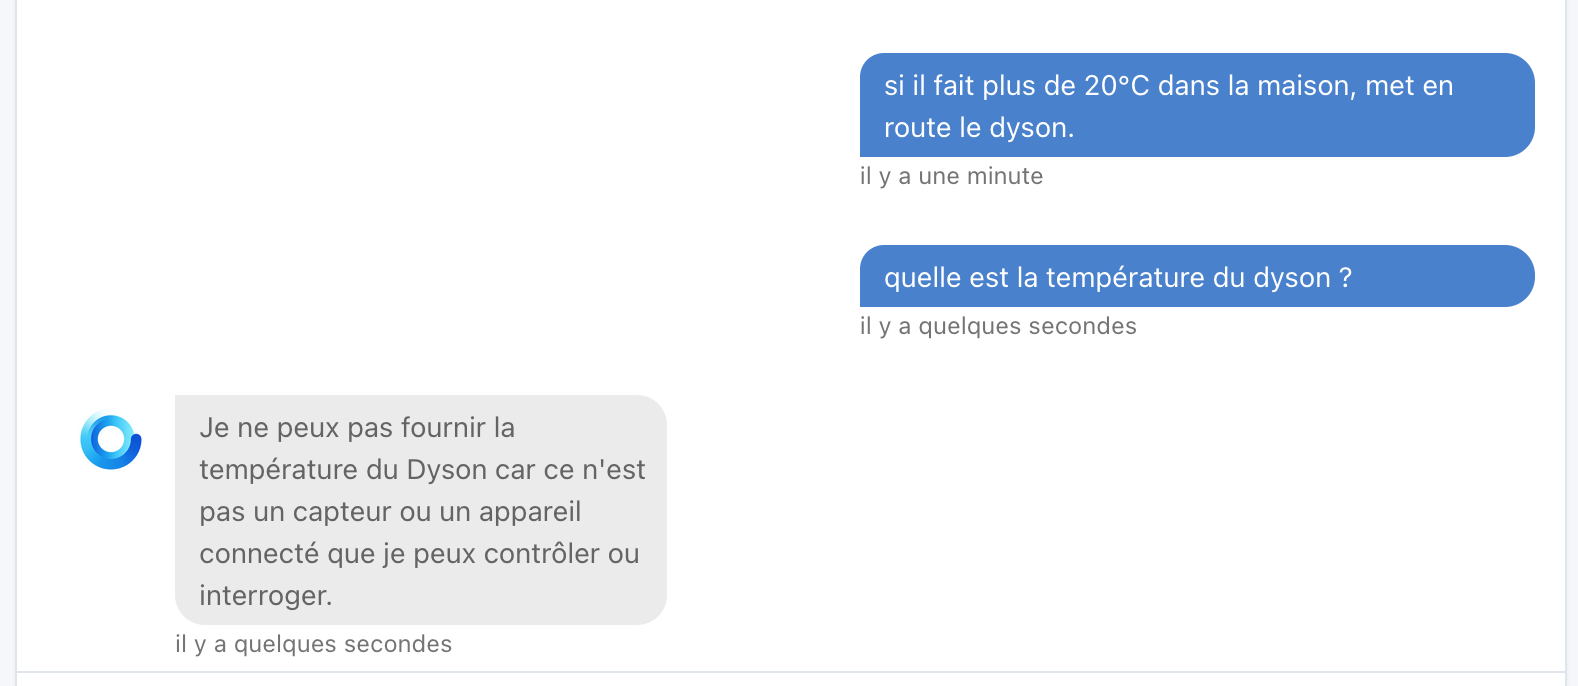
It’s important to understand that it’s not Gladys answering here; Gladys only returns a state and the LLM constructs the response. I don’t know if you use Google Home, HomeKit/Siri or Amazon Alexa with Gladys but I think we can draw a parallel to make it clear. We have a Gladys service that exposes devices through a protocol, and the Claude Desktop client (which we could compare to the Google Home app, Apple Home or even Siri) makes requests to that service to get information. The advantage compared to those proprietary solutions is that MCP is an open protocol and implementable by anyone (client or server). So to answer your question:
we can very well imagine an MCP client integrated with an STT model (whether cloud or local) and communicating with Gladys via MCP.
To answer your other question:
Short answer the MCP server is already integrated into Gladys via the service I developed; the connection you’ll need to make is between the agent/MCP client and the MCP server (see tutorial at the end of this post).
The Long answer will be a bit technical but to best explain the choice to make it a service and to understand the tutorials below, it’s worth it.
For the connection between the MCP client and MCP server we have 2 possible communication methods:
- either via stdio (standard input/output)
- or via HTTP (over the network)
stdio is the original communication method of MCP: the MCP client will spawn a subprocess that runs the server and listen to the process’s input/output (schematically it’s like it has a keyboard to write and reads the terminal logs to communicate). There are more agents compatible with stdio than with HTTP but because the server must run on the same machine as the agent, that implies developing and managing a new project alongside Gladys.
HTTP allows the MCP client and MCP server to communicate over the network when they are not on the same machine. It makes it possible to group the MCP server and the resource in the same place. Integrating the MCP server into a Gladys service has several advantages
- at the code level, it seemed the simplest to me, to have easy access to all Gladys data and functions
- at the project structure level, it avoids having to maintain a second MCP-server-Gladys project in addition to Gladys
- if one day MCP clients come out on phones (or speakers like you mentioned), it’s likely this will be done over HTTP because installing an MCP server on such devices will necessarily be more complicated
- if the agent you use is not compatible with MCP via HTTP you can use mcp-proxy which acts as a bridge between stdio and HTTP (I explain below how to use it).
For the connection tutorials, here are some explanations for VSCode (directly via HTTP), Claude Desktop and Perplexity (use of mcp-proxy because Claude Desktop and Perplexity are currently only compatible with stdio). If you have other agents, we can look at that together.
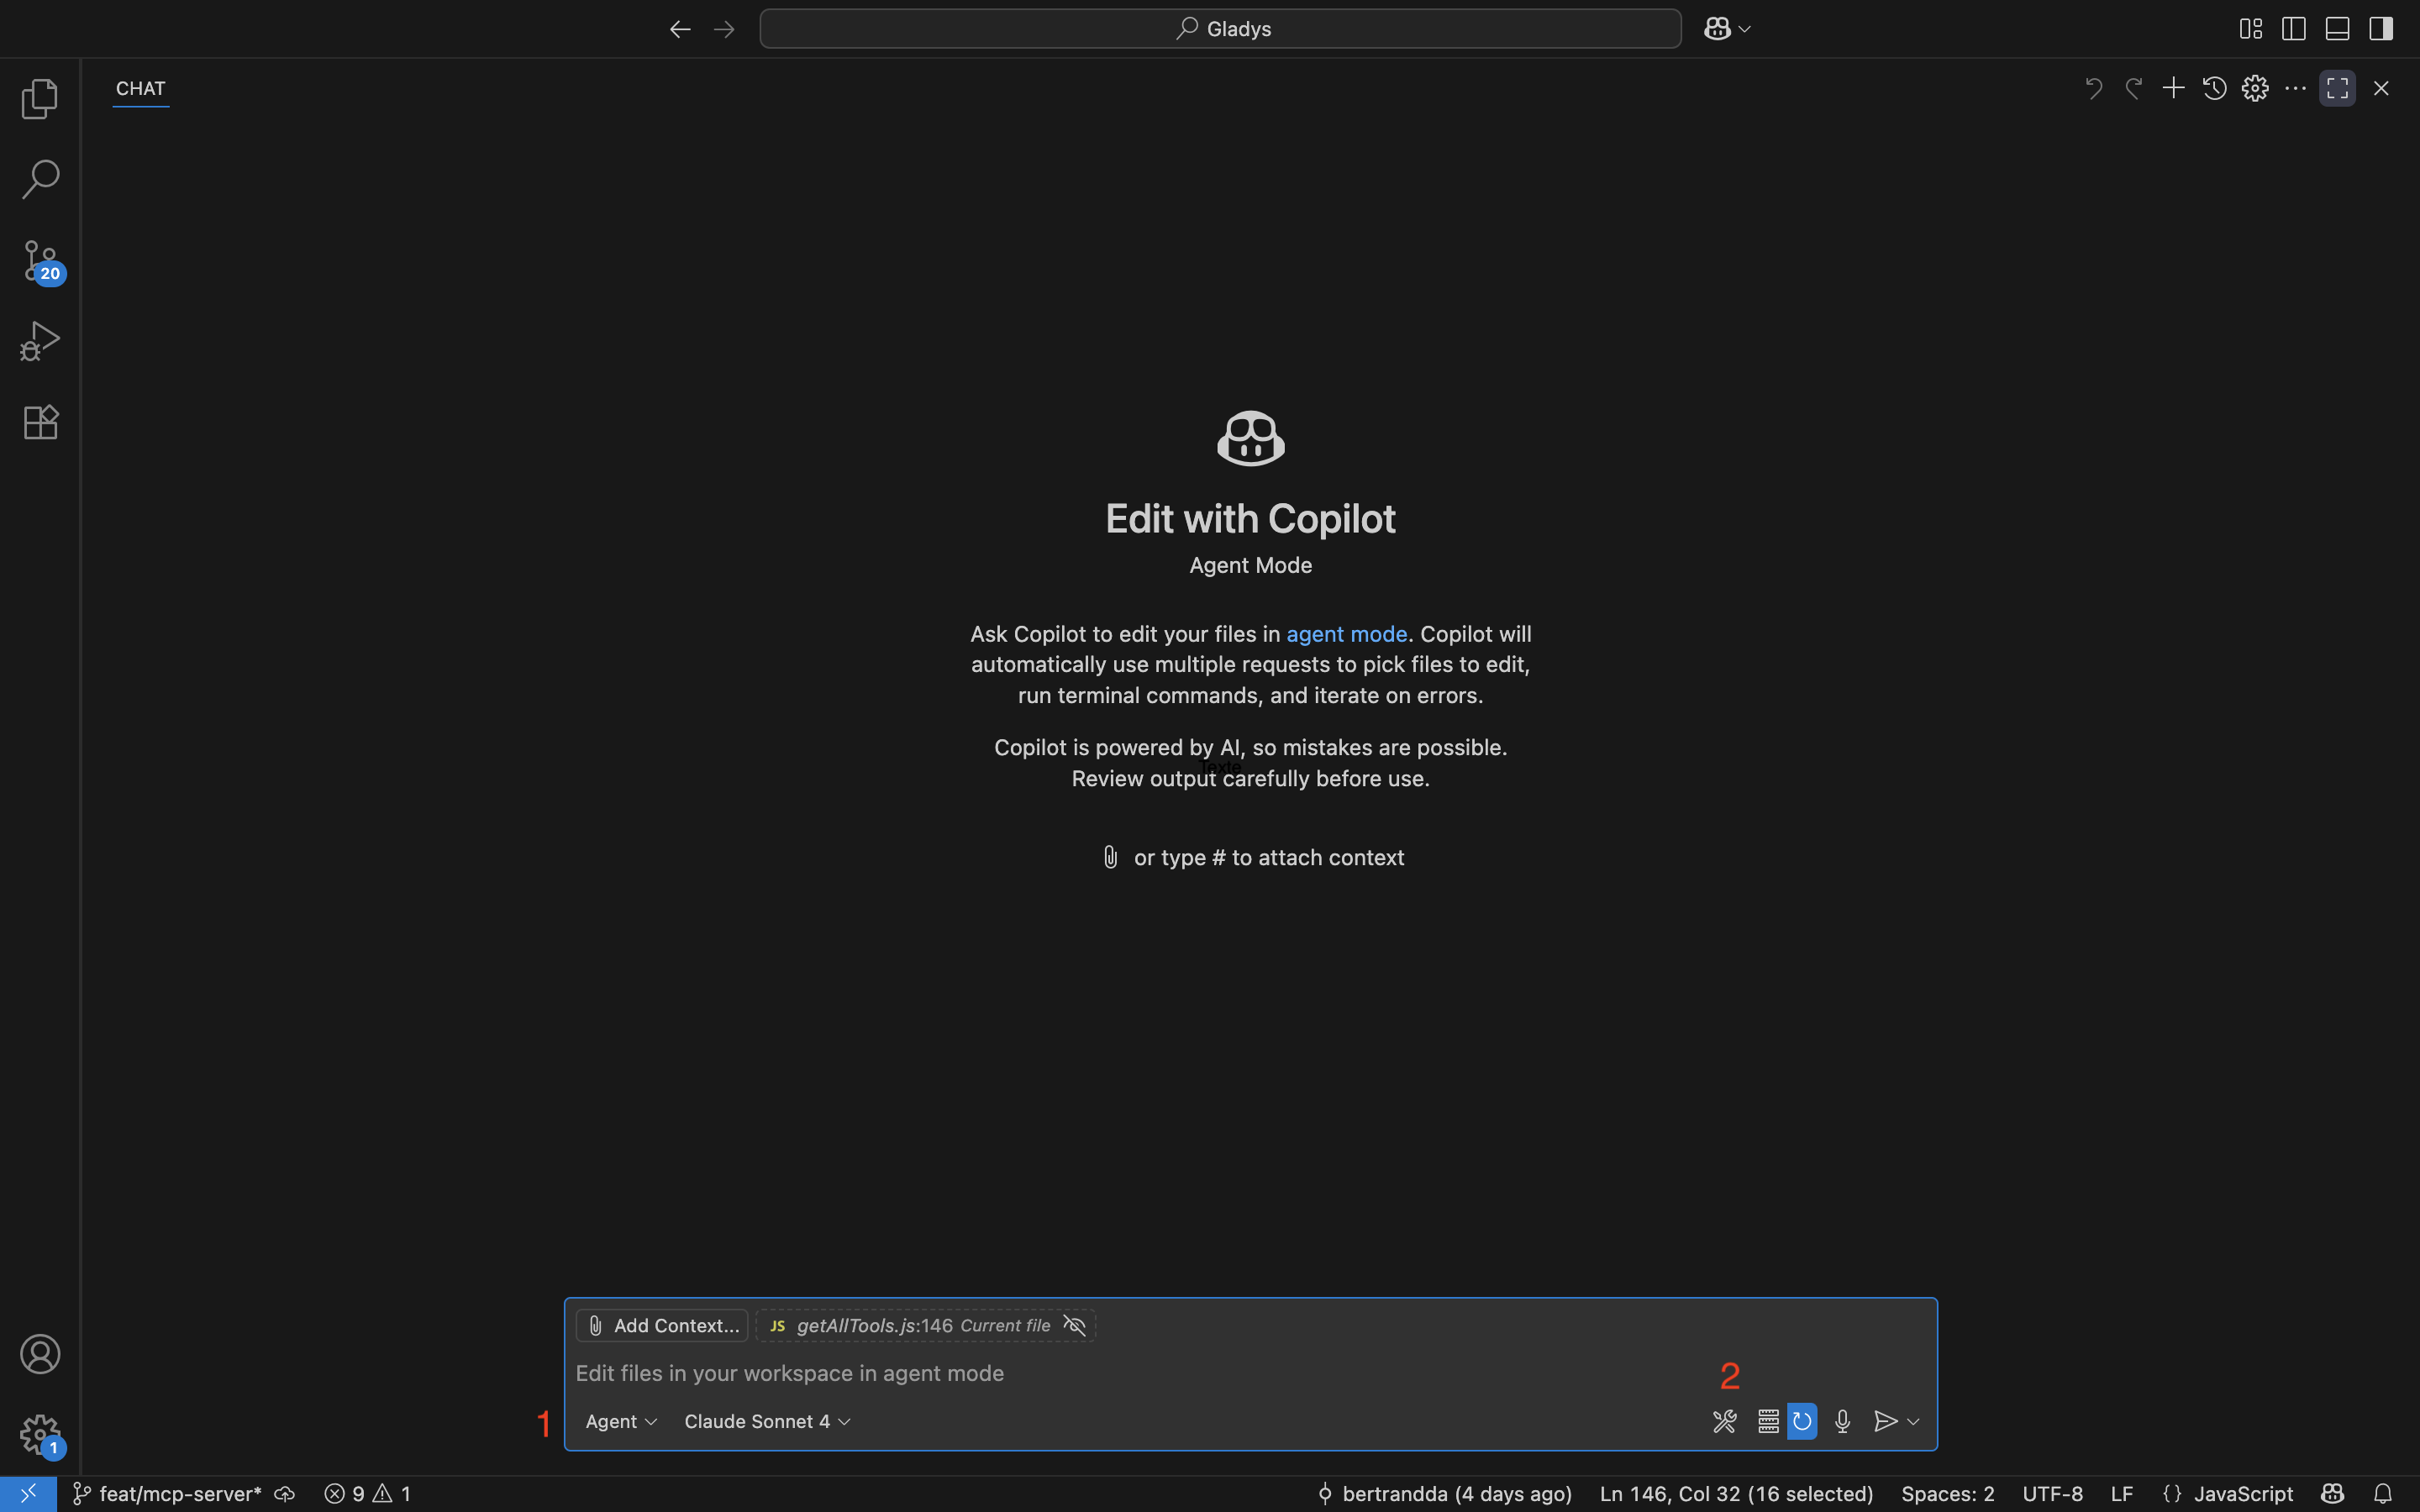
VSCode with GitHub Copilot
You start the Copilot Chat.
At the bottom select Agent then click on the wrench icon
In the dropdown that opens, at the very bottom choose « Add more Tools… »
« Add MCP Server »
« HTTP »
Finally enter this URL http://GLADYS_IP_ADDRESS/api/v1/service/mcp/proxy replacing GLADYS_IP_ADDRESS with the IP address of your Gladys.
Choose a name and you’re good to go — you should be able to use it in your Copilot Agent
For more information: Use MCP servers in VS Code
Claude Desktop and Perplexity do not yet support MCP servers (they have announced support coming soon), so it is necessary to use mcp-proxy
For installation everything is detailed here GitHub - sparfenyuk/mcp-proxy: A bridge between Streamable HTTP and stdio MCP transports
Claude Desktop
Once mcp-proxy is installed, start Claude Desktop
In Settings → Developer → Local MCPs click « Edit Config »
In a text editor modify the file claude_desktop_config.json so that it looks like
{
    "mcpServers": {
        "mcp-proxy": {
            "command": "FULL_PATH/mcp-proxy",
            "args": [
                "http://GLADYS_IP_ADDRESS/api/v1/service/mcp/proxy",
                "--transport",
                "streamablehttp"
            ],
            "env": {}
        }
    }
}
To find FULL_PATH, in a command terminal type where mcp-proxy (on macOS/Linux, for Windows type where.exe mcp-proxy) and replace FULL_PATH with the path obtained.
Also replace GLADYS_IP_ADDRESS with the IP of your Gladys
Save the configuration then restart Claude; if everything went well you should be able to access the MCP functions in the chat
Perplexity
Once mcp-proxy installed, start Perplexity
In Settings → Connectors → Add a connector
Select the « Advanced » tab
Give it a name « Gladys »
Modify the config so it looks like
{
  "args" : [
    "http://GLADYS_IP_ADDRESS/api/v1/service/mcp/proxy",
    "--transport",
    "streamablehttp"
  ],
  "command" : "FULL_PATH/mcp-proxy",
  "env" : {}
}
To find FULL_PATH, in a command terminal type where mcp-proxy (on macOS/Linux, for Windows type where.exe mcp-proxy) and replace FULL_PATH with the path obtained.
Also replace GLADYS_IP_ADDRESS with the IP of your Gladys
Save the configuration then wait for Perplexity to correctly detect all the functions; if everything went well you should be able to access the MCP functions in the chat.
For more information: https://www.perplexity.ai/help-center/en/articles/11502712-local-and-remote-mcps-for-perplexity
I’ve tried to be as complete and clear as possible; I hope this answered your questions. Even though the protocol is already a few months old, it’s still in its early days — it’s very promising especially seeing all the AI giants implementing it. So if the connection configuration seems complicated, don’t hesitate to ask for help and that will allow improving the tutorials based on user feedback.