Node-Red / Xiaomi

Hello everyone,

With the arrival of Node-Red on Gladys, I was wondering if someone could help me configure my 2 double switches and 1 single switch to manage them via Gladys.

I followed Pierre Gilles’ video to the letter and so far, no issues.

I installed node-red-contrib-xiaomi-smart-devices to connect my Xiaomi devices and I can detect my switches and sensors.

However, I’m stuck on managing my single switch (to start before trying the doubles) to connect it to Gladys.

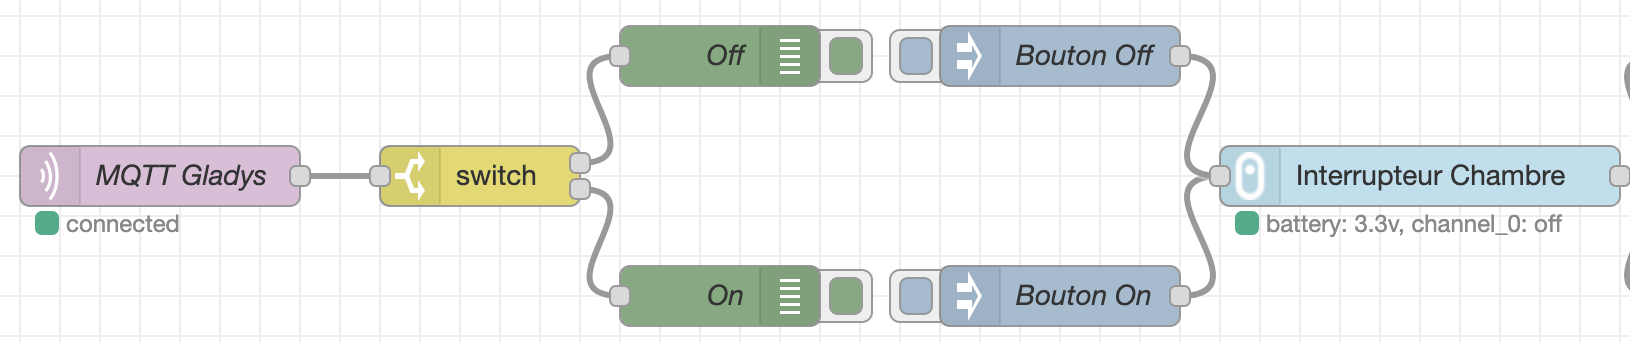
On the Gladys side, I created my MQTT topic and added my switch to the dashboard.

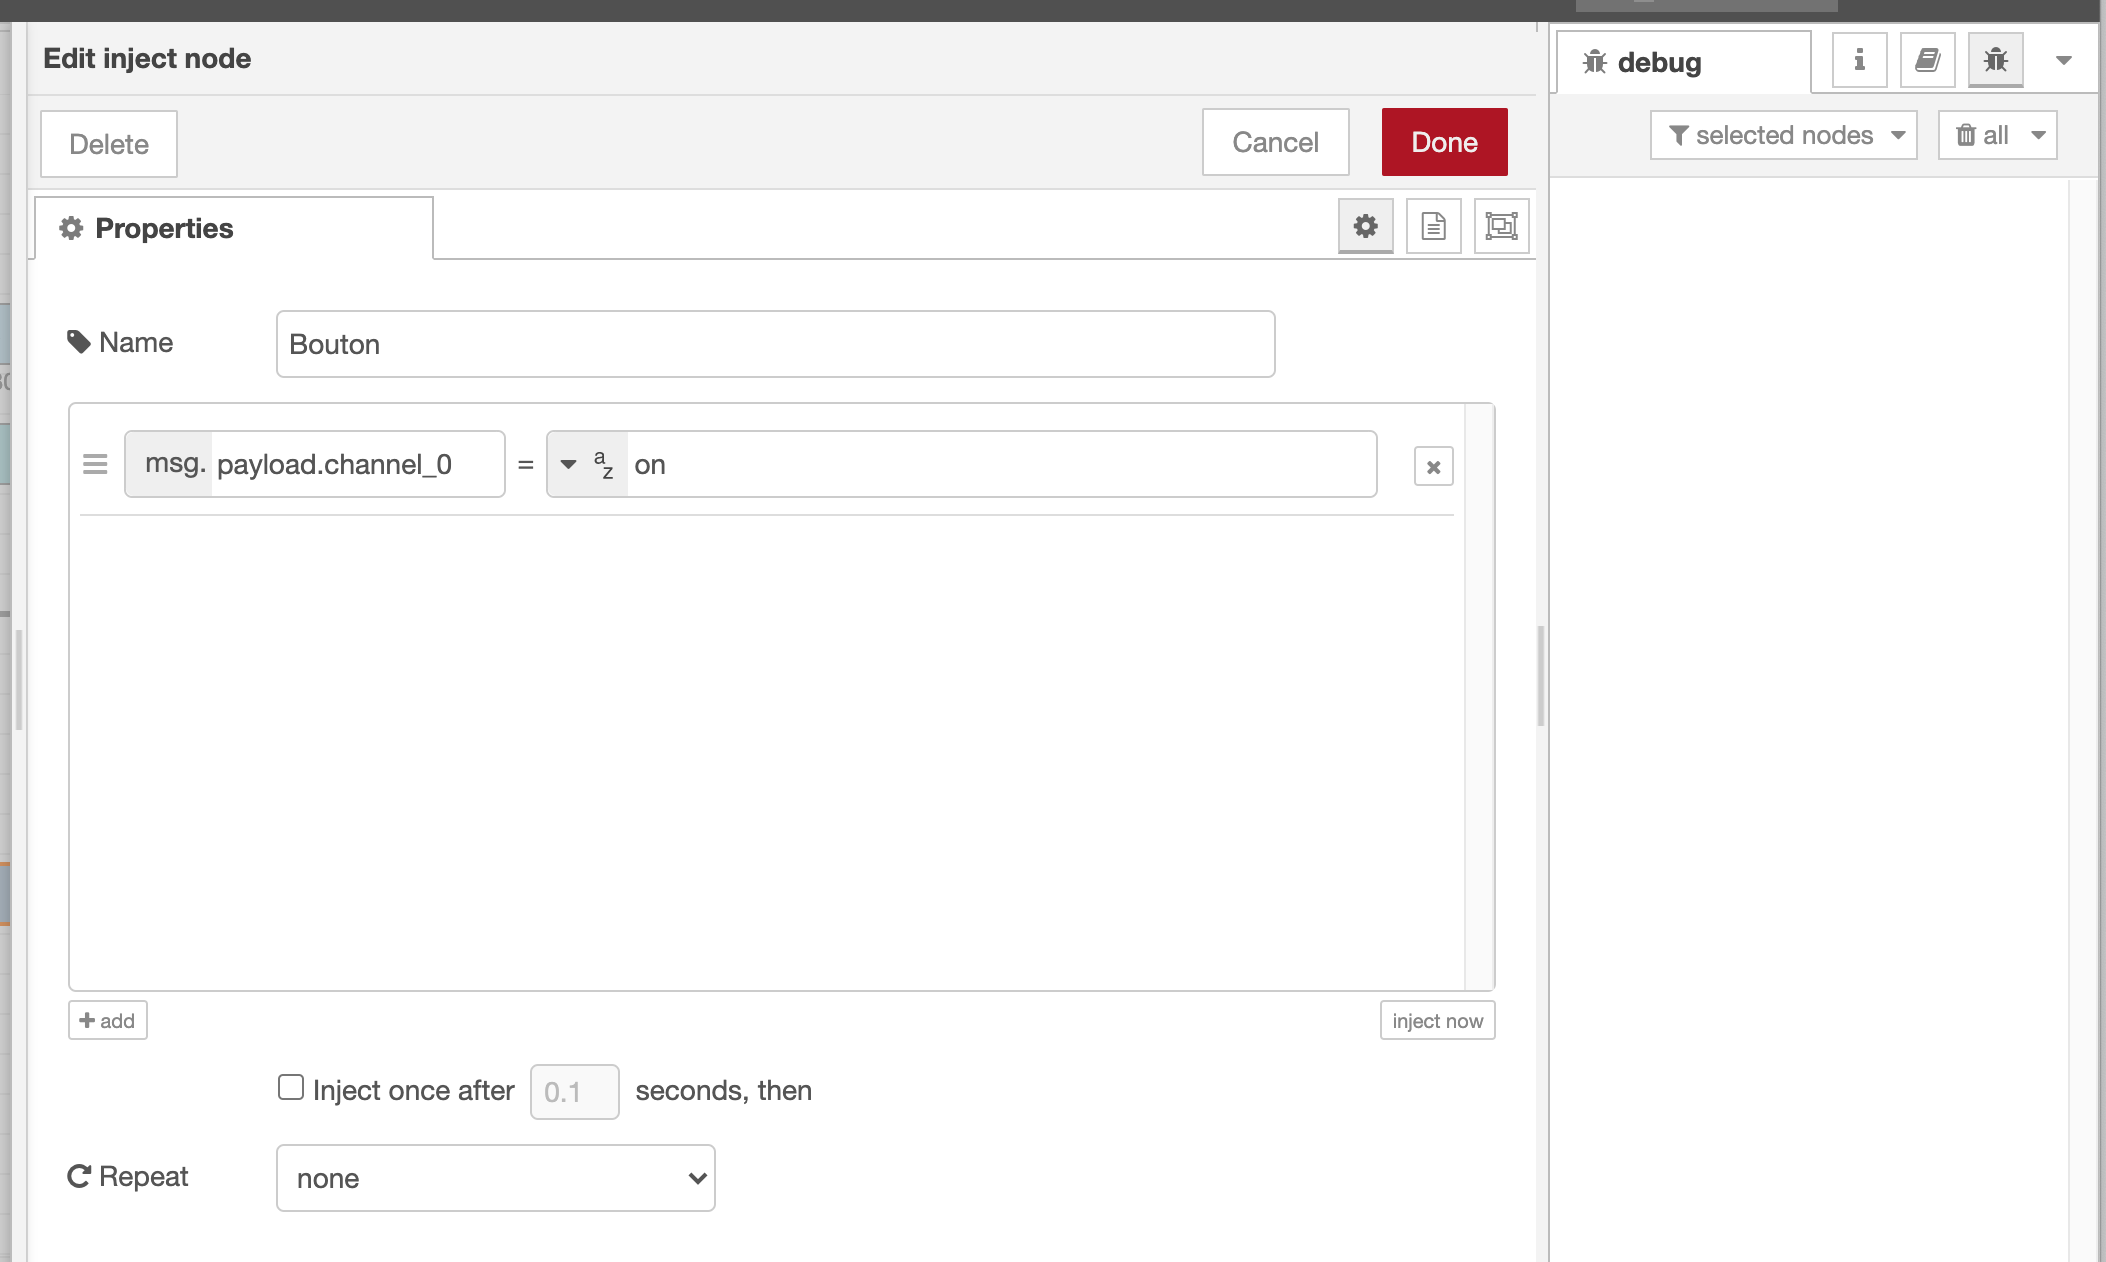
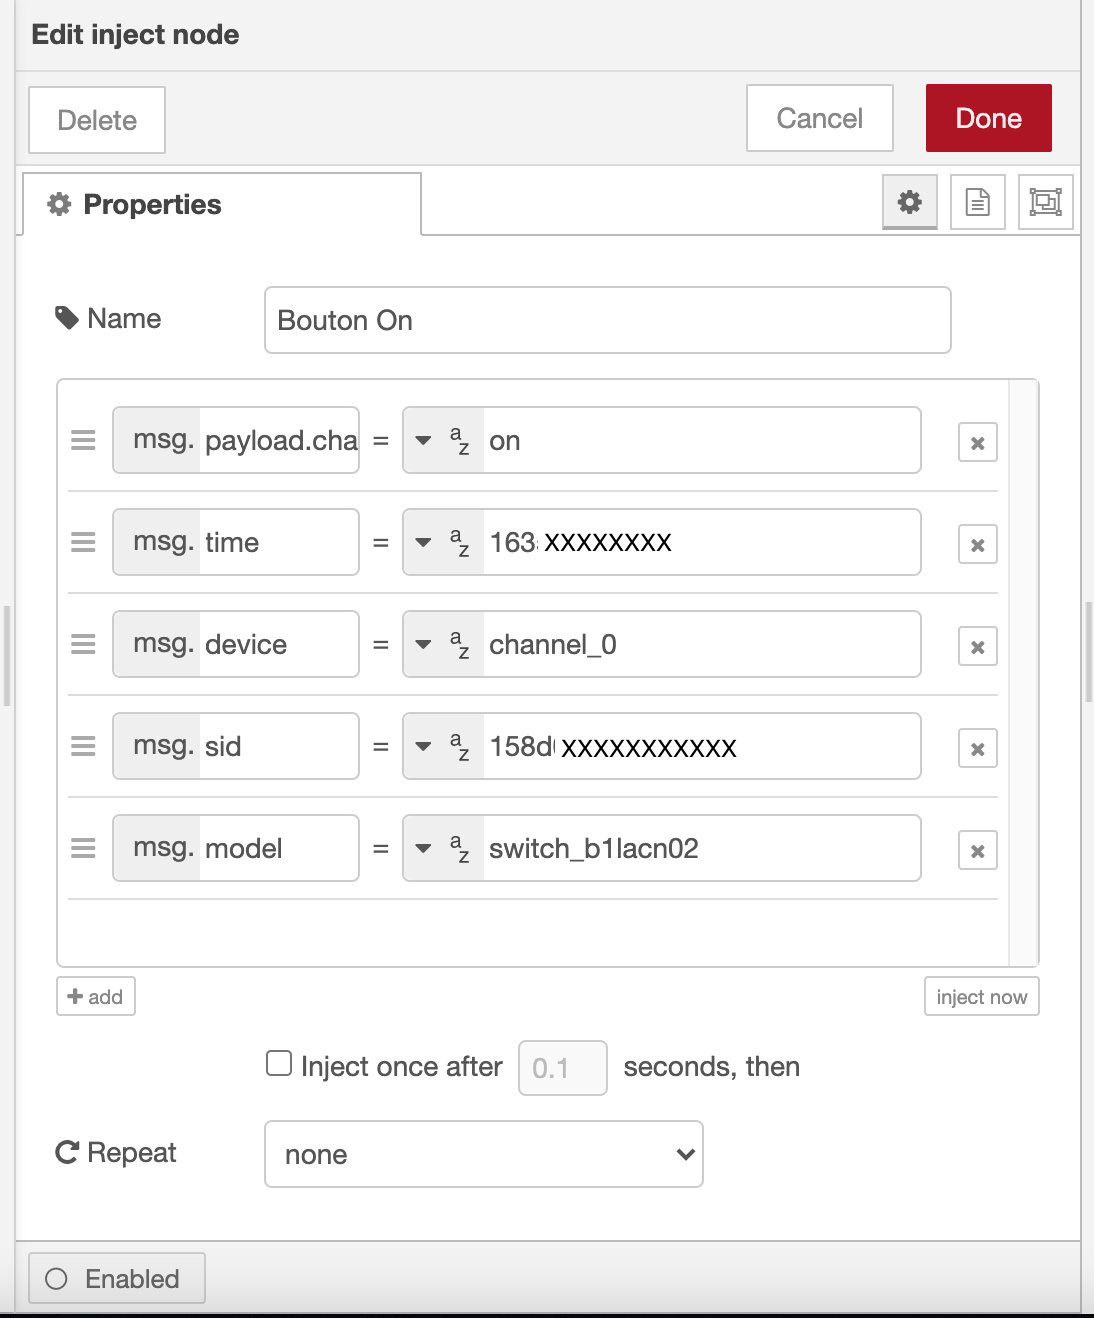
On the Node-red side, MQTT node created and connected, the switch node with the debug on/off also works. My Xiaomi device is also recognized and connected.

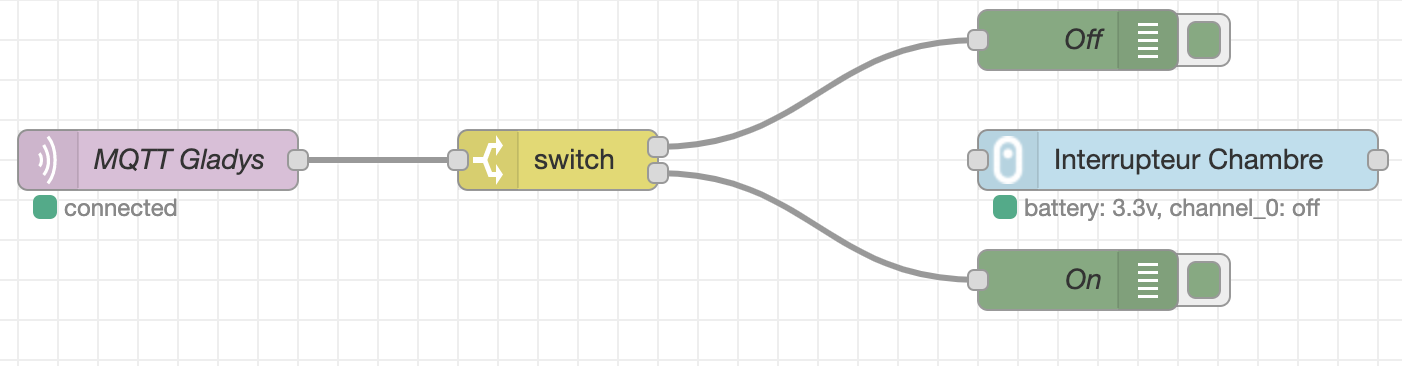
I’m missing the link between the two, with the right function between the switch and the device I think.

A little help :cry: please. I specify that I am far from being an expert and even less Node-red, I am more of a DIYer.

Tell me the screenshots you will need.

Hello @jerome, let’s look at this together! :slight_smile:

Doesn’t it work just to connect the switch with your « bedroom switch » like I do in the video?

Can you turn your switch on/off from Node-RED?

Hello @pierre-gilles

No, I can’t turn the switch on/off either. It’s connected, but when I connect a switch or an injector, there’s no result. Here’s what is specified in Node-RED:

Inputs

payload.channel_0. string

on - if you want to turn on
off - turn off
switch - change state on → off, off → on

payload.channel_1 string

on - if you want to turn on
off - turn off
switch - change state on → off, off → on

Outputs

Passes the complete json object received from the node to the output

Sample message of Wired Single-Button:

{ « fromip »:« 192.168.0.110:4321 », « ip »:« 192.168.0.110 », « port »:4321, « payload »:{ « channel_0 »:« on », « time »:1556987229523, « sid »:« 158d000128f9dd », « model »:« ctrl_ln1 » } }

Sample message of Wireless Double-Buttons:

{ « fromip »:« 192.168.0.110:4321 », « ip »:« 192.168.0.110 », « port »:4321, « payload »:{ « channel_1 »:« click », « time »:1556987769175, « sid »:« 158d000242275f », « model »:« 86sw2 » } }

Do I need to add a function in between? I probably need to specify channel_0 somewhere?

Thanks for your help because I’ve been looking for tutorials or information on the internet and I haven’t found much about node-red-contrib-xiaomi-smart-devices.

You need to use an « Inject » node

You can inject data into the payload:

Then you connect your « inject » node to your xiaomi node

You can test if it works by clicking the button on the « inject » node :slight_smile:

I tried this operation but nothing happens. In debug mode, I get this message:

msg : string[62]
« Error: Invalid property expression: unexpected at position 8 »

Can you send me a screenshot of your inject node + a JSON export if possible?

The error I found is because I tested with the space after payload. channel_0 like your screenshot seemed weird to me.

But I had tested without it before, same no debug return though

Export the json??? Is that what’s missing between the two?

Oh no, but there is no space after payload., it’s my mistake, I just took a screenshot quickly ^^

You can put your debug right after your inject to see what your payload looks like?

No, I was just asking for an export so I can see what you’re doing. It’s not a big deal, the screenshot is fine too :slight_smile:

Hello @pierre-gilles

Thanks to debugging, I can finally turn the light on and off via my switch

Here is the result:

I will try to control it via Gladys now

Great! Keep us updated, and if you can, when you get there, make a small tutorial in the « Tutorials » category of the forum, that will help other people!

I’m a bit stuck here.

I can’t figure out how to connect MQTT to the actuator for my Xiaomi switch.

Phase 1: As in the video, OK in debug I receive the value 0 and 1
Phase 2: With the input I can turn the light on or off

However, between the switch and the actuator, what node should I add? I thought about using a function, but since I’m not very familiar with coding, it’s not straightforward.

For me, it should be told that:
msg.payload = msg.payload.channel_0
that 0 = Off and 1 = On
and that the device is the SID: …

Am I on the wrong track or not?

From the switch to the « Off » button, you just need to draw a line with your mouse, all the work is already done :smiley: You’re really just 1 millimeter away from the result haha :slight_smile:

I’ve already tried and it’s not possible with these two outputs. I don’t have an input on the inject.

Oh my bad! I know there’s a node that does the same as the inject but with an input

There is the switch or the button in the dashboard but I can’t set them up.

For me, the switch is useless, you just need to format the payload if necessary for your actuator.

Format the payload? You lost me, sorry :sweat_smile:

If msg.payload = 1 then msg.payload.channel0 = on

What your actuator receives is the payload (which must be in the correct format)

You can perform this transformation with a function block

if (msg.payload === 0) {
msg.payload.channel0 = off
} else {
.....

Something like this?

if (msg.payload === 0) {
var cmd = {
« sid » : « XXXXXXXXXXX »
}
msg.payload.channel0 = off
}
else { (msg.payload === 1)
msg.payload.channel0 = on
}
return msg;

Sinon @jerome @VonOx, the « Change » function might be more suitable if you’re not comfortable with the code :slight_smile: The Core Nodes : Node-RED

In your case, you can place it after your switch, and do a « set » where you set the correct property, I don’t know if that’s clear for you @jerome