Backup of the zigbee2mqtt database

This tutorial will allow us to download, back up, and re-inject the operational files of the zigbee2mqtt integration during a Gladys reinstallation in order to avoid re-pairing all your devices. (personally I have about forty).

Warning this requires quite a few steps.
For now this tutorial is intended for users on a Windows system.

Prerequisites:

  • Have a virtual machine running Linux
  • Know how to connect via SSH to your Gladys instance

Installing a Linux virtual machine:

You need to enable the Windows Subsystem for Linux:

  • Press the Windows key + R then type: optionalfeatures.exe then press Enter
  • Scroll down and check:
    – Windows Subsystem for Linux
    – Windows Hypervisor Platform
    – Virtual Machine Platform

Then click OK.
You will be asked to perform an update; you must do it.

If you have problems you can take a look here.

After rebooting, we will install WSL2.

All that’s left is to download a Linux distribution from the Microsoft Store.
I chose Ubuntu 18.04 LTS.

If you have problems you can take a look here..

Now that you have installed your Linux virtual machine, we will begin the procedure.

  1. Connect via SSH to your Gladys instance:
    ssh [Nom d'utilisateur]@gladys
    Capture d’écran 2022-05-03 110245

  2. Stop the zigbee2mqtt container
    docker stop gladys-z2m-zigbee2mqtt
    Capture d’écran 2022-05-03 110216

  3. Switch to root
    sudo su
    Then:
    /home/[Nom d'utilisateur]
    Capture d’écran 2022-05-03 110350

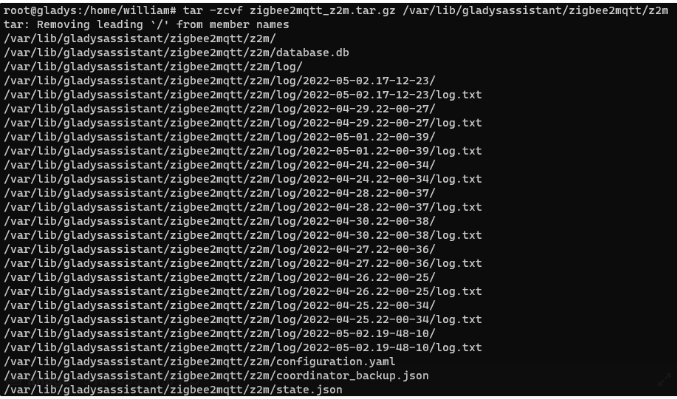
  4. Create a compressed archive of the complete zigbee2mqtt folder in the /home/user folder of the RPi
    tar -zcvf zigbee2mqtt_z2m.tar.gz /var/lib/gladysassistant/zigbee2mqtt/z2m

  5. Exit from root:
    exit

  6. Restart the zigbee2mqtt container:
    docker start gladys-z2m-zigbee2mqtt

Then disconnect from the SSH console.

Now that the archive is created, we will retrieve it directly onto our PC.
For example into the « Downloads » folder
To know the exact path (with capitals); open your file explorer and right-click on the « Downloads » folder, then « Properties » and click on the « Location » tab
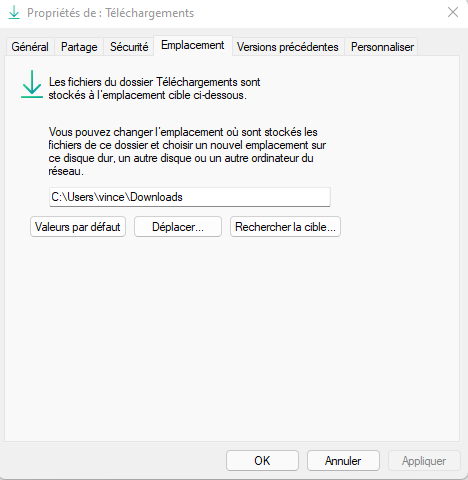

Here is my path:
« C:\Users\vince\Downloads »

  1. Restart your SSH console and navigate to the folder:
    cd /mnt/c/Users/vince/Downloads/
    For William it is like this, with the following result:
    Capture d’écran 2022-05-03 113107

  2. Then enter the command:
    scp [Nom d'utilisateur]@gladys:/home/[Nom d'utilisateur]/zigbee2mqtt_z2m.tar.gz /mnt/c/Users/willi/Downloads/

/home/william/ => replace with the path of the archive created previously on the RPi
/mnt/c/Users/willi/Downloads/ => path where you want to copy your archive
Capture d’écran 2022-05-03 115656

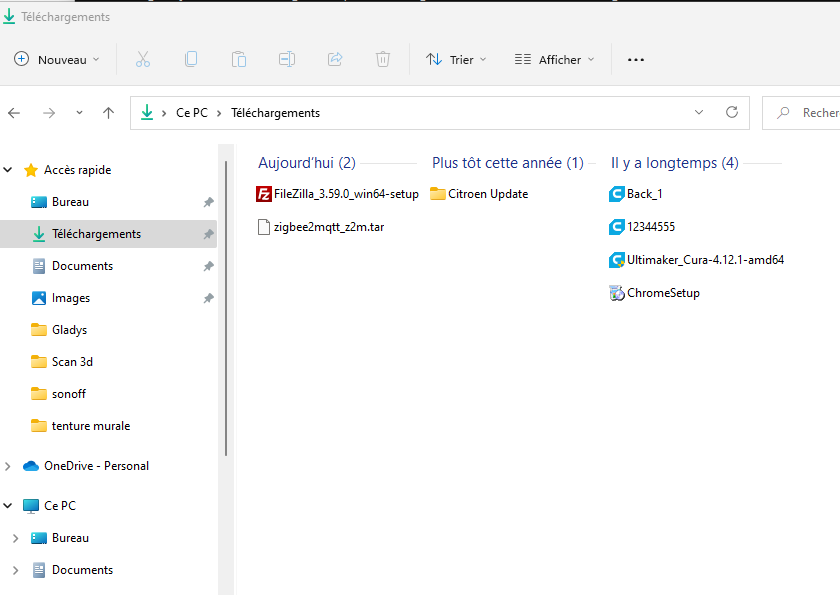
Here is the result in your folder:

Next step, transfer your files to your new Gladys instance.

For my part, I am moving from an SD card to an SSD.
Be careful, you will need to restore the Gladys database. Either with Gladys Plus or if you have backed up your database.

I highly recommend using Gladys Plus for more ease.
See this topic Offre limitée : Gladys Plus à -50% pendant 1 an ! 🤩

On your new instance restore your Gladys database but do not reactivate the zigbee2mqtt integration.

  1. Restart the Windows Ubuntu terminal

  2. First, using the Windows Ubuntu terminal, go to the folder where the zigbee2mqtt archive is stored. In William’s case the « Downloads » folder of his PC.
    image

  3. Enter the command

scp dossier.tar.gz [nomutilisateur]@adresseip:~/

~/ => corresponds to the /home/user folder in Linux

Which gives
image

The folder is copied into the /home/user folder, now all that remains is to decompress it into \var\lib\gladysassistant\zigbee2mqtt\z2m\
To simplify things we will first decompress the archive and copy only the 3 files. No need to copy all the logs.

  1. Reconnect via SSH to your Gladys instance:
    ssh [Nom d'utilisateur]@gladys
    Capture d’écran 2022-05-03 110245

  2. To check if your archive is present:
    ls
    image
    The archive has been successfully copied

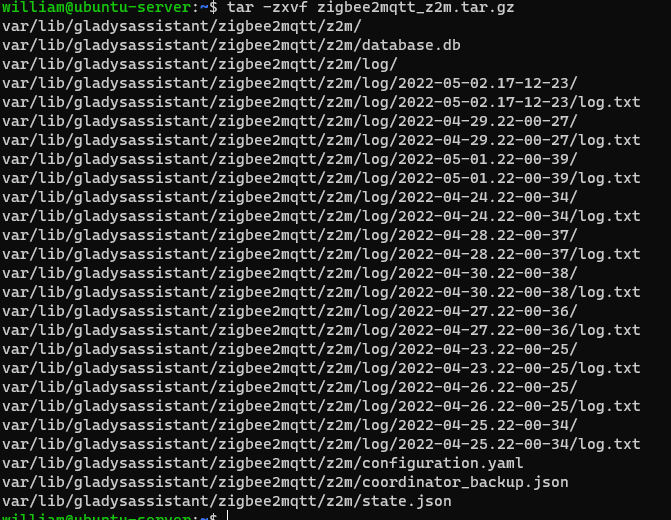
  3. Enter the command to decompress the archive

tar -zxvf zigbee2mqtt_z2m.tar.gz

Now we will just copy the 3 files configuration.yaml, coordinator_backup.json and database.db into the \var\lib\gladysassistant\zigbee2mqtt\z2m\ folder

  1. In the terminal switch to root with the command
sudo su
  1. Create the zigbee2mqtt and z2m directories with the following commands:
mkdir /var/lib/gladysassistant/zigbee2mqtt

mkdir /var/lib/gladysassistant/zigbee2mqtt/z2m
  1. Copy the 3 files with the following commands:
cp var/lib/gladysassistant/zigbee2mqtt/z2m/configuration.yaml /var/lib/gladysassistant/zigbee2mqtt/z2m/

cp var/lib/gladysassistant/zigbee2mqtt/z2m/coordinator_backup.json /var/lib/gladysassistant/zigbee2mqtt/z2m/

cp var/lib/gladysassistant/zigbee2mqtt/z2m/database.db /var/lib/gladysassistant/zigbee2mqtt/z2m/
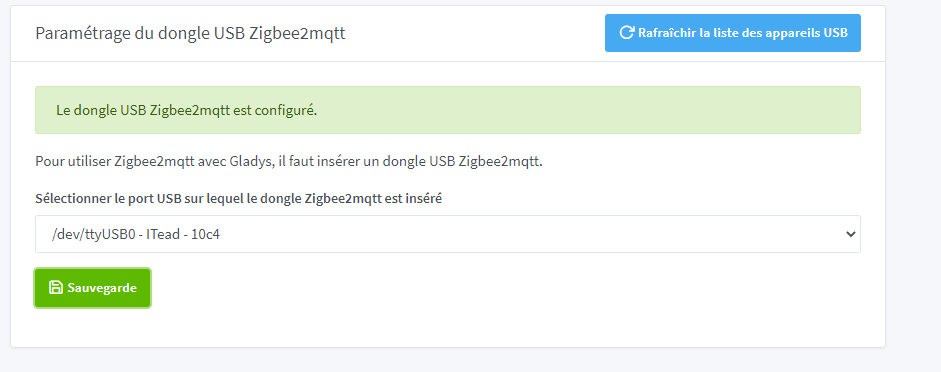
  1. Now plug in your Zigbee dongle and activate the service

This tutorial was written with the help of @_Will_71.
This solution should be adapted if you use a NAS or other, but I am not in a position to tell you what to do.

Don’t hesitate to ask your questions; we’ll try to answer them.

3 Likes

Great, thanks for the tutorial :slight_smile:

I’ll look into automating all that, but @pierre-gilles, wouldn’t it be nice to be able to push that tar.gz directly into Gladys Plus?

I was thinking for example of a Gladys Plus endpoint where we post the file directly via a curl?

We could make a very simple Docker image that tar.gzs and posts directly to a Gladys Plus endpoint — which would then back everything up nicely like you do for the current DB?

We could then restore the tar.gz with that same script if we want to restore?

What do you think?

That’s exactly the intended idea.
Hopefully it will soon be obsolete.

More to come.
Thanks to @_Will_71 for his help.

1 Like

If I have time I’ll do the rest tonight starting from a new Gladys installation.

1 Like

I’m going to use my favorite phrase at work, « it’s not that simple » :smiley: (aha)

I’m in favor of including Zigbee2mqtt in Gladys Plus backups (it’s an old topic!), however it’s not as simple as just making a .tar.gz :slight_smile:

Zigbee2mqtt is a separate, standalone project apart from Gladys, a project that has a different lifecycle than ours, that is regularly updated, that restarts, and that does its thing on its own.

When Gladys Plus makes a backup of Gladys, we don’t just make a .tar.gz of the volume; there’s a whole process to ensure the backup is done correctly and isn’t corrupted.

For Gladys’ DB, we use SQLite, so I use the sqlite3 .backup utility to make a backup that is consistent and non-corrupted. During the backup, we LOCK the DB for writing so the backup doesn’t become infinite (if you write while you back up, it’s cat-and-mouse and it can continue forever).

In Zigbee2mqtt, they use, as far as I can tell, JSON files + a SQLite DB. Gzipping a folder with multiple files while the files are being written is the best way to end up with corrupted and inconsistent files.

Also, nothing guarantees that Zigbee2mqtt will keep these file names in the future. Their project evolves constantly, and they can be quite brutal in their changes. I wouldn’t consider their filesystem to be stable over time.

The solution in my view

What I propose is that rather than trying to build a backup utility for Zigbee2mqtt, do it the other way around: make Gladys able to launch a new Zigbee2mqtt container from scratch, giving it the bare minimum to restore an existing network, without having to re-pair everything.

For that, you need to record 3 things in the DB and be able to recreate a Zigbee2mqtt container with the same parameters:

network_key / channel / pan_id

The original discussion is here:

Yeah, when I say create a tar.gz there could have been a slightly cleaner, more well-thought-out solution — that was without having dug into the topic thoroughly :smiley:

But in this case I didn’t know you could do that so it’s clearly a much better solution. :slight_smile:

And for the record, my solution has nothing to do with Gladys Plus, it’s a solution agnostic to this backup method.

To be developed, everything happens in the Zigbee2mqtt integration, and someone who does their backup manually only has to make a backup of the gladys-production.db file and the integration will be able to get back on its feet.

Now it needs to be developed.

Any PR is welcome :slight_smile:

Yep, the advantage of Gladys Plus, of course

1 Like

That’s what I tell my sales colleagues😀

That said, yes my method works for now and is very dependent on z2m, so if there are changes it will stop working.

What I did is only for testing and if it could help people while waiting for a much better solution.

1 Like

I can’t wait to see what’s next for the restore :

It’s coming, I’ll test it and I’ll add the procedure.

1 Like

Backup on Raspberry Pi, perfect
I’m planning to restore it on the NAS afterwards — I noticed a couple of things in the config to double-check before the restore on my end ^^

I just finished the tutorial for backing up the database of the Zigbee integration on Raspberry Pi.

Your turn if you don’t want to re-pair all your devices.

2 Likes

That’s perfect, it worked very well!

No additional command is needed on the NAS, that’s cool.

Absolutely not — afterwards we can also do it manually by going through DSM and copying the extracted files ^^

Hello, I attempted to save the 3 pieces of information required to restore after a backup on z2m.
I think to test it’s enough to:

  1. Configure a Gladys instance with z2m
  2. Stop Gladys
  3. Delete/stop the z2m docker container
  4. Move/delete the container’s information
  5. Start Gladys
  6. Verify that the file /var/lib/gladysassistant/zigbee2mqtt/z2m/configuration.yaml contains the same « network_key / pan_id / channel » as before
  7. Verify that the devices already registered still respond

Not having a z2m dongle, I developed it blindly.
I recommend testing in a test environment, rather than sacrificing your « prod ».

The image: atrovato/galdys:zigbee2mqtt

Thanks, good luck.

6 Likes

:heart_eyes: that will make a lot of people happy! Thank you very much @AlexTrovato.

If needed, if no one volunteers I’ll run a test on my side, it’s really an important feature.

Do you handle the case of existing instances that don’t have the parameters in the DB right now but that, after an update, will need to save this key?

In theory :

  1. the z2m container does not exist
  • if no information is stored in the DB: create the container with values generated by the image, then read those values to save in the DB
  • if the values are in the DB: create the container with the stored values
  1. if the z2m container exists
  • save to the DB (override if the variables already exist)

The PR is for now only on my personal fork

I also took the opportunity to simplify some heavy parts in the tests, and some logs.

1 Like

Do we know more here?