Hello everyone!
I bought some small Sonoff relays for 4€ via Banggoods (not to name them) to use as a contactor to control a garage door (and a barrier) using Gladys.
There are two versions of the setup: using Tasmota (more complete-complicated) or Ewelink (more simple-basic, basic-simple). There are three main steps in the following process:
- Buy the equipment;
- Assemble the equipment;
- Configure the equipment;
- Integrate the equipment into Gladys;
« Four steps! »
« Well yes. And? »
First step, let’s go shopping!
You will need:
- Sonoff RE5V1C relay (1 per tinkering. Personally, I always order one extra just in case (and you always find a place to use them, since you have them…));
- Soldering equipment (a little. Soldering iron + solder + flux). I recommend the best investment I’ve made in recent months: A wireless soldering iron for 8€ from « Action »;
- Wire long enough to go from the motor to the end of the door’s travel (at least 2.5m);
- A 5V power supply (e.g., a phone charger) and its corresponding plug (USB A in the case of a two-part charger - I cut the wire of an old mouse that didn’t smell too bad);
- One or two switches (buttons) to your liking (at least one if you want Gladys to know if the door is properly closed);
- A programmer (e.g., CH340) to flash Tasmota on the modules (if you plan to go through Tasmota of course);
- A functional Gladys instance (that goes without saying);
- Flowers (cut, as you wish).
Second step, a bit of DIY!
While waiting for all your little packages to arrive (hang in there, it’s coming!), you can already take a little tour in your garage and determine: the location of the Sonoff module (personally, I placed it in the lighting part of the motor), if you are using Tasmota, the location of the contactors (at the end of travel (I fixed them on the rail but you can consider anything) and optionally at the beginning) and your power supply, then measure the necessary lengths for your cables.
The cables:
- [Tasmota] From the closed door contactor to the RE5V1C module;
- [Tasmota] From the open door contactor to the same module;
- From the module to the connection point of the opening switch (often directly in the motor module);
- Your 5V power supply.
Once you have received and unpacked your toys, we can move on to step 2 (3?): Configuration.
But for that, you first need to power the system, so solder the cable you prepared for this purpose. The red wire on the red button (+), the black wire on the black button (GND):
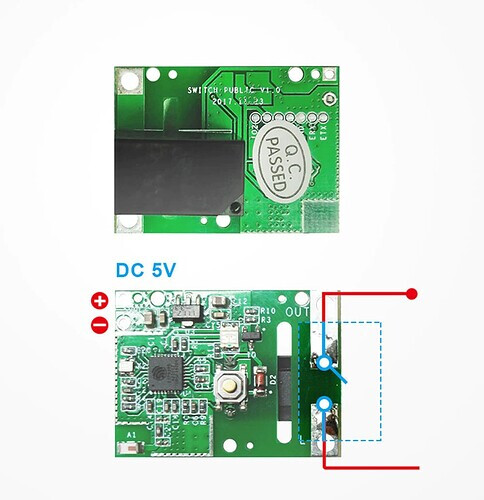
On the other side, near the relay, plan to connect these terminals to your manual door opener (often in the motor box).
If you decide to go through Tasmota, you will also need to solder three wires on the board on the RX, TX, and GND terminals.
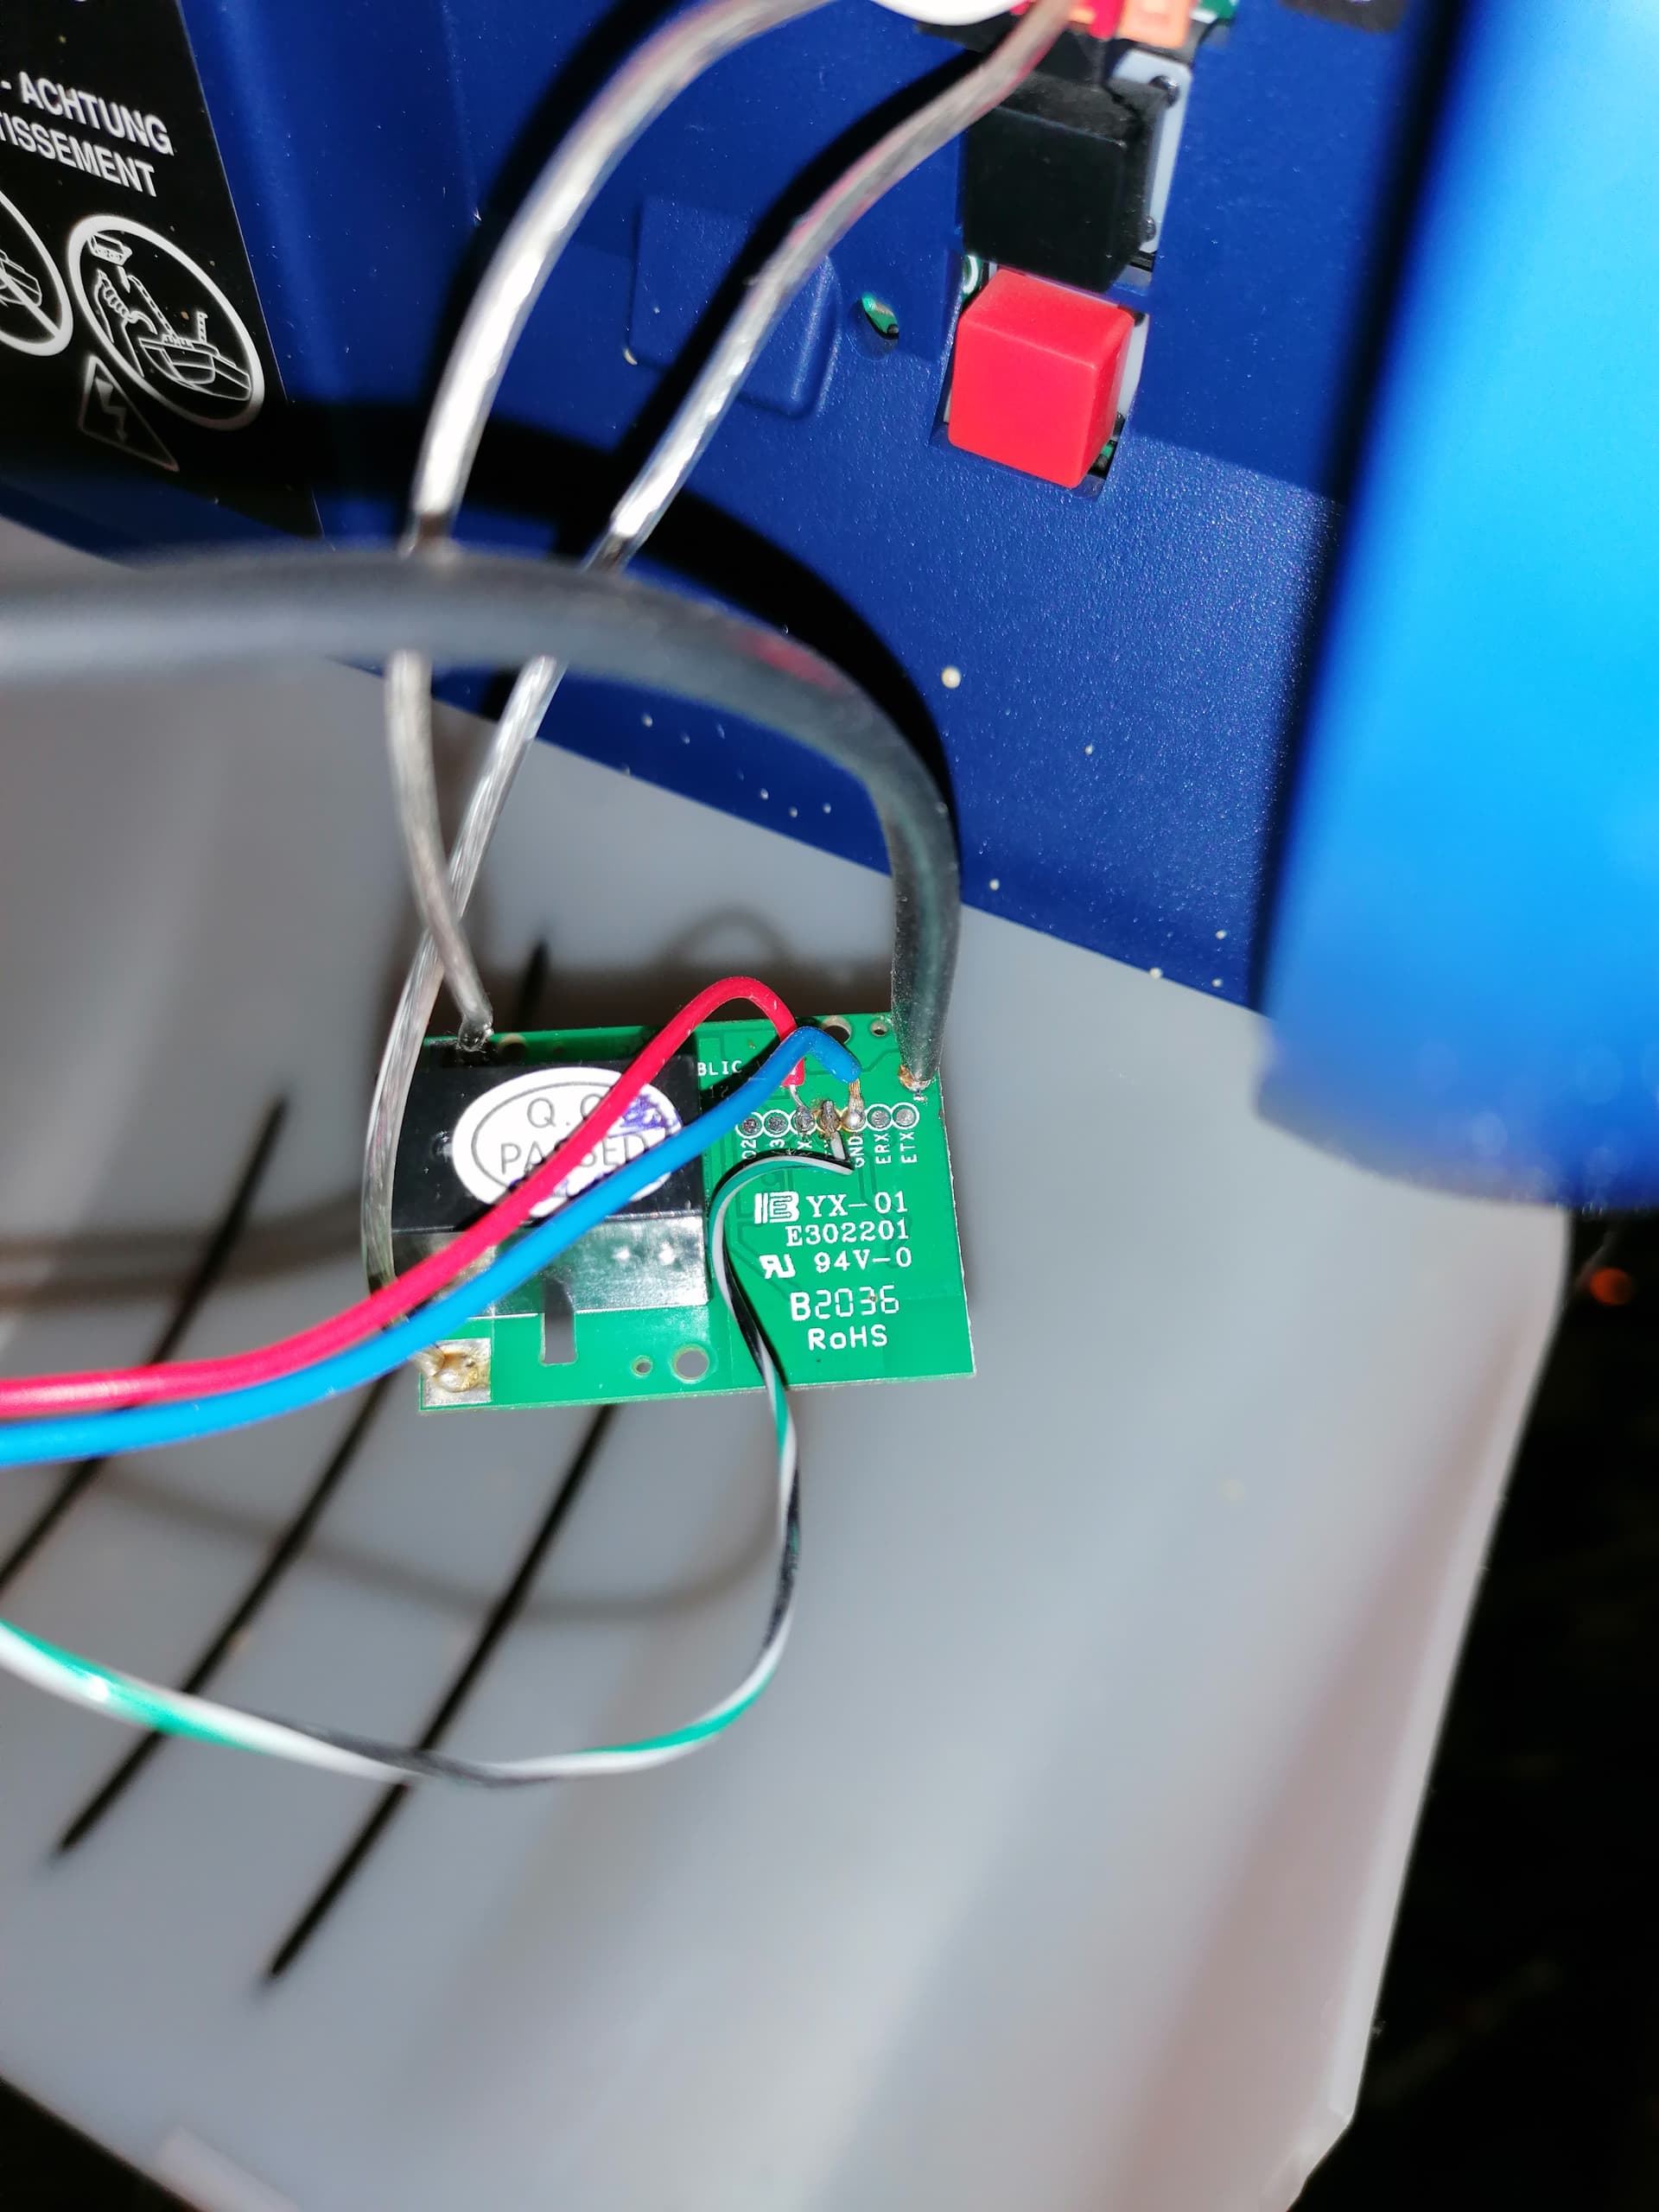
Here is the result at my place:
Then, two solutions are available to you: Tasmota or you don’t have mota?
Tasmota:
Pros:
- Configuration flexibility
- No external server
- Customizable as you wish
- Allows you to know the state of the door (fully open, ajar, or closed)
Cons:
- Requires flashing the RE5V1C module
- Requires more configuration afterward
Ewelink
Pros:
- Already installed on the module, you just need to add it to the application
Cons:
- External server (Chinese) so internet connection required
- DOES NOT ALLOW YOU TO KNOW THE OPENING STATE OF THE DOOR without an independent module!
Ewelink Configuration
You need to add the contactor in the Ewelink application and simply tell it that it is a contactor, not a socket, in the options. Then move on to the next point: Integration into Gladys.
Tasmota Configuration
- I invite you to go back and read this part of the tutorial « [Tutorial] DIY Thermostat and Integration/Programming in Gladys]([Tutoriel] [MAJ] Thermostat "fait maison" et intégration/programmation dans Gladys) » : B. The Sonoff Relay which I provide you with a copy for ease:
Quote
Flashing it: a simple normal Tasmota firmware will do the trick: Tutorial here
Configuring it: Go to the device page, click on « Other Configuration » and paste the following template here:
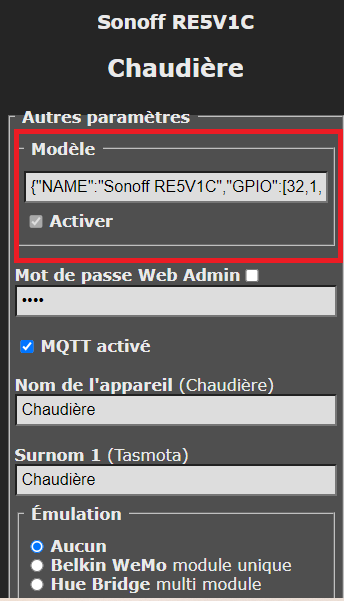
- Template:
{"NAME":"Sonoff RE5V1C","GPIO":[17,255,255,255,255,255,0,0,21,56,0,0,0],"FLAG":0,"BASE":18}
After saving and restarting the relay, go to the « Module Configuration » tab and choose « Sonoff RE5V1C » (then save-restart);
Third step: Integration into Gladys
Either you did everything in Tasmota and you will take a little tour via its dedicated integration, or you use the ewelink integration for the relay.
Basically, do a discovery of a new device and you just have to add the relay as a « switch », everything is automatic!
If you use Ewelink, go straight to the Conclusion part
Fourth step [Tasmota] Additional Configuration:
Connect and configure the actions of the switches/buttons (for Tasmota only!).
To communicate to Gladys the opening state of the door, we will have to configure the Tasmota module. The steps are: create virtual devices in MQTT, retrieve the topics, unlink the switches in Tasmota, and create the rules. Simple, right?
A. Virtual Devices
In the MQTT integration, create a device containing two features like this:
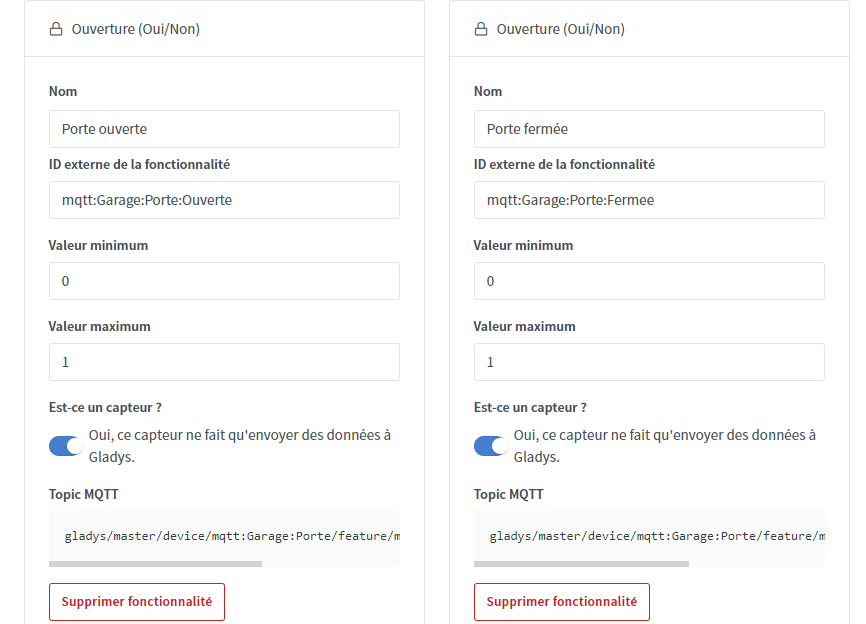
And retrieve the two « MQTT Topics » generated (we will need them for the rules in Tasmota).
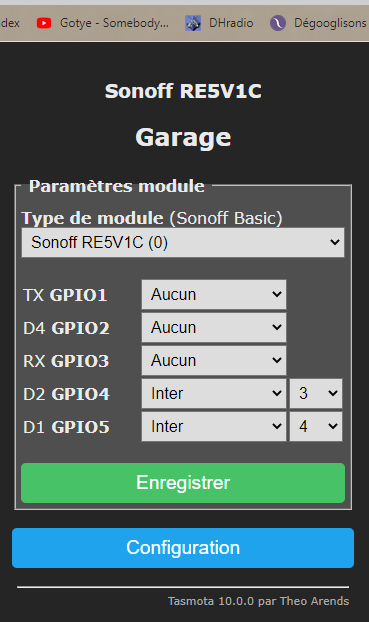
Go to the « module configuration » page, select the module type « Sonoff RE5V1C » and choose « Inter » 3 and 4 then save:
Then go to the Tasmota relay console and type the following commands:
PulseTime 5
SwitchMode3 2
SwitchMode4 2
Then we make the rules which consist of « post the number 1 if the buttons are « ON » and the number 0 if the buttons are OFF on the topics I gave you ». Replace, in the code below, gladys/master/device/mqtt:Garage:Porte/feature/mqtt:Garage:Porte:Fermee/state with the previously copied values.
ON Switch3#State=1 DO Publish gladys/master/device/mqtt:Garage:Porte/feature/mqtt:Garage:Porte:Fermee/state 1 ENDON ON Switch3#State=0 DO Publish gladys/master/device/mqtt:Garage:Porte/feature/mqtt:Garage:Porte:Fermee/state 0 ENDON ON Switch4#State=1 DO Publish gladys/master/device/mqtt:Garage:Porte/feature/mqtt:Garage:Porte:Ouverte/state 1 ENDON ON Switch4#State=0 DO Publish gladys/master/device/mqtt:Garage:Porte/feature/mqtt:Garage:Porte:Ouverte/state 0 ENDON
And then we activate rule 1:
Rule1 1
Conclusion
Bravo! It’s done! Film yourself when you throw the flowers you bought at the beginning, then put them in a vase, no need to waste and it will please Madame (or Monsieur)…
PS: Proofreading and more photos tomorrow ![]()