[UPDATE 20-11-23] Added the use of the « Thermostat » device on the dashboard to manage the set temperature.
Hello everyone!
I suggest you share my thermostat, a boiler management system, entirely made « by hand ».
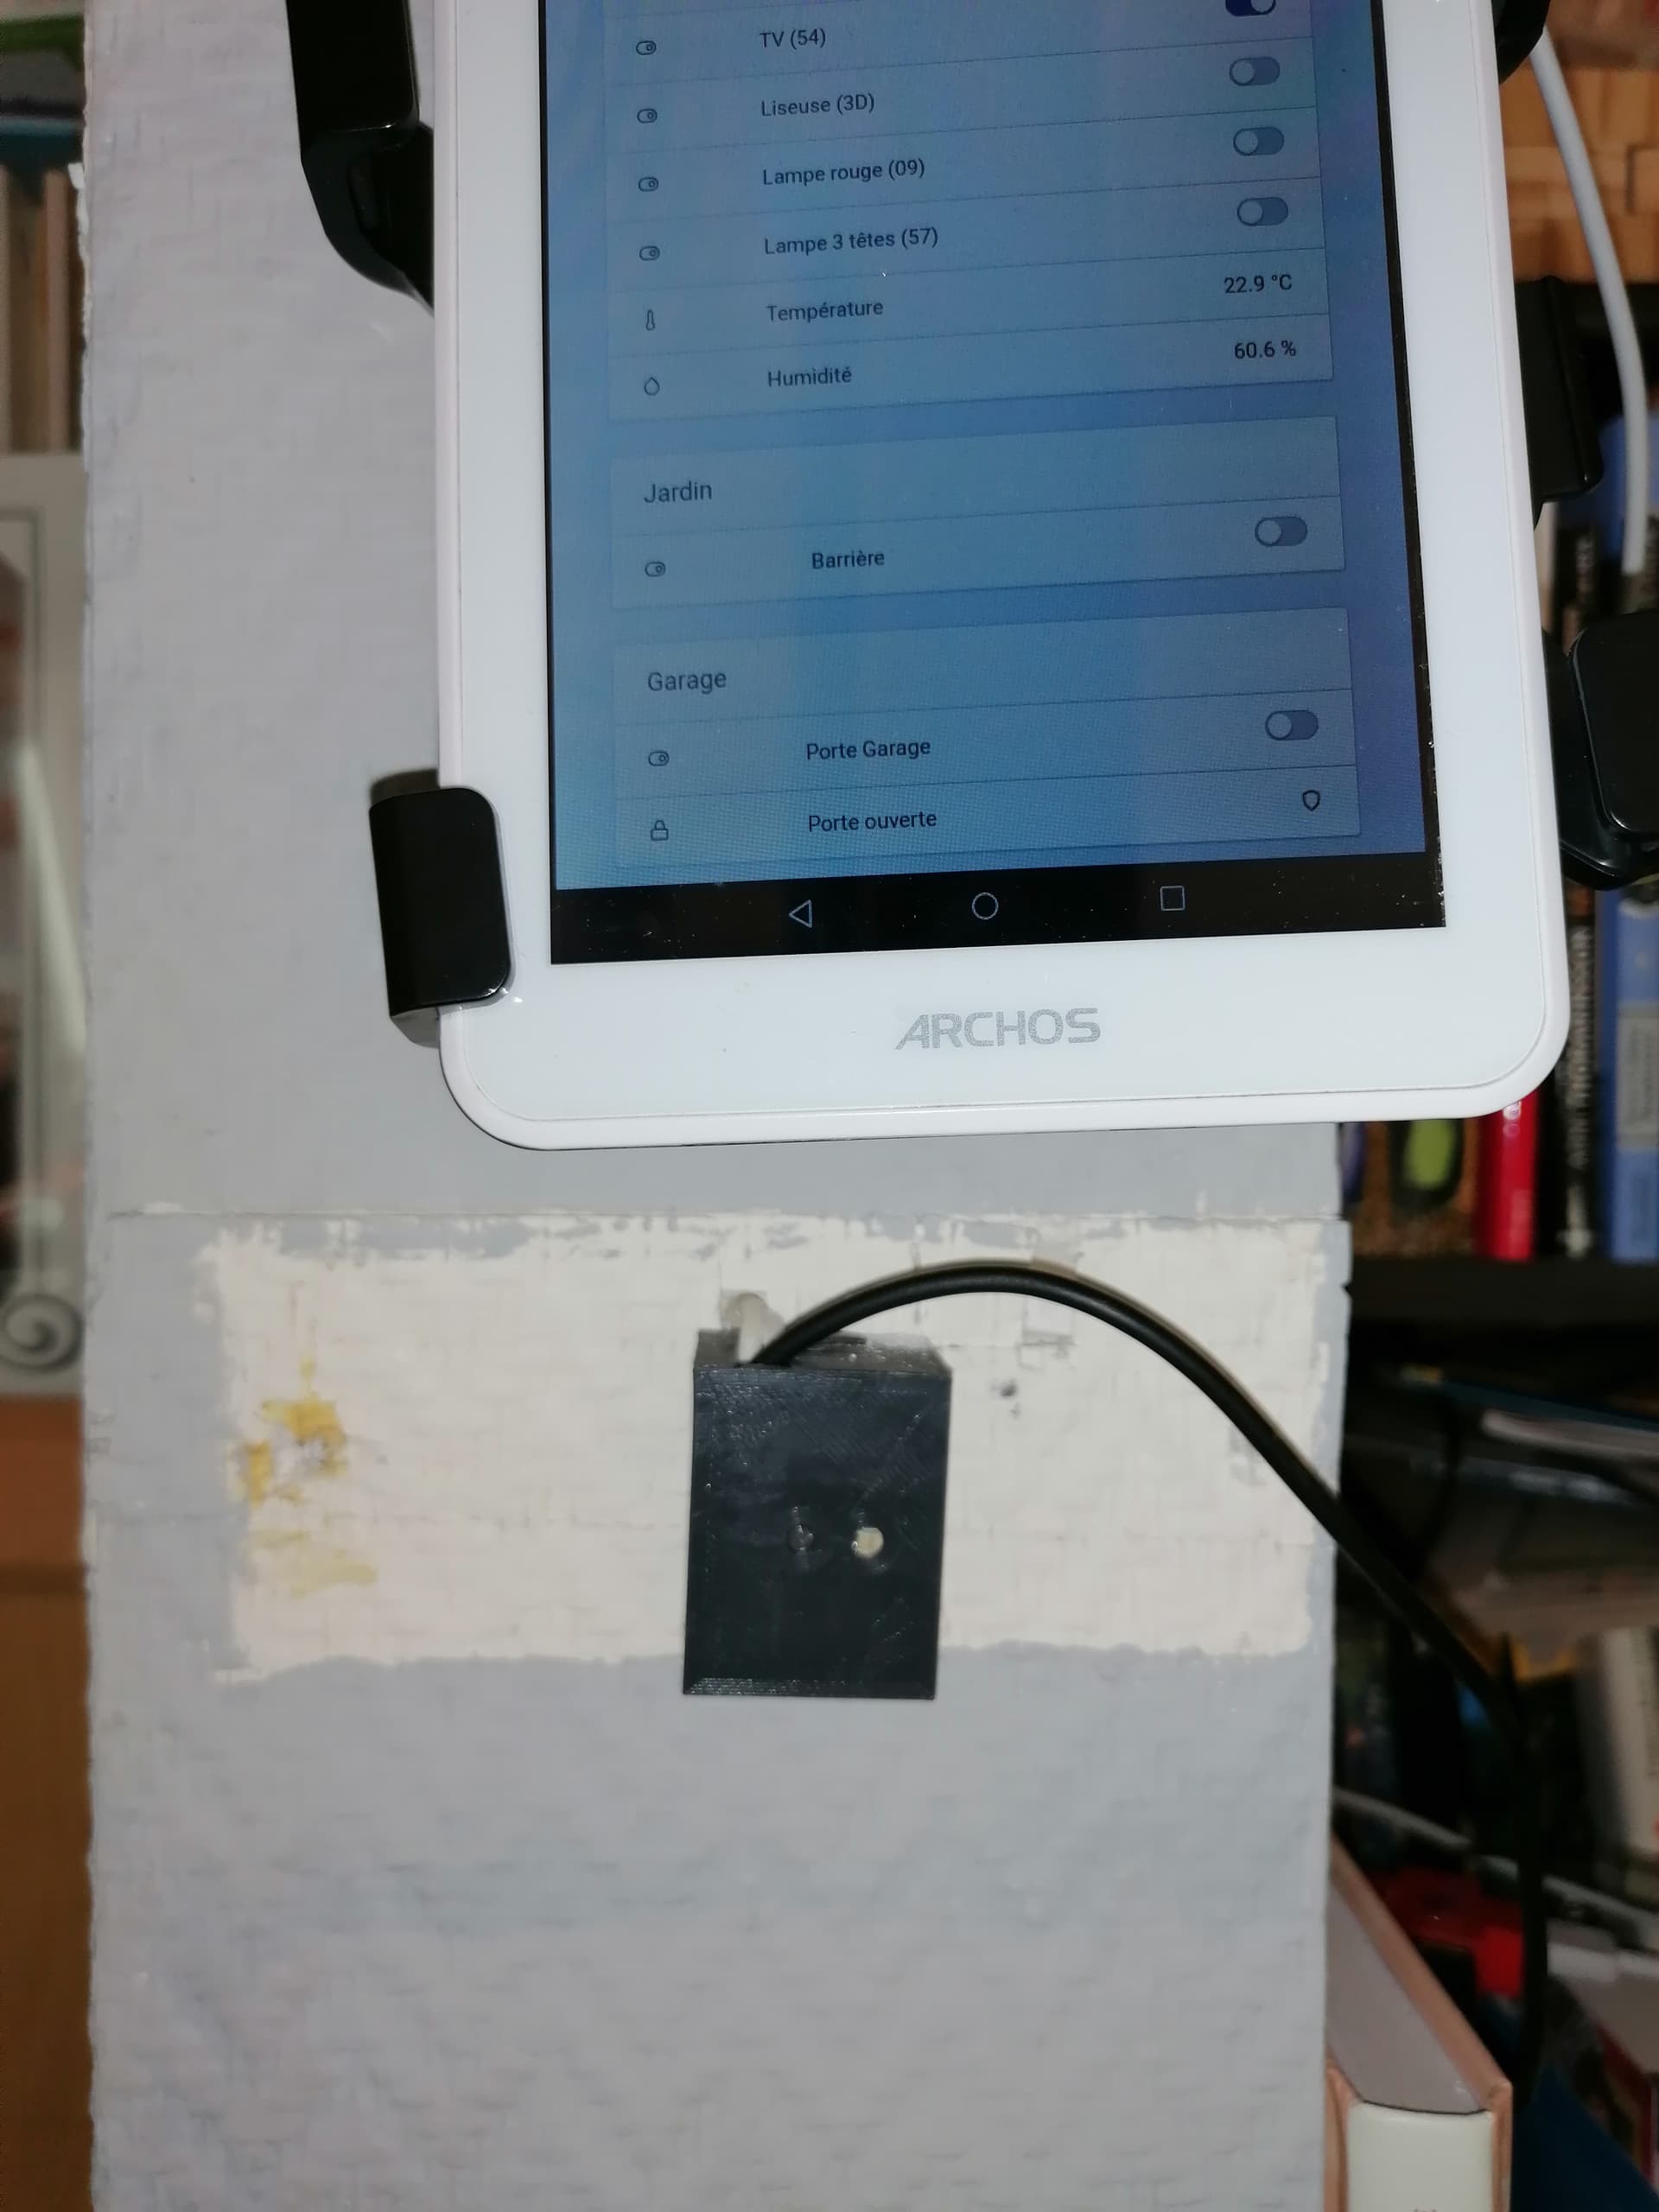
(Yes, I know, it lacks a coat of paint
 but the previous tablet, which broke down, was larger and hid this eyesore!)
First of all, you need to know what a thermostat is and it’s not that complicated to understand…
A thermostat (for a boiler) is a simple « on/off » switch paired with a temperature sensor and sometimes programming management.
- The switch:
I chose a connected relay from Sonoff (+/- €4.30) that I flashed with Tasmota (not mandatory but avoids data leaks to China and keeps everything local). It’s the same one I use to manage the garage and the barrier (I just realized that I never sent the tutorial on this subject, it will come!). You can find them, among others, here; - The temperature sensor:
The choice is wide! Connected probes of all brands or DIY (my choice: DHT11 (€2.50, ESP01S included) and DHT22 (€3.50 bare) )… The goal is to communicate (at least) a room temperature to Gladys;
[EDIT 20-11-23] After two years of using DHTs, I would rather recommend, if you want to do it yourself, using a BME680 which is much more precise and also measures atmospheric pressure! - The programming management unit:
Gladys, the most powerful, intuitive, user-friendly of all systems, of course!
A. Material
You will need the material proposed above but also:
- A soldering iron and its accessories (solder, etc.);
- A 5V power supply (a USB charger lying at the bottom of a drawer) and a corresponding USB cable (the one whose micro-USB side no longer works but you didn’t throw away, you never know)
- A programmer to flash the Sonoff relay (not mandatory) and the ESP-01s (if you took that) with Tasmota. More info on flashing with Tasmota in this post
B. The Sonoff Relay
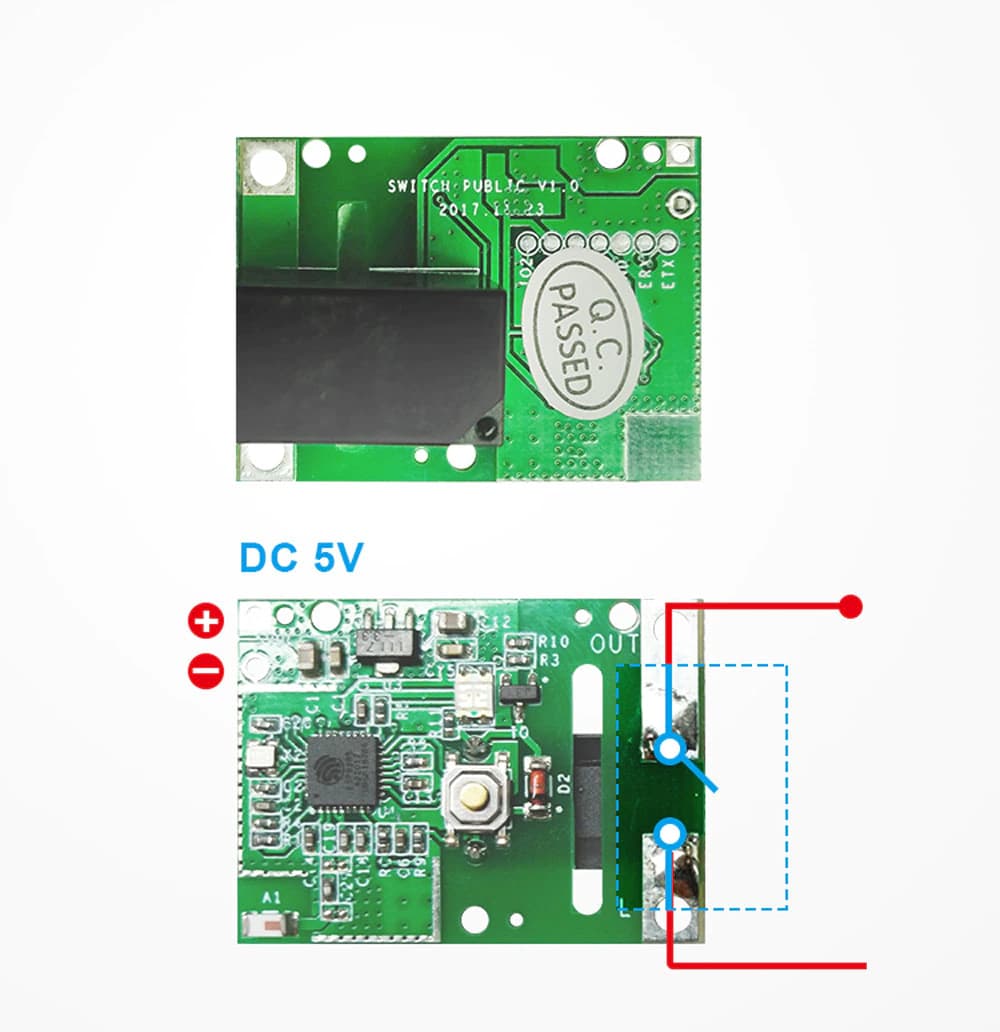
You need to:
- Solder the power supply (side +/-)
- Flash it: a simple standard Tasmota firmware will do the trick: Tutorial here
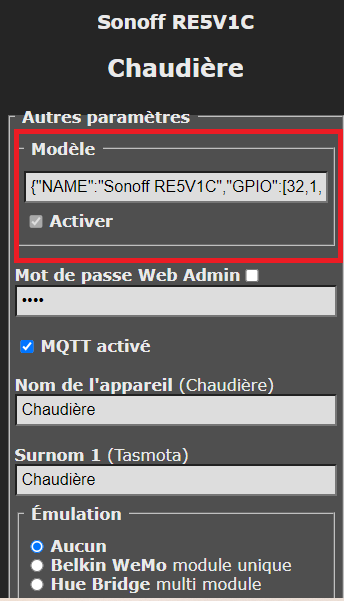
- Configure it: Go to the device page, click on « Other configuration » and paste the following template here:
Template:
{"NAME":"Sonoff RE5V1C","GPIO":[17,255,255,255,255,255,0,0,21,56,0,0,0],"FLAG":0,"BASE":18}
After saving and restarting the relay, go to the « Module Configuration » tab and select « Sonoff RE5V1C » (then save-restart); - Solder the wires coming from the boiler or use connectors and attach them to the relay (on the « OUT » side)
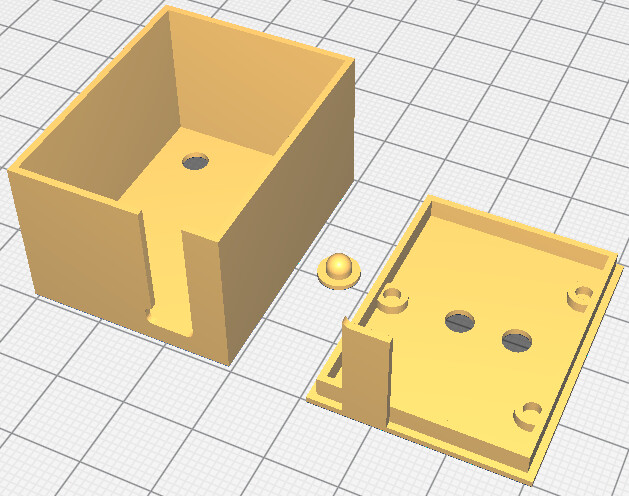
- Secure everything in a small box (if you have a 3D printer, I’m attaching my awesome design!
 )
)
Link to the .stl
The button fits into the thin part in one of the two holes and allows access to the switch integrated in the module. The deeper part is fixed to the wall. The relay goes to the back, printed circuit to the front. I’ll add a photo soon;-)
C. The Temperature
There are many solutions to know the temperature of a room. Personally, I use two DIY types that I mentioned earlier. I really like the « all-in » module with DHT11+ESP01s, flashed with Tasmota (again!) but it is said to be less precise than the DHT22.
The DHT11 module must be powered with 5V and that’s great, we already have a power supply running! We can therefore connect them in parallel or take advantage of this to move the probe if the original thermostat was poorly placed (which was my case). For the DHT22, you need to add an additional ESP module (e.g., an ESP01s but the power supply is complicated or a Wemos D1 mini (more expensive)) or tinker with the RE5V1C module to directly connect the DHT22 - or DHT11 - alone). In the latter case, you need to connect the « data » pin of the DHT to the « ERX » (or « IO2 ») of the RE5V1C module! More info here.
In any case, you need to tell the Tasmota module that a temperature probe is connected (often, it sees it by itself!).
D. Integration into Gladys
Either everything is done in Tasmota and we will take a quick look via its dedicated integration, or we use ewelink for the relay and others depending on your temperature sensors.
In short, you just have to add the temperature and relay peripherals as a « switch », everything is automatic!
E. The Programming
« And this is where the Romans clashed… »
The simplest thing is to say that we want to turn on the heating when it’s too cold in the room and turn it off when it’s hot. But that, a simple mechanical thermostat does very well!
We will therefore work differently. We will create fake devices (fake devices) that will help us in the programming.
The principle
- We will create « peak hours » (where the heating has a « comfort » temperature target of 22°C for the evening, defined by the thermostat on the dashboard)
- And « off-peak hours » where the heating must maintain a 19°C
The programming will aim to change the status of « off-peak hours » to « peak hours », either by time triggers (triggers), presence, season, weather, vacations, etc. or even a combination of all this (beware of neurons…)!
In Gladys
Go to the « Integrations » tab then choose « MQTT » and click on « New + »
Give it an intelligent name, an external ID of type mqtt:House:TimerHC, assign it a room and select « Switch » in the « Add a feature » field.
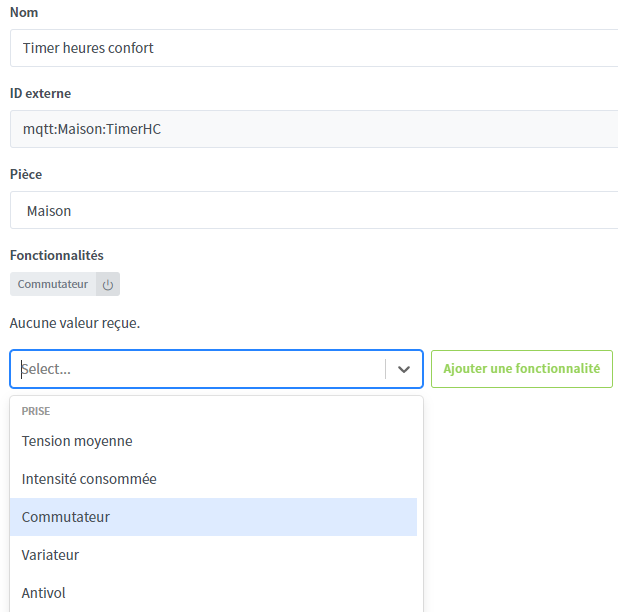
Enter the values as proposed below and « save »:

Also add a Thermostat device that will allow you to choose your heating temperature from the Dashboard.
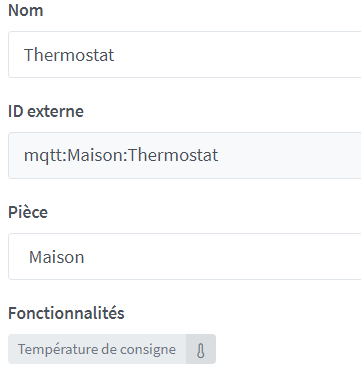
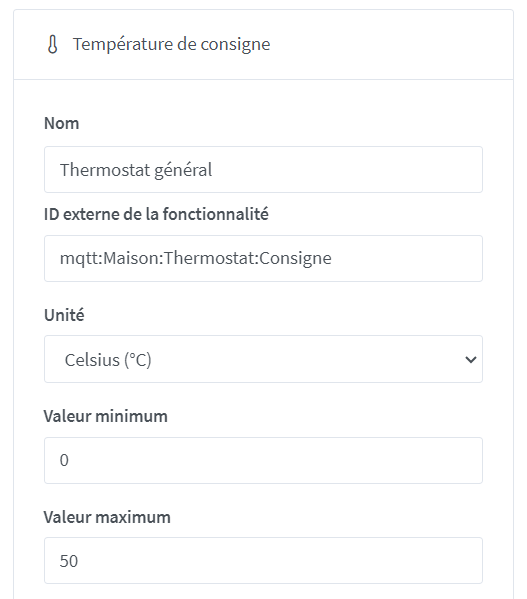
Don’t forget to add this device to your dashboard!

In my installation, I also created Timers for « Vacation » and « Season »
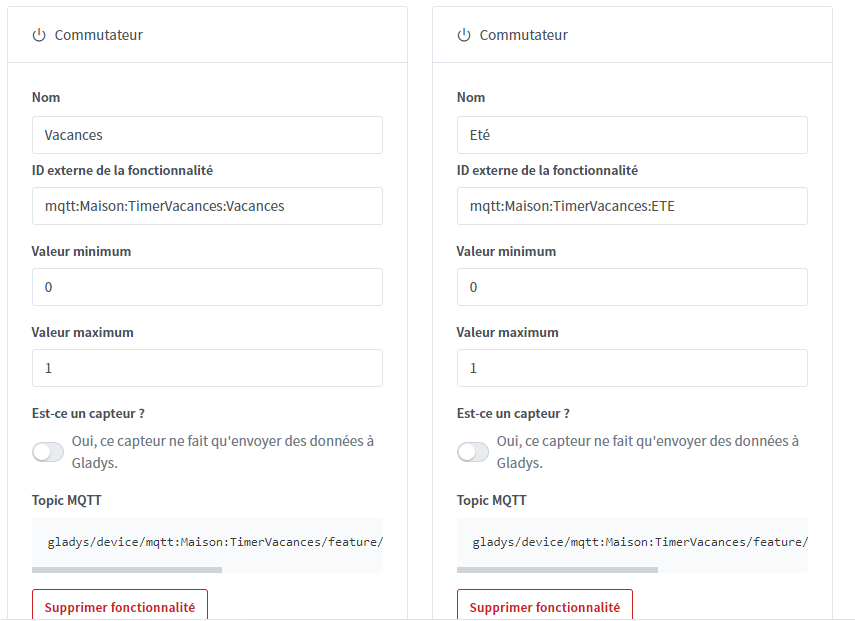
What to do with this? Scenes! Get to work!
I have at least 4 of them (Heating ON, Heating OFF, Heating ON HC, Heating OFF HC):
a) If the temperature is below 21°C (defined on the dashboard) AND we are in comfort hours, we turn on the heating;
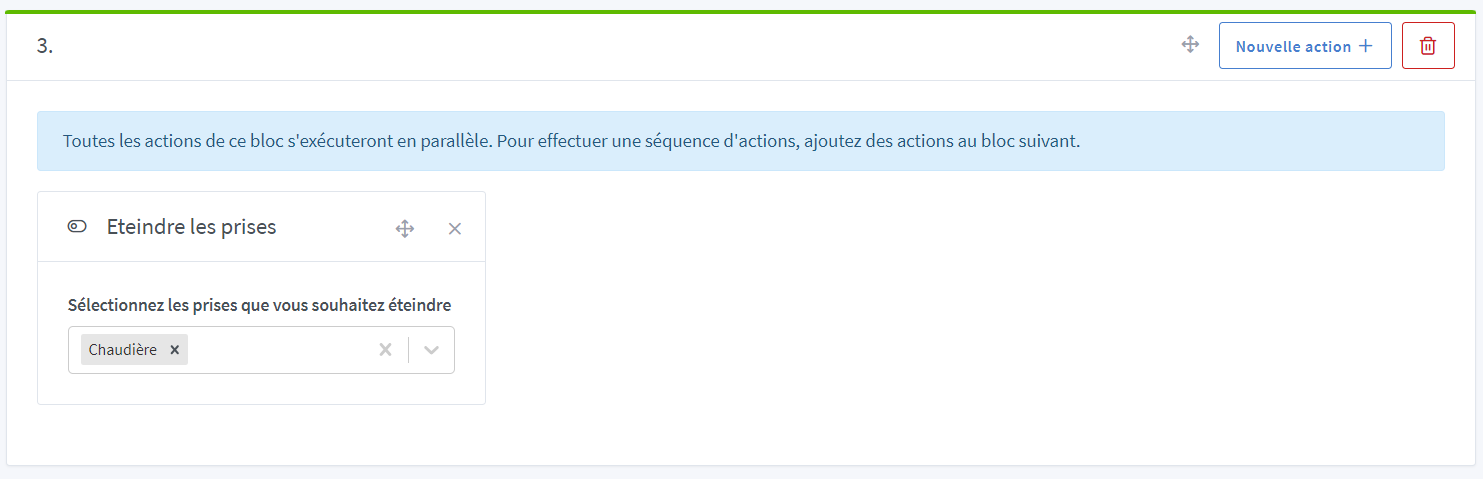
b) If the temperature is above 22°C (defined on the dashboard) OR we switch to off-peak hours, we turn off the heating;
c) If the temperature is below 16.5°C, we turn on the heating;
d) If the temperature is above 17.5°C and we are in off-peak hours, we turn off the heating
Here’s what it looks like:
a)
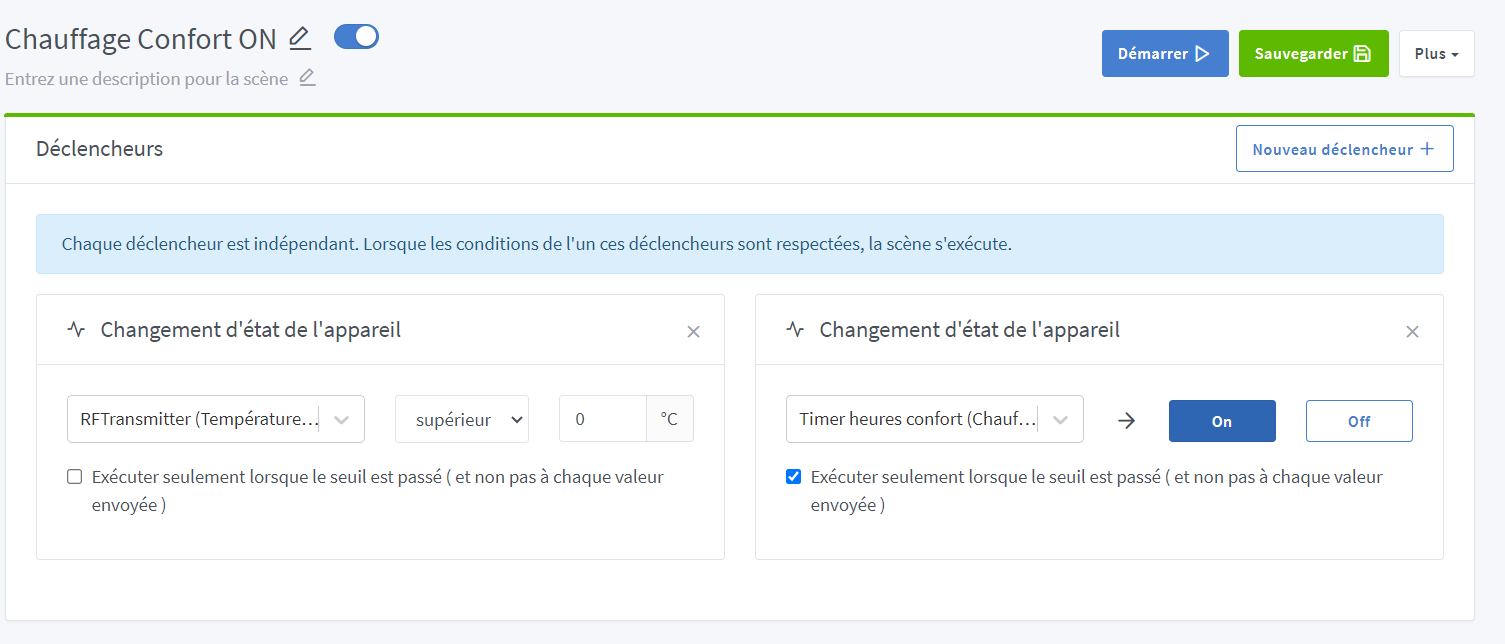
We trigger the scene every 5 minutes or when we switch to heating hours
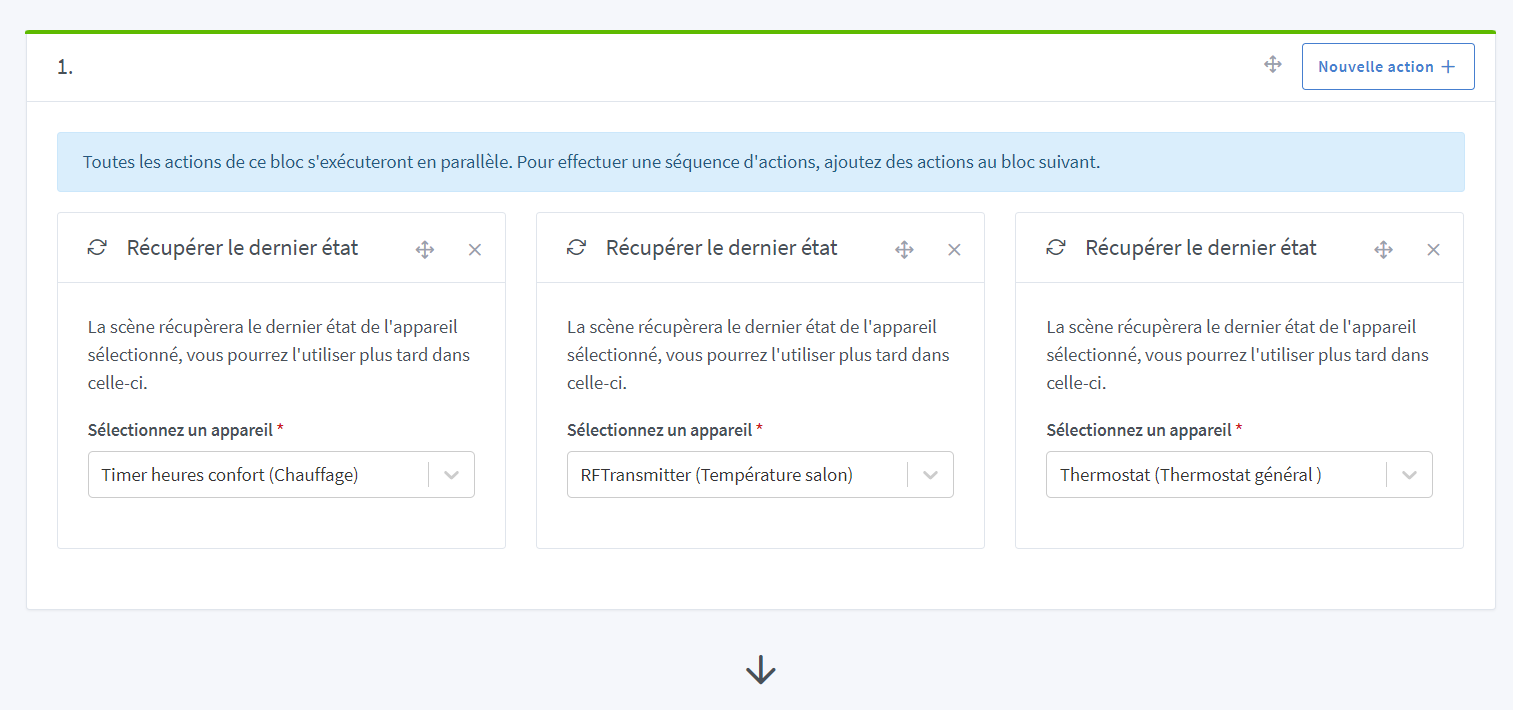
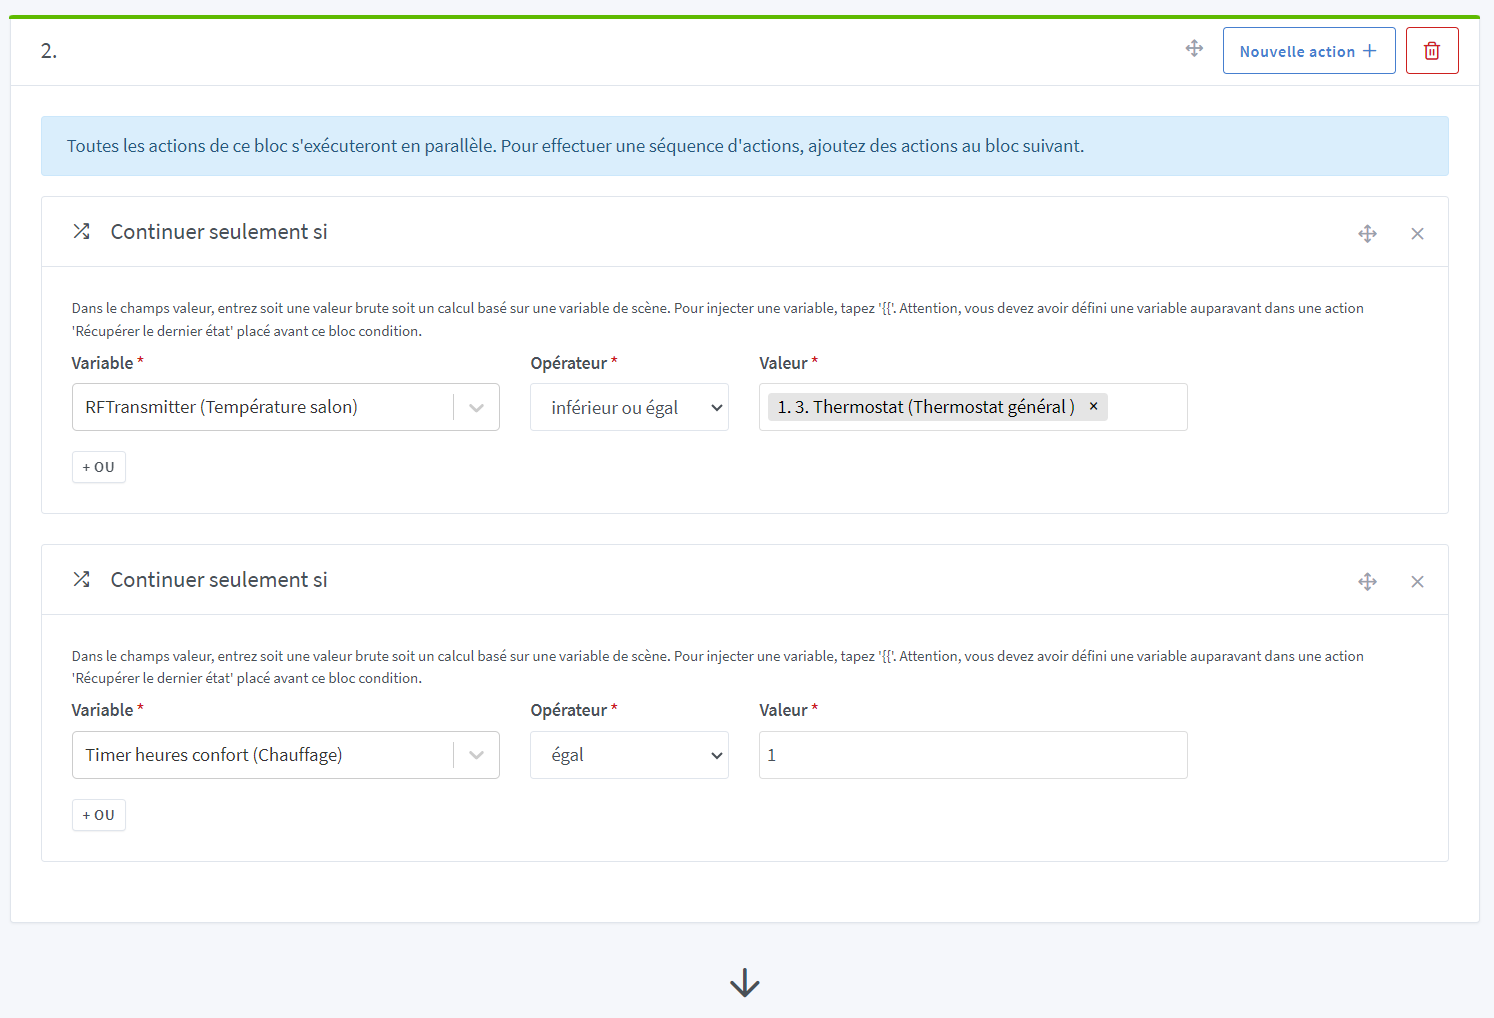
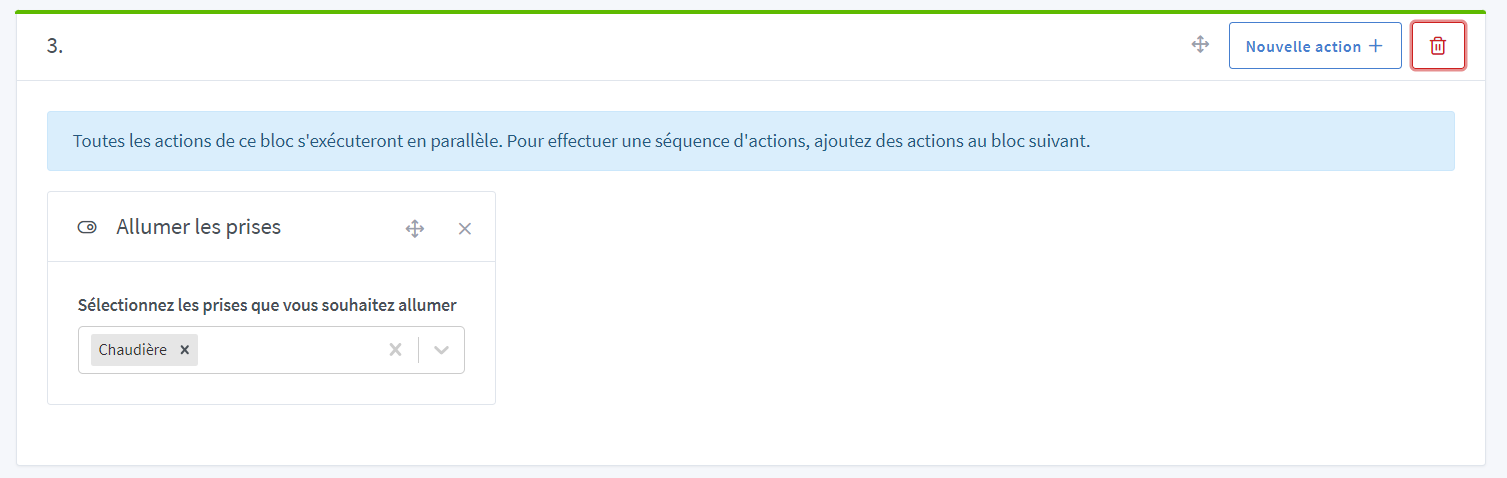
We check why the scene started (If the temperature is lower than the setpoint and we are in heating hours) then we turn on the « Boiler » switch
b)
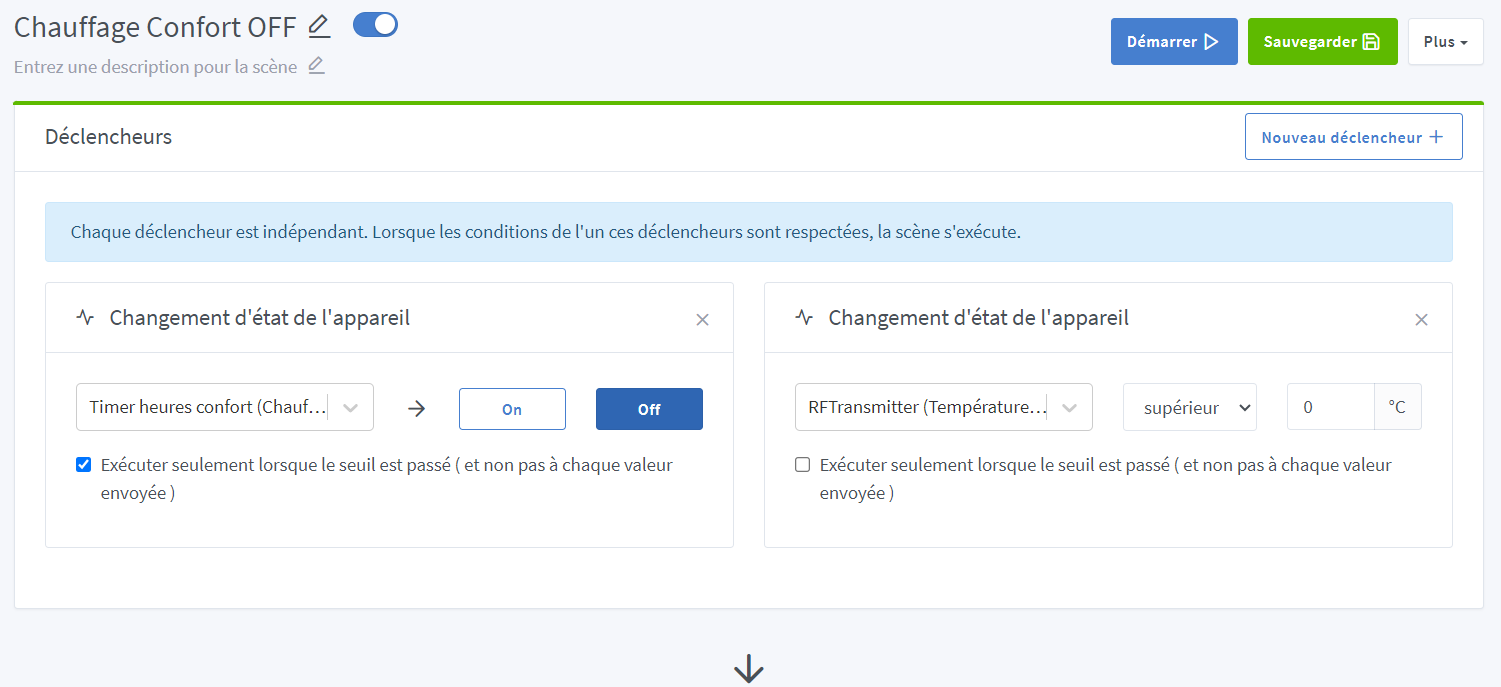
We trigger every five minutes or when we switch to off-peak hours

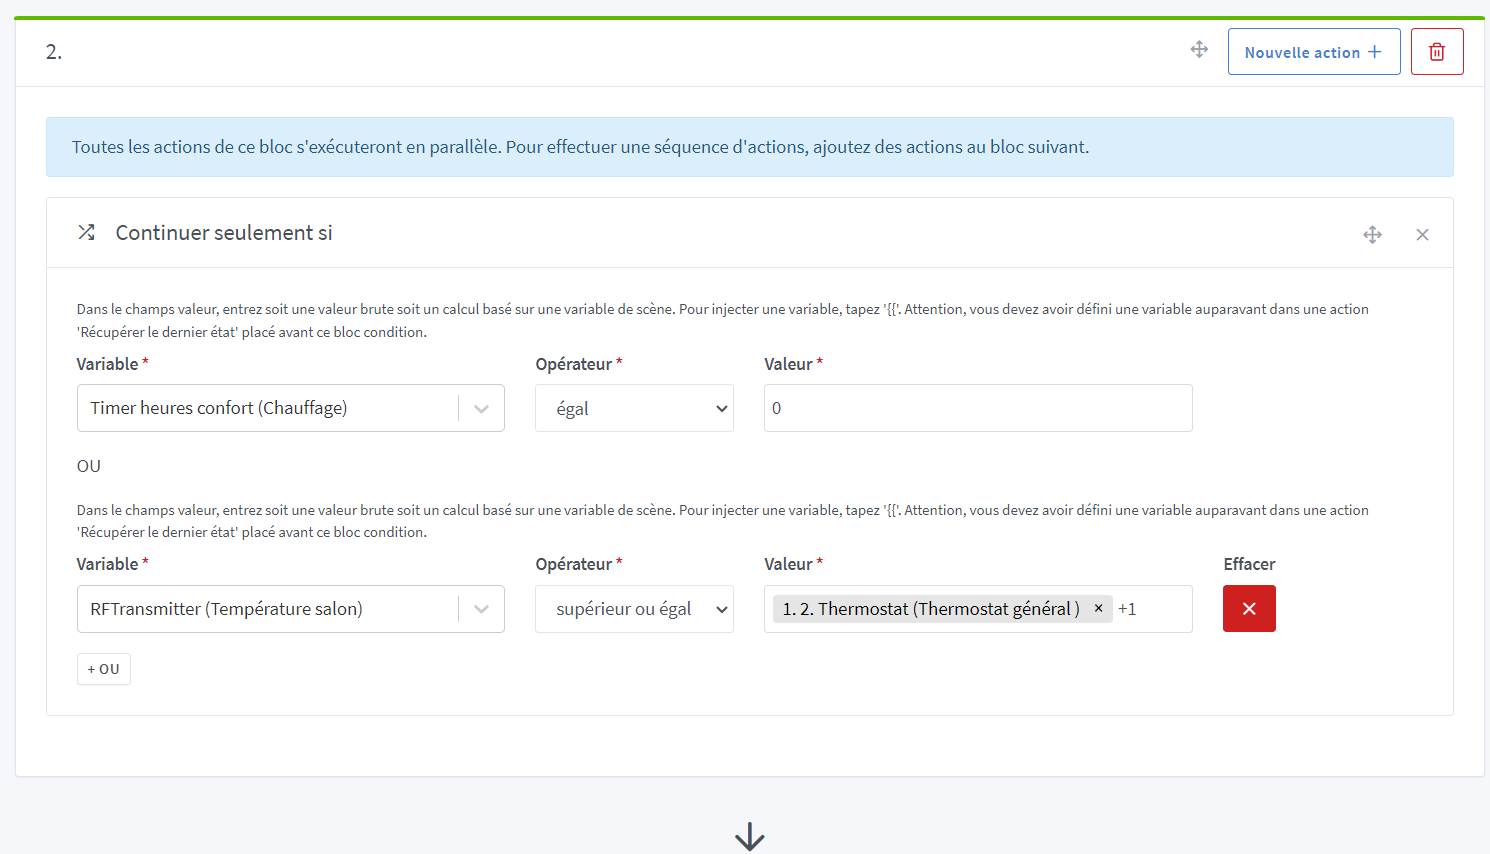
We check why the scene was triggered (Off-peak hours or too high temperature) and we turn off the « Boiler » switch
N.B.: If you look closely, there is a « +1 » next to the value of the « General Thermostat ». This means that if you choose a comfort temperature of 21°C, this scene will turn off the heating when it reaches 22°C. You can of course adjust this value according to your needs!
c)
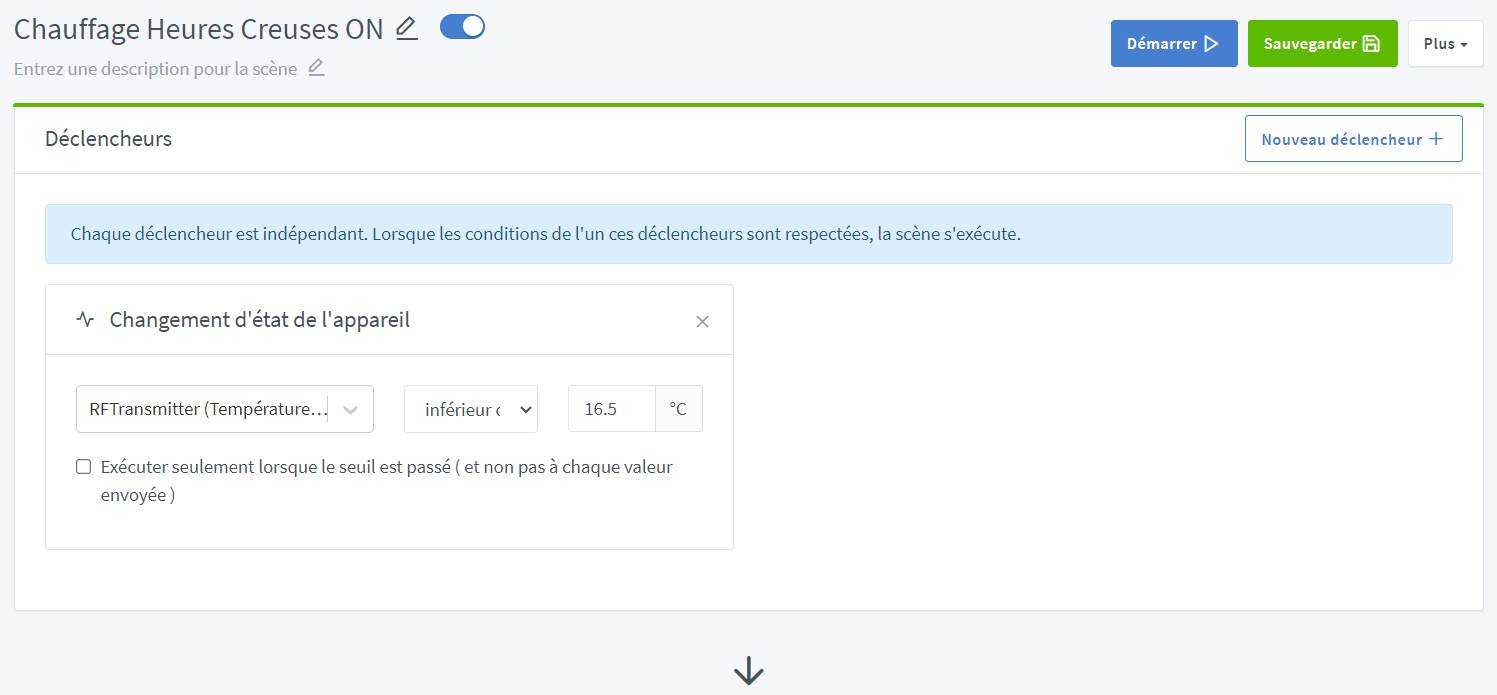
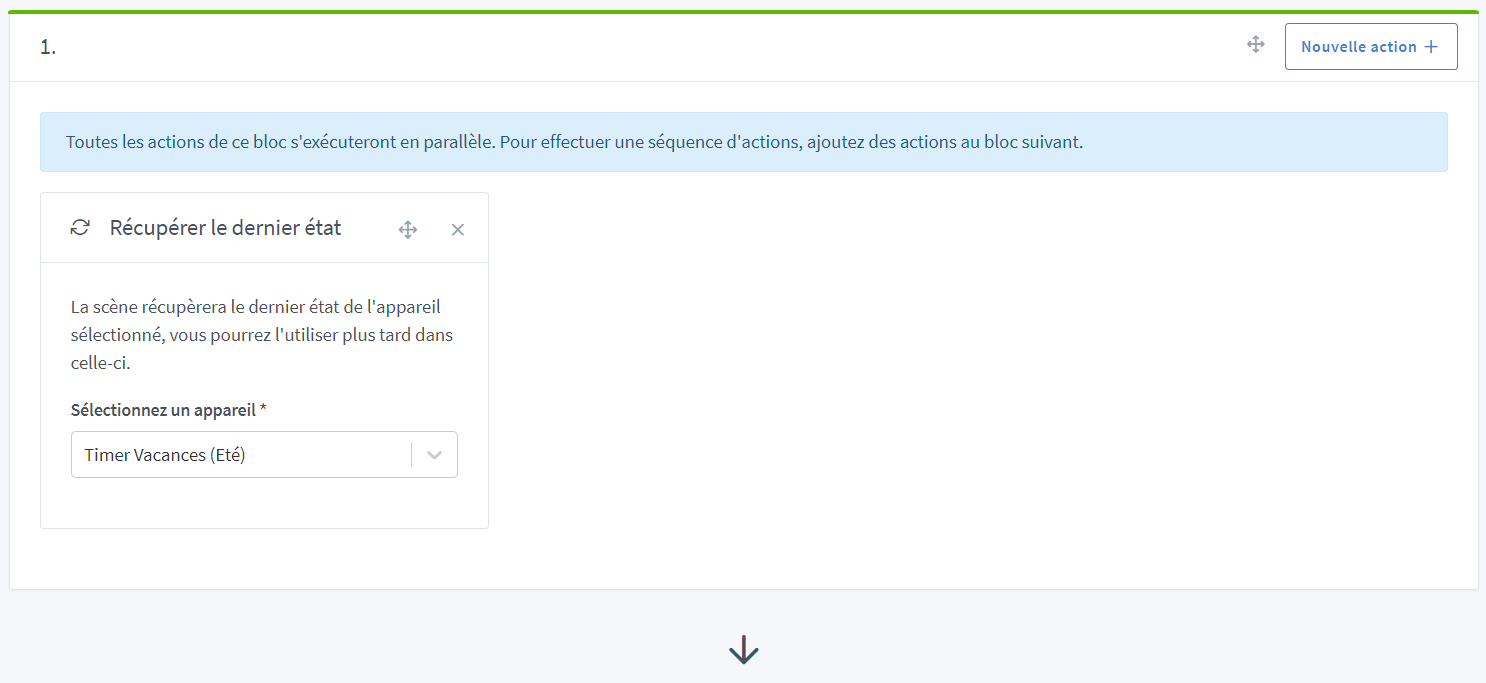
The « summer » trigger is optional. For me, it’s a mode of heating completely turned off.

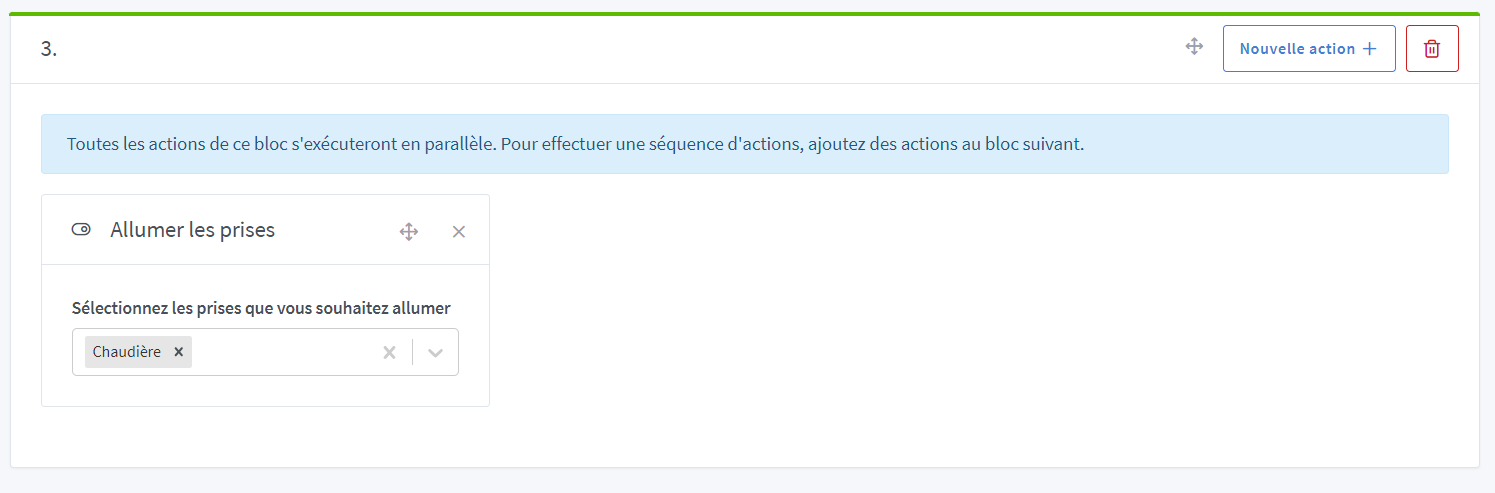
d)
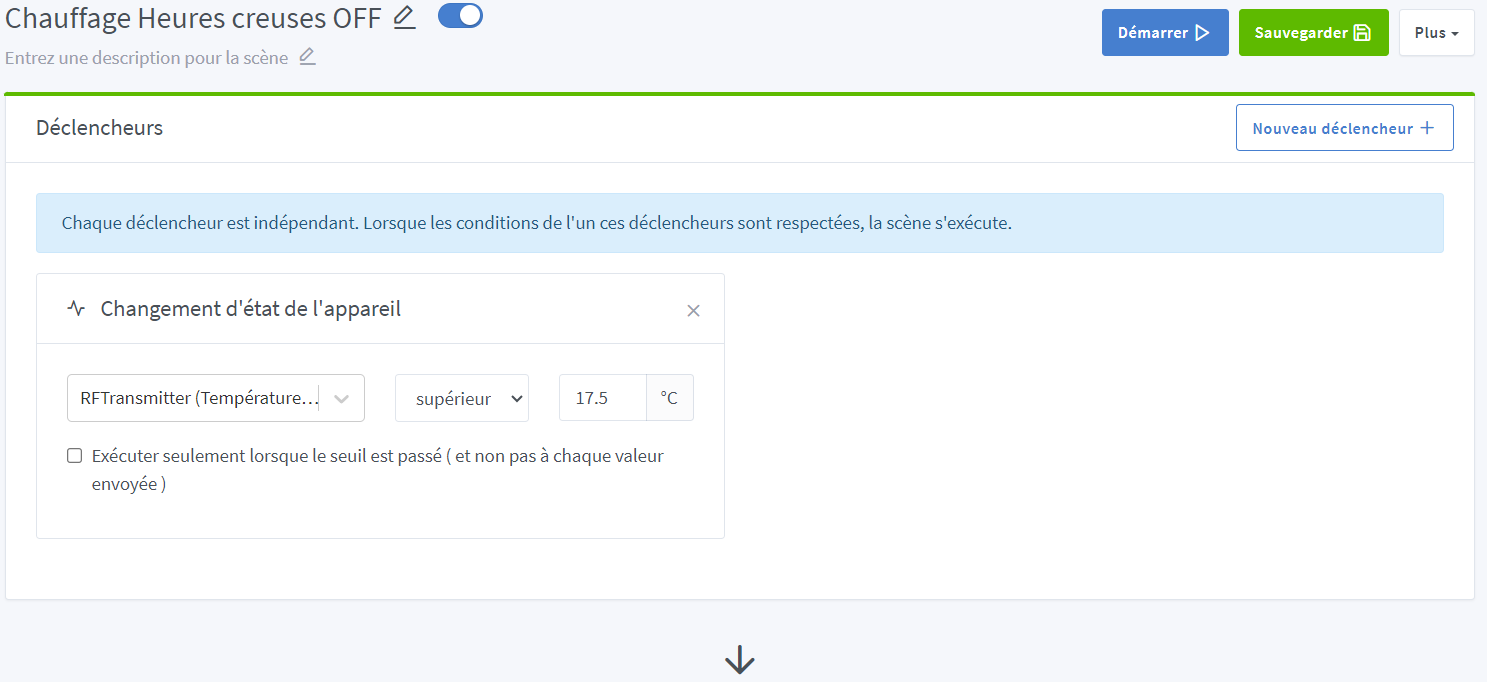
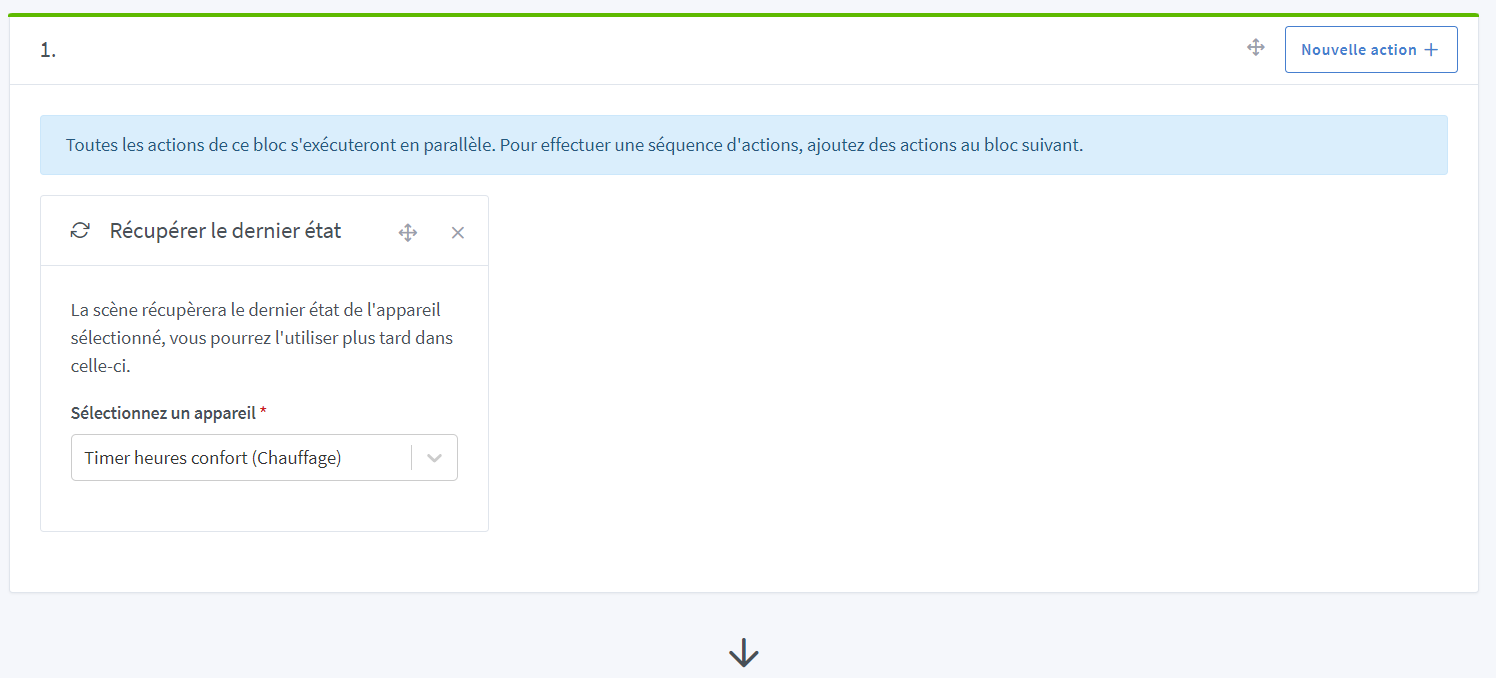
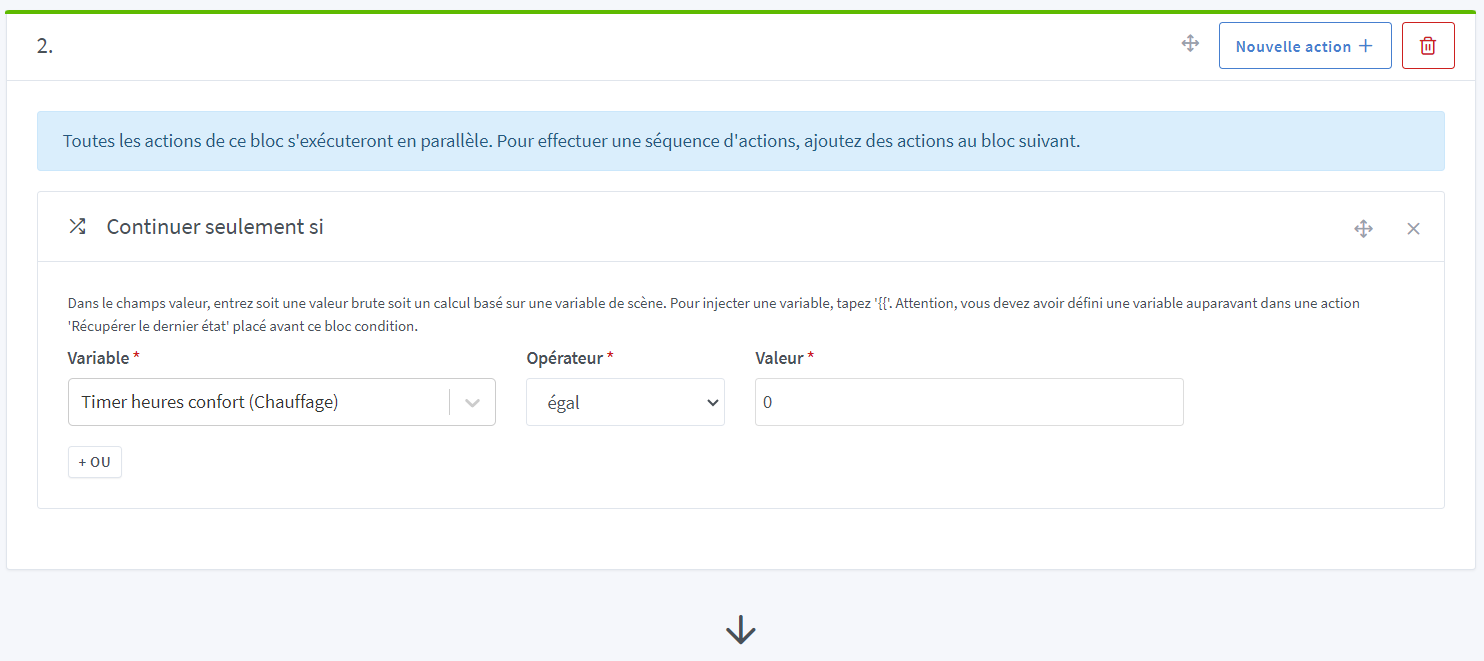
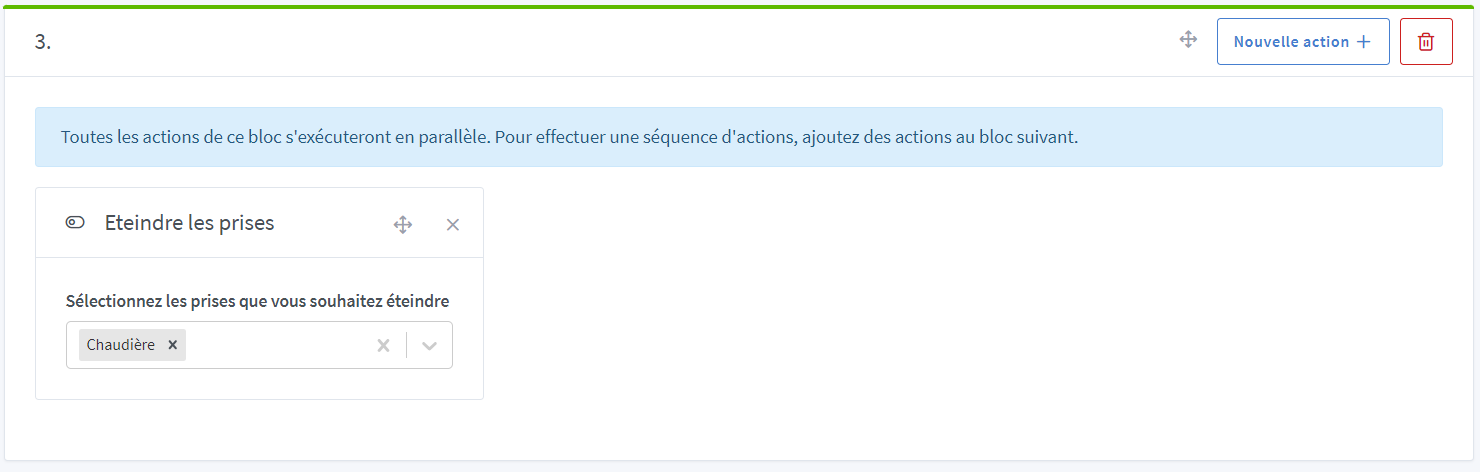
We check that we are indeed in off-peak hours and we turn off
And why haven’t we talked about schedules yet? Here it comes!
For the record, the goal is not just to turn the boiler on or off but to say whether we should be in comfort temperature target or not!
It is therefore in scenes that we will switch the fake outlet « Comfort Hours Timer »
We will therefore create two scenes:
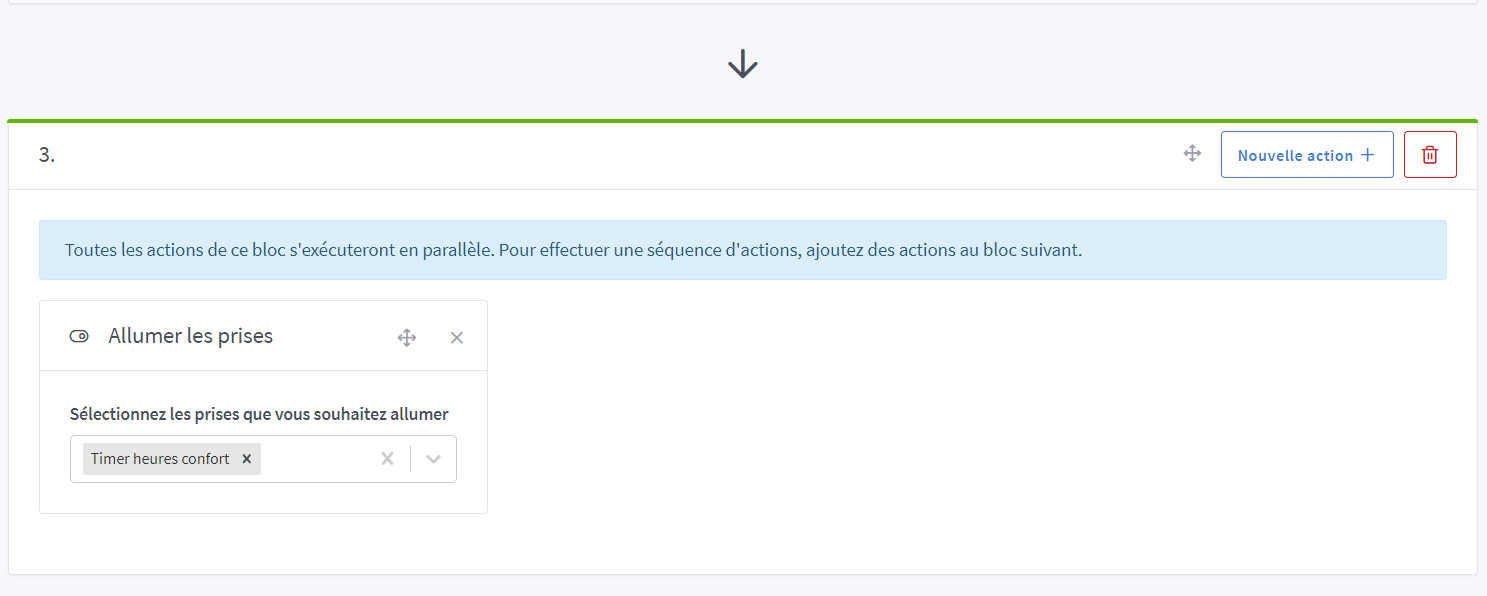
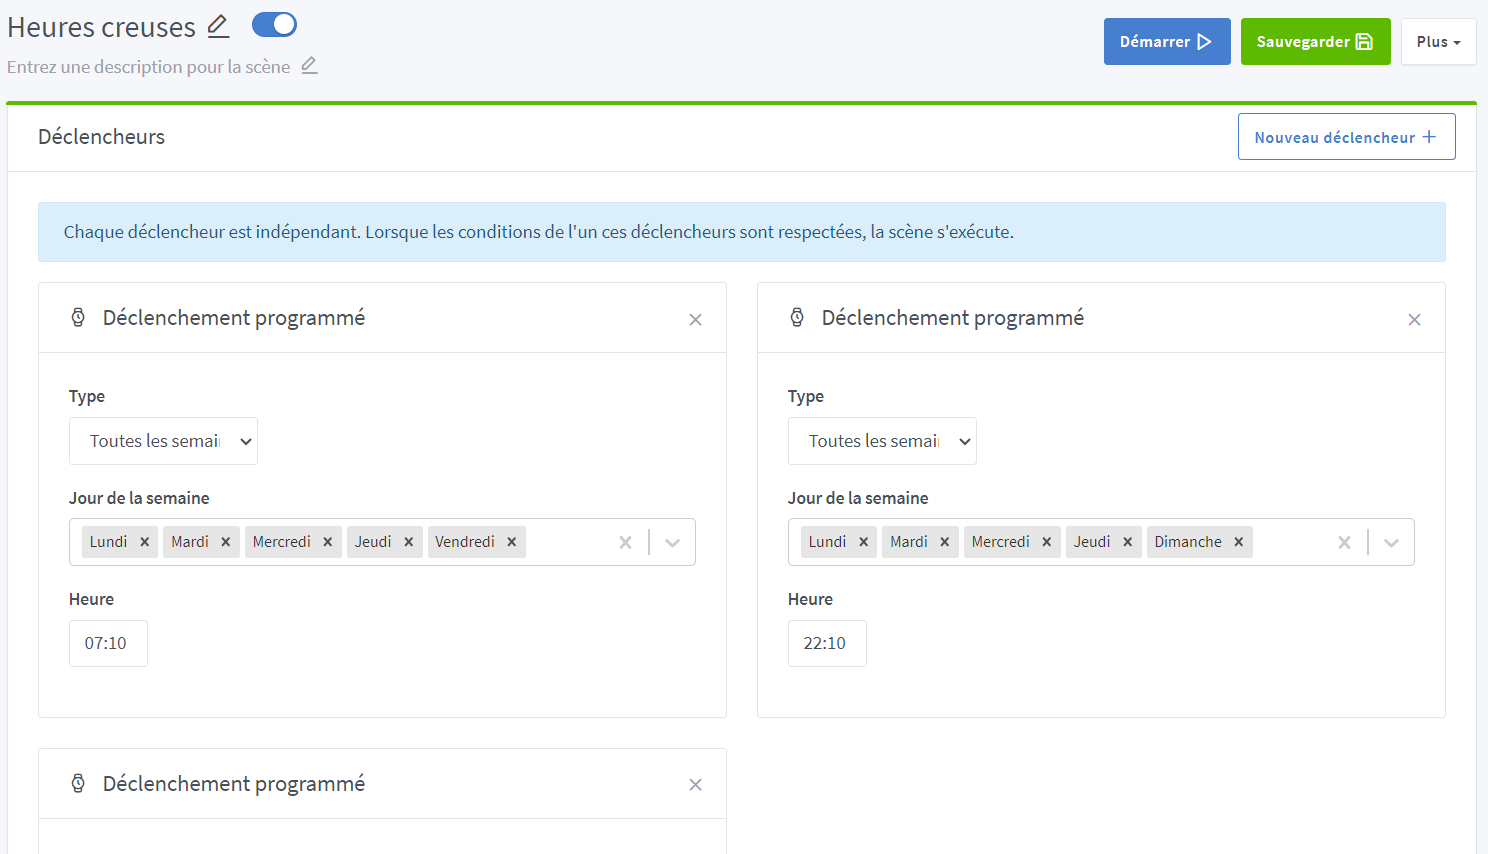
a) We need to warm up a bit in the morning, then in the evening, we switch to comfort hours;
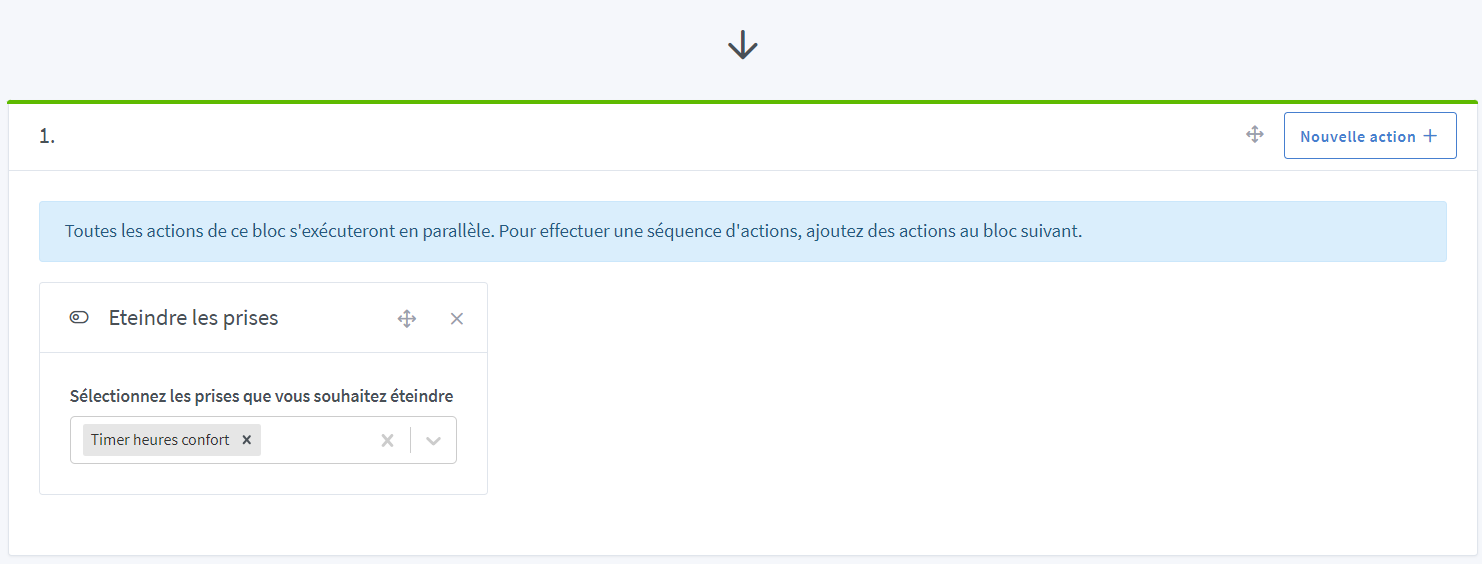
b) The rest of the time, we switch to off-peak hours.
And this is where we add all the other triggers, conditions, etc…
- I added a vacation mode (basically, when we are away, we stay in off-peak hours) and we reactivate everything for the day of our return (practical when we come back from skiing )
- And a summer mode (OFF) because even if it’s cold during the day, I prefer that the heating does not turn on, even if it means making a small fire in the evening
Here’s what it looks like:
a)

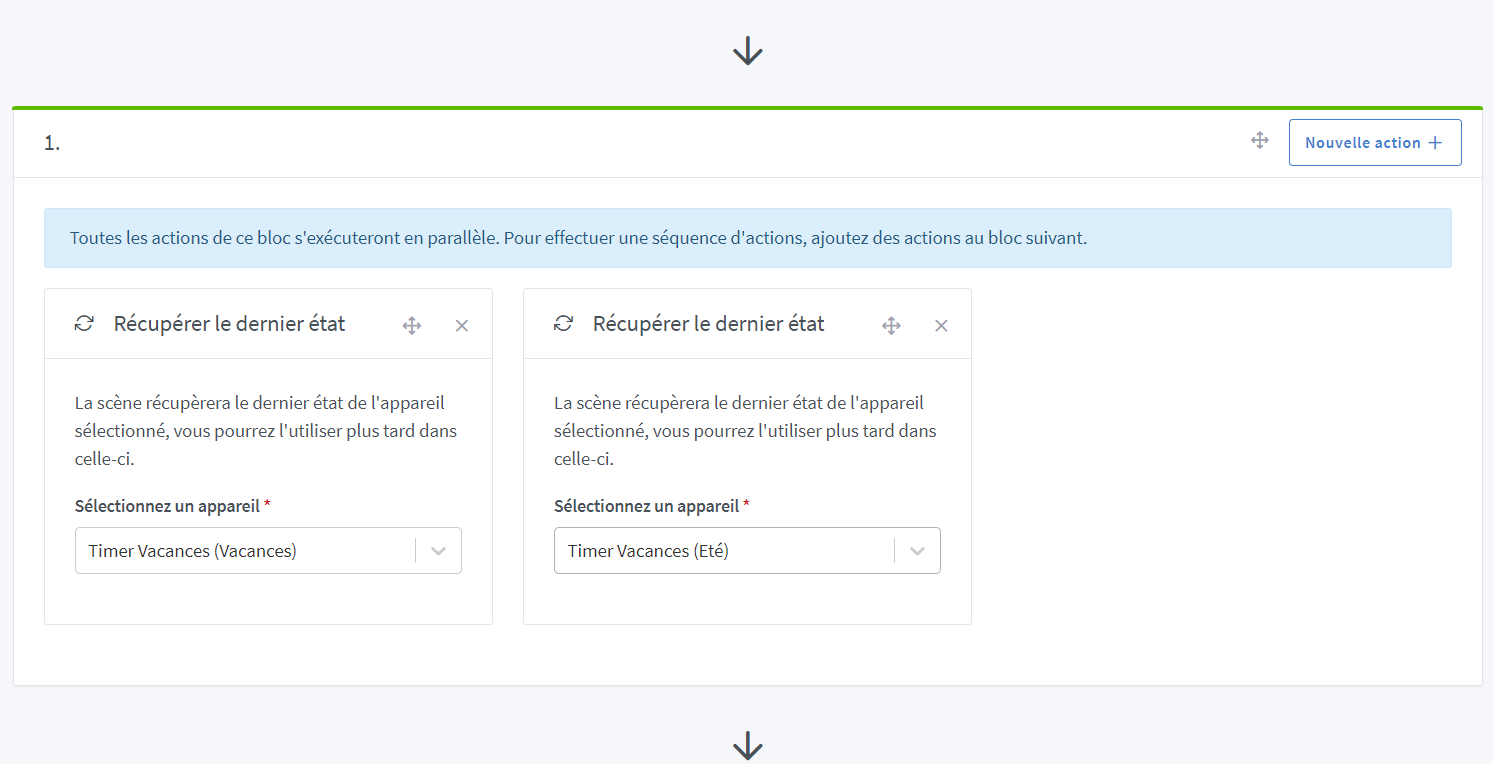
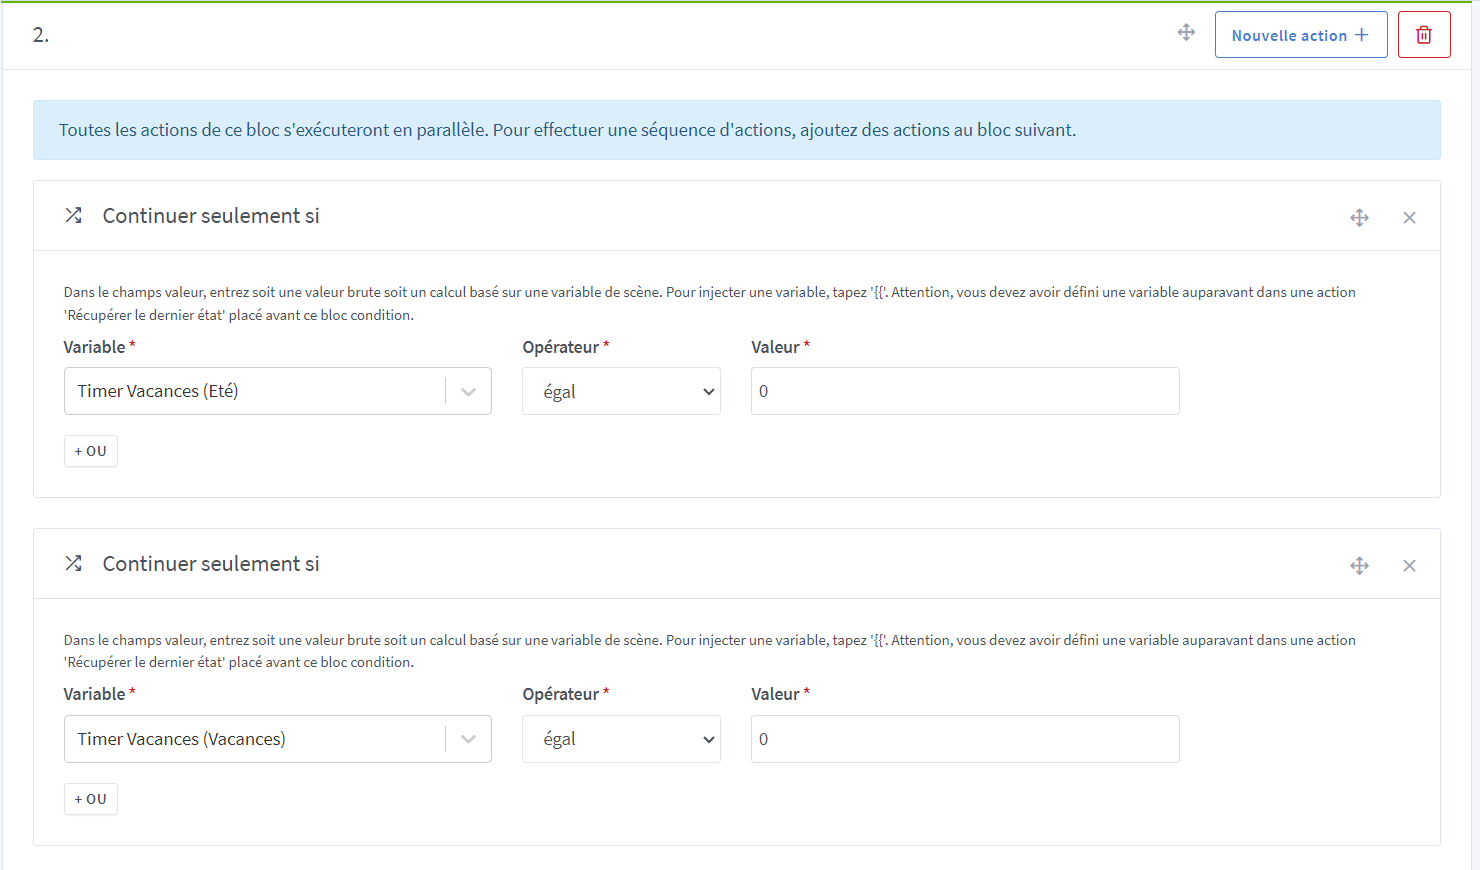
b)
It’s done!
However, don’t hesitate to push the programming, combine your presence sensors, room temperatures (turn on the heating if the office temperature is too low while someone is there…) BUT, don’t forget to only modify the status of the « comfort hours » otherwise you might end up with 28°C in the living room…
Well, I do have a bonus…
On the RE5V1C, there is a button… It would be a shame not to use it…
If you press it, it turns the boiler on or off but… Gladys will override you based on your heating activation conditions! So…
You will need, in the Tasmota relay (only):
- Unlink the button from the relay
- Modify the impact of button presses to change the status of the « Comfort Hours » timer
To do this, you need to find: the MQTT Topic address of the « Comfort Hours Timer »
Integrations → MQTT → Timer HC → Edit and copy this:
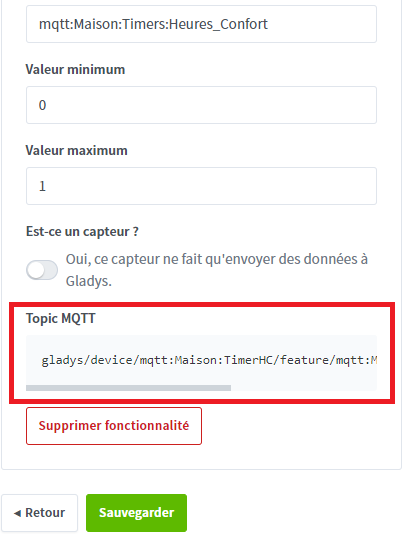
Then go to the Tasmota relay web interface and enter the following commands in the « Console » to disconnect the button from its relay:
SetOption73 1
Then create rules that consist of « one press, post on the ‹ comfort hours timer › topic that it is ‹ ON ›, two presses you set it to ‹ OFF › ». Replace, in the code below, gladys/master/device/mqtt:Maison:TimerHC/feature/mqtt:Maison:Timers:Heures_Confort/state with the value copied earlier.
Rule1 on button1#action=single do publish gladys/master/device/mqtt:Maison:TimerHC/feature/mqtt:Maison:Timers:Heures_Confort/state 1 endon on button1#action=double do publish gladys/master/device/mqtt:Maison:TimerHC/feature/mqtt:Maison:Timers:Heures_Confort/state 0 endon
And then activate Rule1:
Rule1 1
And if you’re having fun and you’ve understood the principle, there’s still the possibility to create an action for 3, 4 and 5 presses (beware, 6 presses restart the module!)
